Flimsy shower doors are wonderful. Not only do they generate plenty of service calls, but occasionally they need to be replaced. It's a vexing double-whammy for the customer.
Most of us have the same type of shower door:a thin piece of glass surrounded by an aluminum frame. The supporting frame pieces for the door are also aluminum, and depending on the size of the opening, you may have additional glass and aluminum panels. For example, some showers have a "pony wall" with an additional piece of glass on top of it. These units are screwed and caulked together.
The door has a magnetic strip on the latch side that holds it to the other side of the frame. The opposite side of the door is hinged to a channel that you can adjust. this channel is U-shaped and it moves in and out. The whole works is held in place via the head rail that slips over the vertical framework and is screwed to each of these pieces.
You can make the necessary adjustments by removing the screws, adjusting the channel, and screwing it back together.
Before you start, you need to determine where the door needs adjusting. If your shower door is rubbing on the bottom track, you might first look at the shower "sweep," which is the rubber piece secured to the bottom of the door to keep water from splashing out. In many cases, the sweep will come loose and stop the door from opening and closing properly. Here is some information on how to repair a shower sweep.
To correct this, you can loosen the screws that hold the sweep in place, adjust the sweep back into position, and tighten the screws. If the sweep looks really nasty, a new one costs about $20.00.
If your door is rubbing on the latching side, you will have to adjust either the hinge channel or the latch channel. You need to make small adjustments and unscrew only one screw at a time.
It's always easier to adjust the latch channel because you don't have to contend with the weight of the door. The screw at the top will be driven through the head rail into the vertical channel. Unscrew this one and move it away from the door slightly.
Do the same with the bottom screw and your job just might be over. If you move the channel too much, you may have to adjust the bottom even if it wasn't part of the original problem.
If your door hits at the bottom of the opening, either move the bottom of the latch channel away from the door edge, or move the bottom of the hinge channel inward. This will fix the problem by moving the latch edge of the door downward, but you may need to adjust the top of one of the channels so you have a uniform gap. You may also need to adjust the sweep.
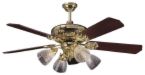 Occasionally, a homeowner who has a ceiling fan will call and want to add a light fixture to it. Most of time a homeowner will buy a light kit at the time they purchase the ceiling fan, but not always. One of the challenges to waiting, is finding a good match between the ceiling fan and the light kit. Some light kits have a wiring harness that mates with the ceiling fan harness, and some light kits have regular wires that you can secure with wire nuts.
If you are adding a lighting kit to your fan, there should be a small cover on the bottom of the fan, where the light kit will mount (assuming the ceiling fan can accomodate a light kit). Remove this cover and pull out the wires (make sure the power to the fan and light kit is off). Again, you will see a plastic wiring harness (a clip that wires run into with mating holes for the light kit harness), or loose wires that you will have to strip.
If you have a wiring harness, you can just plug the mating pieces together. They will snap and lock together. If you have wires, strip 3/8" inch of the insulation off of the end of the wires and wire nut them together, matching the colors.
After the wires are connected, screw the light fixture to the ceiling fan. Then you can install the bulbs and test it. Here are instructions on how to install a ceiling fan.
 You pull up to your house at night and notice that one of the landscape lights are not working, and you suddenly realize that you have a project for the weekend. Troubleshooting landscaping lights is a systematic process. In this case it may be as easy as replacing a bulb. Landscape lights are a series of fixtures that are energized by a cable underground. A multimeter tool helps in diagnosing these electrical issues.
Start by swapping out the bulb. Remove a light bulb from a working fixture and install it into the broken fixture. If your transformer has a timer, rotate the switch to "on". If your transformer has a light sensor, cover it with black electrical tape. This will allow the transformer to send electricity down the cable and illuminate the bulbs. If the bulb lights you simply need to replace the bad bulb with a new one. You can also stick the multimeter probes in the bulb sockets to test for power.
If the fixture doesn't light, the problem is either with the fixture or that the fixture is not receiving electricity. Dig the light fixture out of the ground and get to the area where the fixture clamps into the cable. Remove this clamp which will leave 2 openings in the cable. Use the multimeter probes and test to see if you get electricity. If you do get electricity, you probably need a new fixture, but you can try to re-clamp the fixture onto the cable at a different point (it maybe a corroded connection). If you don't get a reading of electricity, move the fixture down and try to resecure it into a fresh piece of cable. If more than one consecutive fixture is not working, you would need to inspect the cable for failure.
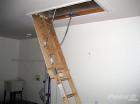 We all accumulate a certain amount of junk over time and need storage space. Your options for storage space are garage cabinets, overhead racks, a rental storage unit, an attic ladder, or even a garage sale. Garage cabinets are expensive and take up valuable floor space, a rental unit is a recurring expense, overhead rack systems are great but can leave the space feeling a little closed-in or claustrophobic. An attic ladder will take several hours to install, but the finished product is hidden, doesn't affect the size or appearance of the room, and is likely the least expensive option.
Installing an attic ladder takes moderate carpentry skills. Here is a link on how to install an attic ladder. Depending on how your roof was constructed, you may have very little space, or you may be able to walk into it like a room addition. On my old house I installed an attic ladder and I could walk from one end of the attic to the other (and I'm 6'2"). I also ran some lights in there and installed a light switch at the opening. The amount of storage space up there was incredible. Plus it's a great place to store holiday decorations and hide Christmas presents!
 There are two methods you can use for dispensing caulking when caulking a shower or tub. One is using a caulking gun and the other is a squeeze tube (think toothpaste). I am not a big fan of the squeeze tube as you have to squeeze the tube with your hands while trying to keep the nozzle tip in the right location. This gets hard to do especially near the end of the tube. Sure, you can get the caulk out of the tube, but it's going to be messy.
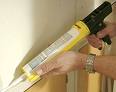
The caulking gun solves this. By having a trigger to squeeze there is much less fatigue on your hand. This leaves your other hand free to guide the tip of the caulking tube exactly where you want it. This makes for a quick, clean application.
A caulking tube made for a gun has a hard exterior, as opposed to a soft squeeze tube. To load the gun, pull the rod out of the rear of the gun, insert the tube, then push the rod up to meet the tube or just squeeze the trigger until snug.
For general shower caulking or tub caulking, cut the tip of the nozzle with a utility knife. You will see markings on the end of the tube for different diameters of the bead you will apply. Typically start out small, usually 1/8" or 3/16". This will give a nice bead of caulking. I find that less caulking is better. Before you start squeezing the trigger, you need to punch through the skin of the caulking to start the flow. A nail or piece of wire is good for this, although some caulking guns have a small rod attached just for this purpose.
You want to caulking to blend in to the surfaces not be so noticeable that it is unattractive. Here are some tips on caulking a shower.
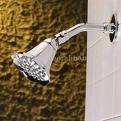 Many people have problems with a leaking shower head. The big issue is if the shower head leaks when the shower is on or off. If the shower head leaks when the shower is off (that is to say the handle(s) are in the off position), then the problem is not with the shower head, but rather the shower valve. Typically a part in the valve needs to be replaced. Here are some hints on how to replace a shower cartridge, which will work for a single handle shower valve.
If the shower head leaks when the water is on, the problem is with the shower head itself, or, most likely, where the shower head screws on to the shower arm. If this is your problem, unscrew the shower head from the arm and wrap the threads three times with Teflon tape. Once you snugly screw it back together, the Teflon tape should prevent leaks at the threads.
It may also be that the shower head is damaged. Many homeowners, when installing a shower head, will overtighten the connection which can crack it, causing it to leak. Lastly, there is a washer inside the connection that seals the water from leaking out. It may be that the washer is damaged or slightly twisted. Try prying it out with a standard screwdriver and then flip it over to give you a new surface to screw against.
If your shower head has a lot of scale and mineral deposits you can soak it in a product such as "CLR" or even warm water and vinegar.
 A customer called and said someone told her to buy a pre-hung door, but she didn't know what that was. There are different doors for different situations. When you are installing a door, there are basically 2 styles; either a pre-hung door or a slab door.
A slab door is just the door itself. Imagine if you unscrewed the hinges from the door and removed the door. That's what you get...no hardware, just the door. You can get slab doors that are flat or paneled, for the interior or exterior.
A pre-hung door is a slab door and the door frame, hinges included. It is a swinging door ready to be installed (excluding the handle/lockset). When you buy an exterior pre-hung door, you will also get the threshold already attached. An interior pre-hung door does not have a threshold.
A slab door is good for a direct replacement of an interior door. For example, if you have a standard size interior door that has been damaged, you can replace it with a slab door. You will have to mortise the hinges and maybe trim it for width, but it should swing well without making too many adjustments.
A pre-hung door is good for installing a door into a rough opening. A common use here is when you have a master bedroom and bathroom adjoining, but there is no door in the opening...just drywall. A pre-hung door will fit nicely, and you will just have to trim it and paint. The nice thing about a pre-hung door is that if you install it correctly, it will swing beautifully from the start. Here are some instructions on how to install a pre-hung door.
 There are times when you just can't get a tube of caulking into a small area to apply the caulking. Maybe trying to caulk behind a toilet or along the top of baseboards prior to painting.
A tube of caulking is about 12 inches long plus the plastic nozzle. The caulking gun is about the same length. When you place the tube of caulking into the gun, you have to pull a rod out of the and of it which only extends the size of the whole thing, making it tough to negotiate small areas. There are small areas around a toilet, in between bathroom vanities, etc. Even on exterior weatherization projects, you will find areas that just aren't accommodating to caulking guns. I dislike using caulking in squeeze tubes that you apply by squeezing with your hand (like squeezing toothpaste). These tubes hold less that a standard tube you load into a gun, but I don't like them because you don't have the level of control you have with a gun. So you can modify the tube to fit your needs.
If I have to apply caulking into an area that isn't large enough to accommodate a gun, I modify the tube to fit my needs. I will get a small hollow hose of whatever diameter needed, and secure it to the end of the tube of caulking. You can tape it with duct tape, and fish the empty hose wherever you need it to go. You can buy a variety of clear vinyl hoses cut to length at most home centers.
The only caveat is to use a full tube of caulking when you start. Depending on how large and long the empty hose you are using is, you may have to fill it with a substantial amount of caulking before it starts coming out of the end and to the area you need it. Of course, in a pinch you could remove the hose from the now-empty caulking tube and stick it onto a full tube of caulking. Caulking a shower is a very common job for any Las Vegas handyman.
 Doing some touch-up painting on the exterior of the house can be challenging. For the most part, a monkey is capable of holding a brush, sticking it in a paint bucket, and dabbing it on a wall. Not that I want to compare myself to a monkey, but let's just say it's not rocket science. So whether you've had some water damage, a stucco patch, or just plain want to freshen up the appearance of a stucco wall, a good paint match is a must.
Short of imitating Picasso and mixing your own colors, you will need to bring a sample of the paint to a paint store or home center. They can take your sample and have it computer matched to get it very close IF the machine is properly calibrated. They will need a sample about the size of a quarter or larger.
Don't try to chip out a piece of stucco for this as the light will hit the rough surface and give the machine fits. Instead, walk around the exterior of your house and remove a metal surface that has been painted the same color. A box cover, such as a cable TV cover, that has been painted will work great. These will be low to the ground and will remove with a couple of screws. Another choice, although larger and heavier, is the cover to the electrical panel. I would use this as a last resort though because of it's size, and because I don't want circuit breakers exposed to the elements, or the neighbors, any more than I have to. The paint store can mix a color and then dab a little on the box cover to see how close it is...and make any adjustments.
Even if you have an original container of the paint, you can get the paint codes from it and it will match exactly right? Not usually. Over time the paint will degrade, the sun will bleach the surface, or maybe it's just that the paint Gods are frowning on your project. It will typically take a patient paint store employee to get a good color match.
 While at a neighbor's house, I noticed a very nice kitchen faucet with a pull-out spout that allow them to spray both sink basins. I'm guessing this was a $400.00 faucet. The husband installed it but he couldn't pull the spout out very far and he didn't know why. Looking below the sink told the story. Sometimes it seems that a las vegas handyman never has free time.
Faucets with pull-out sprayers are more expensive as the sprayer pulls out of the faucet itself, not the kind that sits next to the faucet. You end up having the hose run through the faucet and loop into the sink cabinet only to reconnect to the body of the faucet. So you have this hose that loops down to the cabinet floor and back up, and it tends to get caught on everything under the sink. Most commonly, it will get caught on the drain piping or the water shut-off valves.
Most manufacturers will include a small weight that holds the sprayer head into the faucet body. Without this, the sprayer head would typically just pop out of the faucet and dangle in the air. This weight comes in two pieces and just sandwiches around the hose about 6 inches from where it changes direction and begins to loop back upward.
The neighbor had 2 problems. He didn't have the weight installed on the hose (because he didn't read the instructions), and the hose was getting caught on the discharge pipe to the garbage disposal (here are some general instructions on how to install a faucet).Adding the weight was an easy fix, but I also had him add a small section of hollow PVC piping over the hose. Yes he had to take apart the faucet sprayer to slide the 10" pipe over the hose but the problem is solved. The hollow pipe provides a barrier so that the hose can't get tangled when it is being lifted out of the faucet. Since it is under the sink, nobody will ever see it.