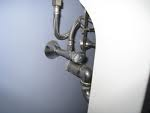
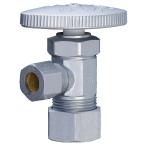
 If you have a leak on the water supply line heading to a faucet (or a toilet), you need to do a little inspection. This is a very common repair...a slow drip coming from an angle valve or water supply line. Just because the water is dripping off of the valve doesn't necessarily mean the leak is at the valve. The valve just happens to be the lowest (and last) fitting before the direction changes, and so the water drips from the valve.
You need to check the length of the water supply line for any wetness. It may be that the faucet is leaking and the water is traveling down the supply line and finally dripping off of the valve. An easy way to determine wetness is to get some toilet paper and touch the water line with it. It will pick up any wetness and clue you in as to where the leak is originating.
I would start high near the faucet (or toilet) and work downward. The most likely areas are going to be where you have water connections. For example, where the angle valve attaches to the pipe in the wall, where the supply line attaches to the angle valve, and where the faucet attaches to the supply line.
Once you have found the cause of the problem, the repair of these items are all easy. If the supply line is corroded, you may have to replace it, but you can first try a new rubber washer. If the angle stop is dripping, you may have to replace it, but first try to tighten the nut just underneath the handle. You might even need to replace the packing underneath the nut to stop the leak.
Here is an article on repairing a drain leak at a kitchen sink.
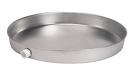 You've probably been through it. The water heater leaks and ruins the drywall it is surrounded by. Water saturated drywall may sit there for weeks or months until you notice the leak at your water heater. And to think the damage could have been prevented...with a drip pan.
A water heater drip pan catches the water that leaks and diverts it to wherever you pipe the drain. You'll have to figure out whether to repair or replace your water heater, but the pan will at least save your drywall. Incidentally, the best time to install a drip pan is when you are replacing your water heater. Installing a drip pan under an existing water heater is about as much work as installing one when replacing the water heater anyway, since you have to drain and move it.
Many people ask if they can install a drip pan without draining the water heater. A gallon of water weighs just over 8 pounds, so if you have a 40 gallon tank, you are looking at 320 pounds of water plus the weight of the tank. Don't even think about it. You must drain the water heater!
Once you turn off the water heater and drain it, it is safer to disconnect the flexible copper supply lines and remove it off of the stand rather than trying to lift it up and sliding the pan underneath.. Once you have the stand clear, you can set the pan down and place the water heater inside the pan (the pan is approximately 3 inches tall). With the pan down, you can run the drain line to the exterior or wherever is appropriate.
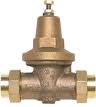 Water pressure regulators serve a vital function in your plumbing system. As their name implies, they regulate the pressure of the water coming into the house. Typically, they are installed on the incoming line with a shut-off valve so that they can be serviced. The allowable water pressure in a house is between 40 psi to 80 psi. When the water pressure creeps up towards the higher end of the scale, fixtures can fail and break, and plastic toilet fill valves can leak. Some fixture manufacturers exclude damage from water pressure exceeding 80 psi, and some home warranty companies will not cover damage to the home for high water pressure. So it's a good idea to have a water pressure regulator.
If you don't already have one at your house, you will need to find a suitable location to install one. In your garage you will likely find a shut-off valve. This would be a good area to install one, but you may need to open the wall and do a little re-piping. For this reason, this wouldn't be a good job for someone with little plumbing experience. You can read this for information on how to solder copper.
Once you have access to the pressure regulator, you can adjust the water pressure by turning the nut on top of the unit (most water pressure reducing valves come factory pre-set at 50 psi). Test the pressure by screwing on a water pressure gauge and checking it after you adjust the nut.
If you've ever had a frozen copper pipe, you know the tremendous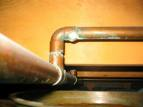 force that freezing water can exert. As water freezes, it expands, and although copper is very strong, the force of expanding water and ice can split a copper pipe wide open.
In addition to water spraying out of the opening, you will have to do some quick thinking. First of all, get the water to stop spraying out of the pipe. Here is an article on how to shut off the water. Once you have the water turned off and have cleaned up the water-soaked area, you are going to need to repair the pipe.
Usually, you will see a nice hole in the pipe with the edges of the copper peeled outward from the pressure. Typically, you will have to cut out the damaged section with a pipe cutter (avoid using a hacksaw as it will leave nasty edges). Once you have cut away the damaged section you will be left with a void in the pipe. You will then use a repair coupling to span the void.
A repair coupling has no stops in it and so you can place it over the pipe and slide it to wherever you need it to go (this is also known as a repair sleeve). From there you will need to either sweat the coupling in place or use a copper adhesive, but check to make sure that your local building authorities allow a copper adhesive, as some don't allow it. Here is an article on how to solder copper piping.
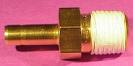
 When you go to replace a plumbing fixture, it is sometimes intimidating trying to figure out how everything goes together without leaking. You've probably seen a threaded fitting that you would screw a hose bib or a water supply line onto. If you've not done much plumbing, you may not be very familiar with a compression fitting.
A compression fitting is used on a bare copper pipe. A nut goes over the pipe, then a soft ferrule and finally the fixture or water supply line, or whatever it is you are connecting to the pipe. This all gets squeezed together tightly. The soft ferrule gets sandwiched in between the nut and the fixture. As it gets squeezed, the ferrule molds itself to whatever gaps there are between the nut and fixture, eliminating leaks.
When you go to replace a fixture that uses a compression fitting, the old ferrule is very difficult to get off the pipe. You almost have to score it and split it open, or grab it and rotate in back-and-forth while pulling it off the pipe. For this reason, I generally leave the old ferrule and nut on the pipe and reuse them with the new fixture. It sure beats damaging the pipe, and if you get a small leak, just tighten the nut another quarter-turn.
 A realtor called us today to troubleshoot a plumbing problem. They represented a bank and turned the water on to the house, but water was not flowing into the house. I suspected that the shutoff valve in the garage was not functioning.
It's pretty common when you shut off the water to a house with an old gate valve, the gate that controls the flow of water will drop down and stop the water from flowing into the house. As long as the water is on and the pressure is maintained, the gate will typically stay in place.
To get the water flowing again, you will need to replace the valve, or at least pull the broken gate out of the valve. The quick fix is to pull the broken gate out of the valve. This means that in the future, in order to shut off the water to the house, instead of turning it off at the gate valve, you will need to turn it off at the street. That probably isn't a big deal to most people.
So turn the water off at the street and put a wrench on the top half of the gate valve. The top will come off in one piece. Then reach down into the lower half of the valve and pull the broken gate out. Put everything back together and turn the water back on at the street.
 This picture is from a customer's house. This is a plumbing pipe repair from someone that I'm guessing has never done plumbing before. The reason I say that is because the repair looks like it was done by someone with a knowledge of arts & crafts rather than a knowledge of plumbing.
I can only guess that the pipe was leaking and instead of replacing the section of pipe or replacing a damaged fitting, the homeowner bought some type of a fiberglass repair kit or maybe a paper-mache kit and wrapped wet strips around the damaged pipe...then crossed his fingers. It looks like after the material hardened he turned the water back on and didn't see any geysers. However, it appears the fiberglass/paper-mache repair just diverted the leak where he couldn't see it any longer. The drip or leak at that point turned into a nice rusty section of the piping. There really are so many ways to get information on a repair, even if you don't know anything about it (one is this website), there is no excuse for something like this.
The story ends with the homeowner becoming a casualty of the foreclosure market. Enter the new homeowner who bought the house "as-is" and now has some repairs to take care of.
 Plumbing leaks are the scourge of home repair. Invariably, you get small leaks at the connections where two pieces of threaded piping or fittings meet. Some homeowners know to use Teflon tape and some don't. Teflon tape (or Teflon paste) fills the little nooks and crannies where the threads connect.
Screwing the fittings together without Teflon tape typically results in a leak. Water will always take the path of least resistance and find a way out. The Teflon tape fills these small voids and stops the water from leaking out. But there is a right and wrong way to apply the tape.
The right way is to wrap the threads in the same direction that the fitting screws on (clockwise). Wrap the threads clockwise and overlap the tape upon itself so that there are several layers with no gaps. The general rule is to wrap the threads three times.
After you wrap the threads, hold the tape to the threads and pull to break the tape. Then take your fingers and, pinching the threads between your fingers, rotate them clockwise to push the tape into the grooves of the threads. When you screw the fittings together, the tape will lay down (because you wrapped them clockwise), and will provide a smoother surface to screw against.
For gas fittings, you can use yellow Teflon tape, which is thicker and made specifically for gas connections.
 There are many times a frustrated homeowner will call needing some type of faucet repair for low pressure.
This is one of those cases where you have to isolate the problem. Yes, you might end up having the faucet replaced, or a valve, or a cartridge, or a stem, etc. You're thinking big dollar signs now right? Well I would ask you some questions before I started to worry (this quick fix will typically solve 90% of low-pressure problems in bath faucets).
Here's how the dialog usually goes: (and I will be interrupted many times throughout the conversation...please, just the facts, Ma'am)
Me: "Is the problem isolated to this particular faucet?"
Caller: "Yes, but"...
Me: "Do you notice low pressure at both the hot side and the cold side when they are turned on separately?"
Caller: "Yes, but"...
Me: "Try removing the aerator to see if that makes a difference".
Caller: "The what?"
Me: "The aerator. It's that thingy at the end of your faucet's spout where the water actually comes out".
Caller: "OK, how do I get it out?"
Me: "You grab it with your fingers and unscrew it"
Caller: "That's it?"
Me: "That's it"
Actually, removing the aerator is only half the battle. Then it is going to take you another 5 seconds to clean out the gunk caught in the screen, and an additional 2.7 seconds to screw it back into the faucet.
Now some people will want to make a project of cleaning the aerator. Just dump out the debris and maybe poke out the gunk in the screen with a pin. If you want to get really fancy, you can soak it in vinegar or CLR. Heck, go crazy and lay out $2 for a new one. It's up to you.
Over the weekend I got a call from a customer that had just 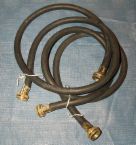 arrived home after an extended vacation. She had a great vacation and was looking forward to relaxing after unpacking. Her heart sank as she opened the front door to find 2 inches of water all over the floor.
The culprit? The rubber washing machine hoses that we all ignore. One of the hoses at the rear of the washing machine had ruptured and flooded the house. Now she gets to have another extended vacation, this time at a motel, courtesy of her insurance company.
Go now and buy 2 braided stainless steel washing machine hoses. They cost $10.00 each and you will need 2 of them. Turn the water off at the hose faucets, unscrew the old rubber hoses and simply screw on the new hoses. Connect the new ones to the same fittings as the old ones (hot faucet to hot inlet and cold faucet to cold inlet). You can also buy "floodsafe" hoses for toilets and the like that have a pre-set flow rate. If the flow rate of the water exceeds the setting, the water flow will stop to that fixture.
This is one of the easiest plumbing jobs out there, and it could save you thousands of dollars and weeks of inconvenience.