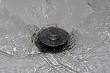
 Many the homeowner has encountered the slow bathtub drain. Not that it is totally clogged, but it has just enough debris in the drain to make the water drain very slowly. Most of the time, the obstruction is not deep in the drain pipe, but rather just beyond the strainer where you can reach it with a tool.
Drains that drain slowly typically smell. This is because the hair and soap mixture that is clogging the drain is decaying and really lets off a pungent odor. So be forewarned, clearing a slow or clogged drain is nasty business.
You need to get access to the drain pipe. Typically you can remove the drain cover by unscrewing it. Because you will have to wrestle around the support for the drain stopper, you must use something long and reasonably thin. Needle nose pliers work great if the clog is fairly close to the surface.
You can use a coat hanger. Straighten out the hanger and bend a little hook in the end of it. Then you can fish it down the drain and hopefully lock on to the hairball. You can also buy a product called a "zip it" that works in the same manner. It is a plastic stick with little barbs all over it. When you push it into the drain the hairball gets caught on the barbs allowing you to pull it out.
Get creative. I've used a shopvac to suck out clogs. I've even taped a PVC pipe to the end of a shopvac to reach a deep area. Finally, you can use a snake. Here is some information on using a snake to clear a drain clog.
Whatever method you use, just be prepared to get the foul smelling clog out of your house quickly.
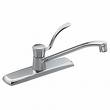 A customer's kitchen faucet leak was driving her crazy. It was leaking around the handle and she was ready to surrender. Kitchen faucet leaks can come from several places which makes fixing them a little more challenging.
If your faucet leaks from underneath the sink, it may be corroded and you will likely be buying a new one, or may be a water supply line in need of repair. If the faucet leaks out of the end of the spout when the handle is shut off (particularly with a single-handle faucet), you probably need a new cartridge in the faucet.
This customer's faucet was a single handled Moen and was leaking when you lifted the handle to turn it on...is was leaking around the handle base very slowly. This usually means a problem with some O-rings that are supposed to keep water leaks at bay.
To access the O-rings, you have to remove the handle. Slide a small screwdriver under the decorative cap and remove the screw. The handle will lift right off. The spout covers the O-rings, one at the top and one at the bottom. The spout assembly will lift off of the faucet body, and you will clearly see the O-rings.
You can buy an assortment of O-rings that will replace these. Match up the correct size and place them into the grooves. I like to slather them up with liquid soap to lubricate them so they won't twist when re-installing the spout assembly. You can test it once you put the handle back on.
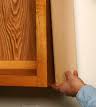 At a customer's house, she pointed out that the end of her kitchen cabinet was water-stained. Apparently, the dishwasher had leaked in the past and stained the end panel of the cabinet. She wanted to know what could be done about it.
The end panel was stained pretty badly and the chance of sanding, staining, and finishing it to look like it never happened was slim. A better idea was to re-skin the end of the cabinet. Basically, you buy a new piece of one-eighth inch veneer and stick it over the damaged piece. This isn't as hard as it sounds. They key is matching the species, color, and finish of the wood.
If you have the manufacturer (look inside the cabinets for a sticker or tag), you can remove a door or drawer and take it to them so they can determine the correct color. If you don't have the manufacturer, take a cabinet door with you on your hunt. You can buy pre-finished panels, or you can take it to a cabinet shop and have someone make it for you. You can also buy unfinished panels from some home centers, that you will have to stain and finish to match.
Once you have the correct panel, you can cut it to fit and glue it in. Some cabinets have corner pieces you can remove, install the new end panel, then re-install the corner pieces. This will cover any unsightly edges.
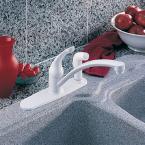 How many times have you wrestled with a loose faucet on top of your sink? It seems to happen most often with single handled faucets...as you lift the lever up to start to flow of water, the entire faucet moves to the point you almost have to hold the faucet body with one hand while to lift the lever with the other. That's not to say that is doesn't happen to faucets with separate hot and cold handles, they have their problems too.
Typically, the problem is that the nut holding the faucet to the sink is loose. You will have to crawl under the sink to access this area, but it's not difficult. Once under the sink you will see the water supply lines going up to the faucet. Look just beyond these and you will see how the faucet attaches to the sink. Some faucets have two nuts that hold the faucet to the sink, and some have one large nut that holds it down. Usually it's the faucets with the one large nut that causes the most problems.
Ideally, a basin wrench will fix this in a matter of seconds, but you can use whatever you have access to...pliers, or even a crescent wrench.
I've also seen a cheap sink as the cause. A cheap stainless steel sink (the really thin kind) will allow the faucet to move as you operate it. Although the faucet may be tight to the sink, the thin sink will flex to the point that it seems the faucet is loose, but its not.
For bathroom sink widespread faucets that have two handles, sometimes the handles feel loose. For these types of handles, if the nuts under the sink are tight, try using your hand and turning the handle body clockwise above the sink. That should tighten it up nicely; this also works for bathtub widespread faucets.
If you are tired of the old faucet, here is some information on how to replace a faucet.
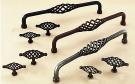 If you have some builder-grade cabinets, here is a way you can dress them up and make them look not-so-cheap. Simply add handles and pulls. There really are a myriad of choices.
The finish of your cabinet pulls and handles should match your hinges if they are visible. Otherwise, it might look like an afterthought. So if you really fall in love with a specific handle that doesn't match your hinges, you may be faced with replacing your hinges as well, to which I say...maybe look for different handles. Handle finishes go from gold, chrome, brass, various brushed metal finishes, ceramic, wood...and the list goes on.
For cabinet doors and drawers, you can choose between handles and pulls that have one mounting point or two. This means drilling either one hole or two holes in your door. Naturally, the more holes you have to drill, the longer the installation job is going to take.
With builder-grade cabinets, you typically have a thin panel surrounded by a wood frame. Don't even try to install a handle in this thin material, instead install the handle on the wood frame.
Here is some information on how to install cabinet handles and pulls. You can buy a template or make your own out of scraps. Either will allow you to install the handles and pulls exactly where you want them.
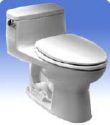 A longtime customer called asking what features she should look for when purchasing a new toilet. She was a little overwhelmed at the choices she had, so I gave her some of the high points of buying a new toilet.
The first consideration is the color and whether or not she wanted a one-piece or two-piece toilet. White toilets are more popular and so you have more choices and options. One-piece toilets are more expensive and therefore are not as popular as two-piece toilets. If white isn't your color, almond/bone is usually stocked, but other colors are available through special-order.
The next feature is a round or elongated bowl. A round seat is smaller and will fit in a smaller space. The elongated bowl takes up more space but is more comfortable.
The height of the bowl is another consideration. You have a "standard" height, a "comfort" height, and a "chair" height. Toilets with a rim height of 16 ½" or more comply with ADA and offer ease of use for tall people or disabled people.
The flushing system a toilet uses is important, and you have a choice between gravity-fed and pressure assist. Most toilets are gravity-fed, meaning that the toilet uses the natural force of gravity to send water from the tank to the bowl. Pressure assist uses pressure to force the water into the bowl. You get a stronger flush with pressure assist, but the cost to repair these is MUCH higher than a gravity-fed toilet.
To me, the most important feature is the size of the trapway. The trapway is the passage that carries the waste from the bowl to the drain pipe in the floor. The larger the trapway, the better. You can get a toilet with a trapway from 1 7/8" to around 3". The larger the trapway, the fewer clogs you will have. It's also better if the trapway is fully glazed so the passage is smooth. Along with the trapway, is the size of the flush valve. This is the size of the hole in the tank that allows water to flow into the bowl. The larger the flush valve, the stronger the flush will be.
You might also consider the water surface inside the bowl. The larger the water surface, the easier it will be to keep the bowl clean, and it will help to reduce odor.
Yet another consideration is a dual-flush option. These toilets have a flush mechanism that allows for a "half-flush" for liquids, or a "full flush" for solid waste. These can considerably cut down on your water usage. Here is some information on how to replace a toilet.
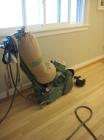 Making your wood floor look fresh again is a big carpentry chore. You're going to need to rent a sanding machine (either a "drum" or a "belt" model), an edger, and a buffing machine.
Before you start chewing away a layer of your floor, though, you should be aware that some floors can only be refinished once or twice. If, for example, you have engineered floors with a thin layer of veneer on top (instead of solid refinishable wood throughout), the risk is that you could sand through the veneer and ruin the appearance. Try investigating this in an inconspicuous area like a closet.
If the veneer checks out, start the job by clearing everything out of the room and sweeping the floor. Make sure you are comfortable with the sanding machines, and cover the doorway with plastic to keep the dust inside. Begin with a low-grit sandpaper medium and work progressively to finer and finer grits to eliminate the scratches from the previous grit.
By the way, maker sure you wear a dust mask because it will get pretty cloudy in there.
Since the floor sander is bulky and you must stand behind it to operate it, you can't start in a corner. Instead begin by sanding from somewhere near the center of the room, but do it at an angle. This will help level the floor as you sand.
Conversely, if you initially sand parallel with the walls, the sander will tend to bounce if it hits an edge of a wood strip that is protruding. This will cause the sander to dig into the floor and create troughs. Sanding at an angle will help cut down on the troughs.
Try 60-grit sandpaper for a test run to see if it produces a level pass. If not, you may try a 40-grit (the lower the number, the larger the abrasive particles on the paper and the more material it will remove). After finding the right grit, you can sand half the room, then turn the machine around and sand to the opposite walls.
After you have completed sanding the floor at an angle, run the sander parallel to the wall with the grain of the floor. This will eliminate the scratches from the previous step. Sweep or vacuum the floor to remove the grit and continue moving up in sanding grits until you reach the suggested grit recommended by the manufacturer (usually 100).
Now comes the perimeter of the room. For this area, use an edger, which is a small sanding machine held with both hands. Move it from side to side with the grain of the wood, starting as close to the wall as you can get. Gradually move the edger away from the wall until you can blend in the sanded areas from the floor sander.
Again, sweep or vacuum after each grit change. After the hand sander, you will still need to do some actual hand-sanding and maybe use a scraper to clean out the corners and other small areas the sander will miss.
Now you can break out the floor buffer and attach both a driving pad and a 100 to 120-grit screen. This will further blend in the sanded areas where the edger meets the floor sander. Start buffing with the grain along one wall with a sweeping motion moving toward the center of the room. Once you get to the center, change the screen and go to the opposite side of the room, again starting along the wall. When you reach the center of the room, you're done.
Depending on the size of the room, you may have to change the screen more frequently. Give the room a thorough vacuuming, preferably with a vacuum equipped with a HEPA filter.
The finish you use will either be oil-based or water-based. There is good and bad with either, but water-based dries faster and it doesn't add color to the floor. Make sure you thoroughly read the manufacturer's instructions.
For water-based finishes, you have to use a compatible sealer. The sealer will protect against stains and not allow the subsequent layers of finish to absorb, allowing a buildup of layers.
The sealer and finish are applied in the same manner. The sealer will be poured along the length of the floor and then spread with a T-bar applicator, which looks like a giant squeegee. The trick is to keep a wet leading edge on the applicator, and to do the entire floor at one time without stopping.
Pour a thin line of sealer along the edge of the wall and use a hand squeegee to feather it out. Continue pouring the sealer and spreading it around with the applicator. Overlap the previous stroke slightly, but don't overwork the sealer or you will get bubbles in it. The sealer will dry fast, so keep moving.
Once the sealer is dry, you will typically have to buff it with a fine buffing screen. This will rough up the surface and promote adhesion of the finish.
The finish is applied the same way. Use a damp T-bar applicator and spread the finish around the floor in straight rows, slightly overlapping each row. When you see the finish start to diminish in front of the applicator, pour a line of finish in front of it. As you approach a wall, use a wide sweeping motion and turn the applicator 180 degrees to change directions. Don't stop in the middle of a pass or it may leave a mark. Once the finish dries, lightly buff it and wipe up the dust with a tack cloth. Then you can start the fun all over again for the next coat.
 A customer called to say that a recessed light in his house kept going out. He said that after turning the light on, it stays illuminated for a few minutes and then turns off. He replaced the bulb several times anyway and it still turns off.
The problem isn't the bulb, rather it's the heat. Recessed light fixtures (aka can lights) are basically a can with a light bulb in it. Most people use a flood-style or spot-style bulb in them. These produce heat that gets trapped in the can. To complicate matters, there is a decorative trim ring around the bottom of the can which further traps heat. You see these when you look up at the ceiling.
It's not the light bulb that is shutting off, it's the light fixture. The recessed can fixture has a high-limit cut-off switch that shuts off the fixture when the heat becomes excessive. An easy fix may be as simple as moving the light bulb closer to the ceiling's opening, allowing more space between the bulb and the switch. If the bulb is too deep in the can, it is closer to the switch and more likely to build up heat, which will shut off the fixture. The fixture will have a sliding mechanism with a wing nut that you can loosen so you can move the bulb up or down.
Another thing to consider is whether or not the correct bulb and trim ring are being used. Unscrew the bulb and read the label inside the fixture. It will tell you what bulbs are compatible and the maximum wattage. You may be able to solve the problem by just using a bulb with a lower wattage. Here is some additional information on recessed light fixture repair.
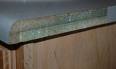 As I walked through a customer's kitchen, my sleeve caught the corner of her laminate countertop and almost peeled the side piece clean off. That's not the way to start a good business relationship. She wasn't really concerned as I told her I would fix it. Had the piece snapped in half or broken off, I would have been in real trouble. I would have had to find a matching piece and would likely been out of luck.
Fortunately, the laminate strip was just flapping around ready to be glued back on. I started by sanding both the adhesive side of the laminate strip and the wood substrate is was glued to, to remove any traces of the old adhesive. I got some contact cement and prepared for a little magic.
The trick with repairing laminate is you want to give each mating surface 2 coats of contact cement, allowing each coat to dry before the next coat is applied. Also, don't let the surfaces touch until you are ready for them to. In this case, I stuffed a wood pencil in between the two surfaces which gave me plenty of space to work.
I like to use a sponge brush to dab on the adhesive on both surfaces until dry. When ready to mate the surfaces, I just held the flap of laminate, removed the pencil and pushed the laminate firmly against the wood substrate. You can even use a rolling pin to squeeze out any gaps.
 I got a call today from a lady that was complaining of a sewer smell in her bathroom. She said she had called the water company and they advised her to run water down each of the drains in the bathroom. Good advice.
This customer sounded pretty hands-on and said she had taken the drain pipes apart below the sinks and washed them. That sounds pretty gross to me, and it wouldn't have much of an effect. I work around drain pipes and I don't want to touch them if I don't have to, much less wash them.
Over the phone she gave me the details. The bathroom has 2 sinks one of which she doesn't use, a toilet, a shower, and a bathtub which she never uses. A couple of issues jumped out. First, she doesn't use one of the sinks. Second, and perhaps the more likely culprit, she never uses the bathtub. The reason I say more likely is that the tub has a larger drain than the sink, and consequently could let more sewer smell into the room than a smaller diameter sink drain.
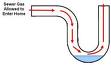
Over time if you don't use a fixture, the water in the drain trap (the "U" shaped drain pipe) will evaporate which allows the sewer smell into the room. This water barrier is the only thing preventing this from happening. I also told her to make sure there is water in the drains, i.e. turn on the water for a few seconds.
The customer said that within a few weeks the smell would return. Well, that makes sense...if she is not using the tub, the water will evaporate from the drain and the smell returns. I suggested that after she runs the water, pour a tablespoon of mineral oil into the drain. The oil is lighter than water and will float to the top and not evaporate.
I also told her keep an eye on the level of water in the trap. I suggested that she shine a flashlight down the tub drain every so often to make sure she could still see the water/oil in the trap. If there is no water left, there may be a crack in the drain that is allowing the water in the trap to drain out, leaving a wide open path for the smell to enter the room.