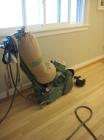
 Making your wood floor look fresh again is a big carpentry chore. You're going to need to rent a sanding machine (either a "drum" or a "belt" model), an edger, and a buffing machine.
Before you start chewing away a layer of your floor, though, you should be aware that some floors can only be refinished once or twice. If, for example, you have engineered floors with a thin layer of veneer on top (instead of solid refinishable wood throughout), the risk is that you could sand through the veneer and ruin the appearance. Try investigating this in an inconspicuous area like a closet.
If the veneer checks out, start the job by clearing everything out of the room and sweeping the floor. Make sure you are comfortable with the sanding machines, and cover the doorway with plastic to keep the dust inside. Begin with a low-grit sandpaper medium and work progressively to finer and finer grits to eliminate the scratches from the previous grit.
By the way, maker sure you wear a dust mask because it will get pretty cloudy in there.
Since the floor sander is bulky and you must stand behind it to operate it, you can't start in a corner. Instead begin by sanding from somewhere near the center of the room, but do it at an angle. This will help level the floor as you sand.
Conversely, if you initially sand parallel with the walls, the sander will tend to bounce if it hits an edge of a wood strip that is protruding. This will cause the sander to dig into the floor and create troughs. Sanding at an angle will help cut down on the troughs.
Try 60-grit sandpaper for a test run to see if it produces a level pass. If not, you may try a 40-grit (the lower the number, the larger the abrasive particles on the paper and the more material it will remove). After finding the right grit, you can sand half the room, then turn the machine around and sand to the opposite walls.
After you have completed sanding the floor at an angle, run the sander parallel to the wall with the grain of the floor. This will eliminate the scratches from the previous step. Sweep or vacuum the floor to remove the grit and continue moving up in sanding grits until you reach the suggested grit recommended by the manufacturer (usually 100).
Now comes the perimeter of the room. For this area, use an edger, which is a small sanding machine held with both hands. Move it from side to side with the grain of the wood, starting as close to the wall as you can get. Gradually move the edger away from the wall until you can blend in the sanded areas from the floor sander.
Again, sweep or vacuum after each grit change. After the hand sander, you will still need to do some actual hand-sanding and maybe use a scraper to clean out the corners and other small areas the sander will miss.
Now you can break out the floor buffer and attach both a driving pad and a 100 to 120-grit screen. This will further blend in the sanded areas where the edger meets the floor sander. Start buffing with the grain along one wall with a sweeping motion moving toward the center of the room. Once you get to the center, change the screen and go to the opposite side of the room, again starting along the wall. When you reach the center of the room, you're done.
Depending on the size of the room, you may have to change the screen more frequently. Give the room a thorough vacuuming, preferably with a vacuum equipped with a HEPA filter.
The finish you use will either be oil-based or water-based. There is good and bad with either, but water-based dries faster and it doesn't add color to the floor. Make sure you thoroughly read the manufacturer's instructions.
For water-based finishes, you have to use a compatible sealer. The sealer will protect against stains and not allow the subsequent layers of finish to absorb, allowing a buildup of layers.
The sealer and finish are applied in the same manner. The sealer will be poured along the length of the floor and then spread with a T-bar applicator, which looks like a giant squeegee. The trick is to keep a wet leading edge on the applicator, and to do the entire floor at one time without stopping.
Pour a thin line of sealer along the edge of the wall and use a hand squeegee to feather it out. Continue pouring the sealer and spreading it around with the applicator. Overlap the previous stroke slightly, but don't overwork the sealer or you will get bubbles in it. The sealer will dry fast, so keep moving.
Once the sealer is dry, you will typically have to buff it with a fine buffing screen. This will rough up the surface and promote adhesion of the finish.
The finish is applied the same way. Use a damp T-bar applicator and spread the finish around the floor in straight rows, slightly overlapping each row. When you see the finish start to diminish in front of the applicator, pour a line of finish in front of it. As you approach a wall, use a wide sweeping motion and turn the applicator 180 degrees to change directions. Don't stop in the middle of a pass or it may leave a mark. Once the finish dries, lightly buff it and wipe up the dust with a tack cloth. Then you can start the fun all over again for the next coat.