 Installing a newel post can be a challenging carpentry job. A newel post is main support of a handrail for stairs or a landing. They have to be anchored at the bottom where they attach to the stair or wall (or other structural support).
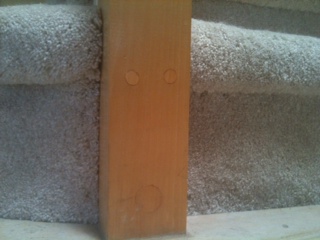
You can use a countersinking bit to bore out the holes in the base of the post for the lag bolts. You will need a drilled through the base of the post for the shank, and a larger hole big enough that he lag bolt’s head will fit into. The head will stop at the depth the larger diameter stops. You will thread the lag bolt through the appropriate washer. You should have at least two lag bolts installed through the base, one high and one low. This will prevent movement as these posts can be under considerable force. You can see in the picture there are three lag bolts installed in the post’s base.
To cover up the holes, you can use plugs. You can buy generic plugs or you can buy a plug cutting bit and cut your own. If you cut your own plugs, try to orient the grain so that it matches with the surrounding wood so that the plugs virtually disappear.
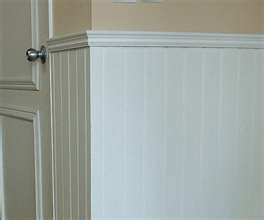 Here is a straightforward carpentry project with a little country flair. You can install it right over the drywall.
Beadboard comes in either planks or sheets but the sheets install much faster than the planks. Many products are tongue-and-groove and fit together seamlessly.
The thicker the board, the deeper the grooves. A lot of the inexpensive products are thin, so the decorative grooves of the beadboard are not very deep. When it’s time to paint them, the paint will settle into the grooves and fill them, which detract from the appearance. So, if it’s in your budget, you might consider the better product.
Start by determining how high you want the beadboard and snap a chalk line on the wall to mark the height. At this line, install a temporary strip of wood to keep the top of the beadboard aligned. While the top is important, the bottom is not, as it will be covered by the baseboard.
Remove the baseboard along the bottom of the wall. Use a putty knife to scrape off any caulking that is sticking to the wall. Regardless of whether you are using the sheets or the planks, make sure the first piece you install is plumb. If your first piece isn’t perfectly vertical, all others will be off as well. You can use a level to check.
Beadboard is usually secured to the wall with adhesive and then nailed at the top and bottom. The bottom nails will be hidden by the baseboard and the nails at the top will be hidden by cove molding that you install afterward.
Before you start hitting nails into the wall, mark out where the studs are located. You can use small finish nails to tack the board to the wall, as the adhesive will do the brunt of the holding. Apply beads of construction adhesive horizontally to the wall about 16 inches apart and push the board into the adhesive. Make sure the top of the board rests against the underside of the temporary guide strip so that everything is aligned at the end. The next piece of beadboard will have a tongue that slips into the groove of the previous piece.
The electrical outlets will be a challenge. You will need to cut a hole in the beadboard to allow the outlet to be accessible.
Grab a tube of lipstick or a crayon and draw a line around the outlet. You can dry-fit the panel over the outlet and push the beadboard to the wall. Pull the beadboard off and on the back of the board will be the outline of the outlet. Use this as a guide to cut the opening large enough to allow access to the box.
Words of caution: Turn the power off to the outlet when you are working on it. You will have to remove the cover plate, install a box extender, and then reinstall the cover plate after the board has been secured to the wall. You must also negotiate the corners. As you approach the corner, just cut it to end flush at the corner. Coming out of the corner, you can butt the end of the board against the other corner piece. You may have to cut the piece coming out of the corner so that the beads maintain the same amount of spacing.
Once the beadboard is installed, reinstall the baseboard and then look to the top of the beadboard. Install a piece of bullnose along the top of the board so that it stands proud like a tiny shelf. Under this shelf, install a piece of cove molding. This will not only hide the finish nails, but will also dress up the installation. Maybe then you can slip on an apron and start cookin’ some country fixins’.
 There are several reasons you might want to do this carpentry job: cutting a hole in your countertop. Maybe you are adding an under-sink soap dispenser, or maybe a reverse osmosis system. Whatever the reason, the job doesn’t take a lot of knowledge. You simply need to determine the size of the hole and get busy cutting it.
You will need a drill and a hole saw. A hole saw is a circular tool attached to a drill bit. This allows you to stick it in a drill, which spins it around and cuts the hole. The drill bit sticks out the farthest and this is the first thing to contact the surface to be cut.
Mark the countertop where you want to start the cut. The drill bit will start to drill into the surface. Once it reaches down, the teeth of the hole saw contact the surface. The key here is to hold the drill at a point where all the teeth of the saw are cutting uniformly. If the drill is leaning to one side, only that side of the hole will get cut. This will make the drill wobble. Listen for the sound the saw makes as it cuts. It too should be a uniform sound. If the sound is loud and then soft, the drill is not in a plumb position.
Once you have cut halfway through the countertop, remove the drill and cut the rest of the hole from underneath the counter. The reason is that a lot of hole saws don’t have the depth to cut the entire thing in one shot. In addition you won’t have any tear-out of the surface.
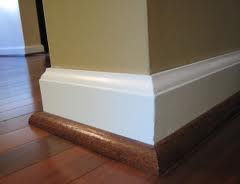 This is a fairly simply carpentry question really. Have you ever noticed that when a wood floor or laminate floor is installed, there is often times quarter-round molding installed around the perimeter of it? It is a very common site. The quarter-round molding serves a very important purpose. It covers the gap between the baseboard on the wall, and the new flooring. You find this if the installer chose to keep the baseboard in place, rather than remove it and reinstall it.
There are two ways to go when installing a wood or laminate floor. If you remove the baseboard, you can run the flooring right up to the wall. Once the floor is installed, you can reinstall the baseboard over the top of the floor for a seamless finish. This is beautiful and you don’t need to install quarter round because the gap is hidden underneath the baseboard.
It’s only when you leave the baseboard in place and install the flooring up to it that you need to use the quarter-round, as a gap is present between the baseboard and the edge of the flooring. Flooring manufacturers make quarter-round molding for this purpose. It will match your floor and will give you a finished presentation. It will however, make your baseboard look shorter because it effectively hides the bottom of it.
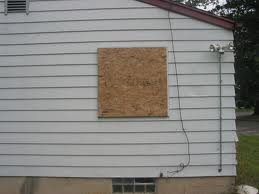 This is a unique carpentry job, unique in that this is only temporary…at least until the glass company can replace the glass. So although it is a temporary fix, it has to be solid enough to deter any additional vandalism. With so many vacant houses around, knowing the proper way to board up a window is valuable.
A sheet of plywood is tough. I prefer ½” plywood because it is tough, but light enough to manhandle by yourself, although I know people that use wafer board. Forget about just nailing it up to the perimeter of the opening. The bad guys can just pull it down.
I think the best way is to use some short lengths of 2”x 4”s and some carriage bolts and screw it all together. Here’s how it’s done…
Cut the plywood so that it fits over the window’s opening. Cut 2”x4”s long enough so that they will overlap each side of the opening. You want two 2”x4”s per opening, one near each end of the opening. In each 2”x4” will be two carriage bolts. The smooth head of the bolt will be on the exterior and the threads and nut will be on the interior (so the bad guys can’t just unscrew it). Thread the carriage bolt through the plywood, and into the 2”x4”. Place a washer and finally a nut on the end of the carriage bolt and tighten it down until snug, which is usually when the plywood will start to bow. This configuration basically sandwiches the window opening between the plywood and the 2”x4” lumber.
 Many carpentry jobs require mitering corners for a clean tight fit. Mitering is simply the act of cutting mating pieces of wood to follow the angle of whatever it is you are working on. Most commonly, if you are installing baseboard, you will miter inside and outside corners so that the angle adds up to 90 (assuming the corners are actually 90-degrees.
Power miter saws are the way to go here. They are fast, precise, and safe. Use proper eye and ear protection, as well as breathing protection. Always clamp the piece to the table or fence of the saw. You certainly don’t want to get your fingers too close to the spinning blade. You can set the blade to cut the angle you need to mate the pieces for a perfect fit. Compound miter saws cut multiple angles simultaneously. These get tricky because you will need some math skills to figure out the angles.
If you don’t have a power miter saw or don’t want to rent one, you can buy a backsaw (a handsaw) and a miter box. I don’t care for these much because they take too much effort and the cut ends up sloppy. The result is that you get a mitered cut that isn’t perfectly straight.
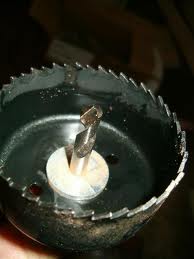
 For most carpentry jobs using a hole saw, it is usually a straightforward process. The hole saw has a drill bit in the center to guide the hole saw to it’s intended location. But what if you have already cut a hole and the hole is too small? The drill bit can’t act as a guide because there has already been a hole cut out, although it is too small.
If you place the larger hole saw over the smaller hole, the saw will tend to wander around until it cuts a groove. This wandering will cause the hole to be cut in a little off center and also scar up the work surface.
To eliminate this, use a couple of drywall screws. Place the hole saw over the exact location where you want to cut the hole. If you can draw a circle around it--great. You want to locate four drywall screws around the larger hole saw, in effect trapping it in place. It won’t be able to wander because the drywall screws will be holding it in place and not allowing it to move.
Start the cut slowly and when the teeth bite into the wood enough, you can stop and remove the screws from the work surface. Then continue with the cut until finished.
Here is a simple carpentry job that is actually easier than the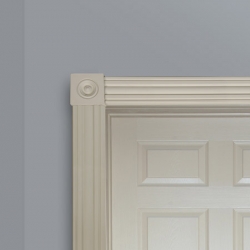 alternative. If you are replacing trim molding around a door, you typically would cut the ends of the two mating pieces at a 45-degree angle to turn the corner. These angles when put together make a 90-degree corner. Most door trim is done this way as it is fast and miter saws all cut a 45-degree angle.
Rosettes are an alternative to mitered corners. Rosettes are basically square blocks with a decorative finish. Most rosettes are used with fluted trim, but you can use whatever style trim fits your taste.
In place of a mitered corner, you install these rosettes. You can take a level line along the top of the door and install the them on this line. In that way, you can run the vertical trim up to the bottom of the rosette and then install a horizontal piece in between the two corner rosettes at the top of the door.
A nail gun works best, and even putting one nail at the center of each rosette works well while you line up the molding pieces. When you are done you can fill in any holes and then touch up the paint or stain it.
 Here is a simple carpentry job that is actually pretty common. Cutting a hole in a desk to run computer cable. This is done using a hole saw.
A hole saw looks like a drill bit shank on one end, and on the other end is a round opening with teeth surrounding it. In the middle of the opening is a traditional looking drill bit. This tool gets chucked in a drill driver and is spun into the desktop to cut the hole. The drill bit is longer than the hole saw’s teeth and so it contacts the wood surface first. This keeps the hole centered.
As the drill bit penetrates the surface, the teeth of the hole saw follow. A steady cut is important here. The tool will tell you how it is operating by how it sounds and how it feels. You want to hear a consistent hum as it cuts and you want the drill to stay stationary. If the drill is moving or shaking, you don’t have the bit perpendicular to the surface. You will feel the bit cut on one side and not on the other, which causes it to shake back-and-forth.
When the drill bit penetrates the back of the work surface remove it from the piece. Now place the drill bit into the hole on the other side of the piece and start cutting from that side. In this manner you won’t have tear-out of the wood. Instead you will have 2 nice looking cuts with no grain tear-out.
 Modern homes have plenty or potential carpentry projects. If you have a niche or an alcove, you could add some display shelving to dress it up. You will have to think ahead on this one though as there are plenty of options to consider.
If you have a large niche in a wall, you could use wood shelving and either paint it or stain and varnish it to see the wood grain. Solid wood is more expensive and more challenging to work with, so you could try using plywood veneer with an end molding or iron-on edging. You could use ¾” thickness if the space is large enough, so that the thickness of the shelving won’t overpower the space. That thickness will also support a fair amount of weight.
If your niche is smaller, you can use glass shelving. The smaller size of the glass shelving will help the shelves to blend in more and won’t break up the space as much as wood shelving. I wouldn’t put as much weight on glass that you could on wood, but for a small space, it likely will be for display anyway.
For wood shelving you can install runners along each wall, creating a resting space for the shelf. Just make sure you use a level and have each runner level. You can secure the runners into the wall studs.
For glass shelving, you can also use runners or you can buy special support clips that will hold the shelf in place. Again, the clips should all be level with one another. For small spaces you will likely only need four clips total, two on each side of the shelf.