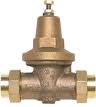
 Water pressure regulators serve a vital function in your plumbing system. As their name implies, they regulate the pressure of the water coming into the house. Typically, they are installed on the incoming line with a shut-off valve so that they can be serviced. The allowable water pressure in a house is between 40 psi to 80 psi. When the water pressure creeps up towards the higher end of the scale, fixtures can fail and break, and plastic toilet fill valves can leak. Some fixture manufacturers exclude damage from water pressure exceeding 80 psi, and some home warranty companies will not cover damage to the home for high water pressure. So it's a good idea to have a water pressure regulator.
If you don't already have one at your house, you will need to find a suitable location to install one. In your garage you will likely find a shut-off valve. This would be a good area to install one, but you may need to open the wall and do a little re-piping. For this reason, this wouldn't be a good job for someone with little plumbing experience. You can read this for information on how to solder copper.
Once you have access to the pressure regulator, you can adjust the water pressure by turning the nut on top of the unit (most water pressure reducing valves come factory pre-set at 50 psi). Test the pressure by screwing on a water pressure gauge and checking it after you adjust the nut.
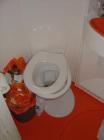 Have you ever gone to use the bathroom and the toilet seat nearly slides right off of the bowl? It's gross to think about, but toilet seats get...well...abused. They are held in place by plastic bolts that hide under some decorative caps. Tightening a toilet seat to the bowl is very easy, but you probably want to wear gloves when working on them.
The toilet seat is hinged so that the lid and seat can be lifted. The hinged section has a plastic bolt that extends down into holes at the back of the bowl and gets secured with a wing nut.
To tighten the seat, pry off the caps at the back of the seat. A small screwdriver is perfect for this. Once the caps are lifted, you will see the slot in the screw head. Turn this clockwise until snug. Most of the wing nuts have a built-in stop so as you turn the bolt, it doesn't turn with the bolt and tightens. If your seat is really old, you may need to hold the wing nut still while you turn the screwdriver.
Newer seats have a mechanism that allows you to mount the seat by turning the hinge clockwise. It's easy but not as secure as the old bolt and wing nut style. If it's time for a new one, read this on how to install a new toilet seat.
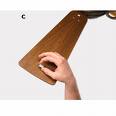
 A newlywed couple purchased their first home, a foreclosure, which needs a lot of work. One of the items they want installed is a new medicine cabinet, mainly because the one they had was stolen before they took possession of the house.
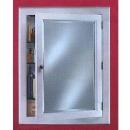
There are two styles of medicine cabinets, either surface mounted or recessed. Surface mounted is easier to install but looks like an afterthought. A recessed medicine cabinet is much cleaner looking, but involves you cutting a hole in the drywall to install it.
The newlywed couple had the recessed style stolen, and so it was very easy to buy the same size, place it in the hole, and screw it to the studs. However, if you were installing one as new, you would need to cut a hole in your wall and install it. They typically fit nicely in between the studs, but you run the hazard of finding electrical or plumbing lines in the wall after you've cut it open. You will want to use a stud finder and mark off the location of the studs before you start cutting. When you do cut the wall, cut shallow so that if a cable or pipe is in the wall you won't damage it. You will either have to re-route these or find a new location for your medicine cabinet. After the hole is cut, screw it to the studs.
A surface mounted medicine cabinet installation is about as easy as hanging a picture. Find the studs, level it, and screw it to the wall. You at least have to screw it to one stud. If the cabinet is not wide enough to span two studs, use a wall anchor, such as an EZ toggle to hold it in place.
 I hate waiting...for food, for stoplights, and hot water. If you live in a house where the master shower is at the far end of the house and the water heater is at the other end, you're going to do some waiting too. Save yourself a little agony and think about installing a water recirculation pump.
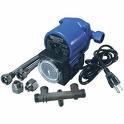
A water recirculation pump creates a loop in your house, where you ordinarily wouldn't have a loop. When a house is built to accommodate a hot water recirculation system, a loop is built into the house and then the plumbing fixtures are branched off of this loop. However, with a retrofit type system, we have to create a loop using a cold water line.
The pump can be mounted under the sink farthest away from the water heater or at the water heater itself. When the retrofit pump unit is installed at the water heater, a pipe is installed at the sink farthest away from the water heater that essentially connects the hot and cold water lines at that fixture.
The idea behind creating a hot water circulation loop is much better than cutting up walls and re-piping the house right? Well, you will have to tolerate losing a cold water line though. It's best to install the pump (or the pipe, depending on which style you have) under a bathroom sink that has two sinks in the bathroom. This is because you will lose the cold water in whichever sink you decide to install this. When I say "lose", I don't mean it will be totally gone, but remember how long you had to wait to get hot water? Well you will have to wait about that long to get cold after you install the pump system. You will have to clear out all the hot water so that the cold can make it's way to the faucet. That's why I suggest installing it under a double vanity sink, if you want cold water immediately, just take 2 steps and there it is. Once you've decided to save thousands of gallons of water annually, read this article on how to install a water recirculating pump.
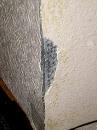 Drywall corners take a beating. Whether they form a 90-degree corner or have rounded bull nose they all dent when little Johnny swings a toy into it, or runs a wagon into it, or...you get the picture. Fortunately, they aren't difficult to repair...all you need is a little drywall mud, some texture, and paint.
Whether the corners are square or rounded, the corners are metal and you basically want to correct any metal that is sticking out...you want to hammer it back into place and fill in the gaps with drywall mud. If you have a deformed piece of metal jutting out, you can tap it into place with a hammer. If the metal corner is torn you can use a standard screwdriver or chisel and place it back into the plane of the wall. Hold a ruler or yardstick against the wall and let the end of it stick out past the wall. If you can move the yardstick up and down the wall and the damaged metal doesn't touch the yardstick, you are good to go. Do this on the intersecting wall also.
Get out the drywall mud and fill in the damaged areas. Once that dries, you can texture it and then paint it. Here is some information on how to repair drywall and texture it.
 Have you ever been hunched over the kitchen sink rinsing off the dishes and suddenly the sink starts backing up? People get confounded when just one side of the sink fills up...the side with the garbage disposal. A garbage disposal takes all kinds of abuse with people throwing things down there that they shouldn't be. I'm guessing the plumbing gods took this into consideration and a restriction pipe was placed after some disposals.
The discharge pipe leads from the side of the disposal and meets up with the drain which carries the waste to the sewer. Usually, this discharge pipe connects to the vertical sink tailpiece which flows to the drain trap. The restriction is typically after the disposal but before it meets the tailpiece.
Things like potato peels and other vegetable peelings are famous for clogging up the restriction pipe, and you can only access it from below the sink. You will have to disconnect some piping, so either get a wet/dry shopvac and suck out the water from the sink, or have a bucket under the piping to catch the water (and make sure the bucket is large enough to handle it). The pipes will come out after you loosen the slip nuts that hold the pipes and fittings together. Pull out the potato peels (or whatever is clogging the pipe) and run some water through them to flush everything out (put the bucket under the sink to catch the water). Once you reassemble everything, tighten the nuts and test for leaks. By the way, here is some information on how to snake a clogged drain.
 One of life's little frustrations is having a wobbling ceiling fan. Whether it is a slight vibration or a large swinging motion, it's just something you have to take car of. Fortunately, its cheap and relatively quick.
A fan balancing kit costs a few dollars and includes a weighted clip and some adhesive-backed weights. Before you start balancing the blades though, make sure the fan is secure to the ceiling. In other words, before you spend some time adding weights and moving around blades, make sure all the screws are tight. You might also measure the distance from the ceiling to the tip of each blade to make sure they are the same distance from the ceiling. You may have a blade that is not in the same plane as the other blades, leading to a wobble. If you have this, you may be able to move the blades to different positions, you might have to replace the blade, or you may get away with adding a washer or even bending the blade holder to align the blade.
The ceiling fan will hang from a down rod from between 4" and several feet. The longer this down rod, generally the more out-of-balance the fan will be. Start by placing the weighted clip on the near the end of the leading edge of one of the blades, and turn the fan on high. Take notice if the balance of the fan has improved or worsened. You will do this to each blade of the fan, placing the clip at the same spot on each blade. Then you will focus on whichever blade (or blades) shows the most significant improvement.
Once you've chosen the suspicious blade (or blades) move the clip along the length of that blade, again on the leading edge. Try it near both ends and the middle to see where it makes the most improvement. Wherever it makes the most improvement, place a weight on top of the blade equidistant from the edges (it‘s a peel-and-stick weight). Remove the clip and run the fan on high. If it still wobbles, use the clip again to see if you need to place another weight on the same blade, or move to another blade to add a weight. On come occasions, you may need to swap positions of 2 blades on opposing sides of the motor to balance the fan. It's one of those jobs that is part art and science.
 Matching paint is tough. Two weeks ago I wrote about matching exterior paint for stucco. Well, more often I find myself having to match interior paint for a drywall repair, or just freshening dirty walls. You can have a perfect drywall patch and poor matching paint and the wall patch will look terrible. You can have a mediocre drywall patch and perfect paint, and the result is very nice. So how do you get a good paint match?
Most homeowners don't know how to color paint, which is why they make computers to do this for us. As long as the machine has been properly calibrated, the quarter-size sample you bring in can be matched. If you don't have a piece of broken drywall (that has the correct paint on it) laying around from your drywall patch, here is a little trick. You can go to an inconspicuous area, like a closet or down low on the wall, and cut out a paint sample. Now when I say cut out, I'm taking about making a shallow cut in the drywall just deep enough to peel off the paint and the top layer of drywall paper. Do this by using a utility knife and cutting about 1/16" deep into the drywall. This will cut through the paint, texture, and top layer of drywall paper. Make a cut about 1 ½" square...this will be big enough for the computer to match. Then take the blade and lift the corner of the cut and gently peel it off.
So you will have another small drywall blemish to fix and texture, but at least the paint should be a very good match. Here is some information on repairing drywall.
If you've ever had a frozen copper pipe, you know the tremendous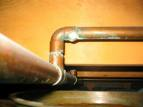 force that freezing water can exert. As water freezes, it expands, and although copper is very strong, the force of expanding water and ice can split a copper pipe wide open.
In addition to water spraying out of the opening, you will have to do some quick thinking. First of all, get the water to stop spraying out of the pipe. Here is an article on how to shut off the water. Once you have the water turned off and have cleaned up the water-soaked area, you are going to need to repair the pipe.
Usually, you will see a nice hole in the pipe with the edges of the copper peeled outward from the pressure. Typically, you will have to cut out the damaged section with a pipe cutter (avoid using a hacksaw as it will leave nasty edges). Once you have cut away the damaged section you will be left with a void in the pipe. You will then use a repair coupling to span the void.
A repair coupling has no stops in it and so you can place it over the pipe and slide it to wherever you need it to go (this is also known as a repair sleeve). From there you will need to either sweat the coupling in place or use a copper adhesive, but check to make sure that your local building authorities allow a copper adhesive, as some don't allow it. Here is an article on how to solder copper piping.
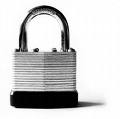 As I pulled into my neighborhood, I noticed a neighbor furiously cutting off a lock with a hacksaw (or at least attempting to). It was on a side gate and he was breaking a sweat trying to remove it. So out of the goodness of my heart I stopped to offer some advice.
Trying to cut through a pad lock with a hacksaw is good aerobic exercise, but it won't do much for removing the lock. You have a couple of options here. You could go to a rental yard (or many home centers rent equipment) and rent bolt cutters. For a case hardened pad lock you will want to rent bolt cutters with 3 foot handles...this will cost under $10.00. Grab the shank of the pad lock with the cutting head wherever it is convenient, and squeeze the handles together (this isn't as easy as it sounds). The long handles provide plenty of leverage but it will leave you out of breath.
The other option is to grind it off. This Las Vegas handyman carries lots of tools and one of them is a grinder. What we ended up doing is using a grinder with a metal cutting blade in it. It makes quick work of a pad lock, and the shower of sparks really impresses the neighborhood kids.