 I don’t typically like peel and stick weatherstripping, but it does have its place. Generally, I find it to be a very temporary type of weatherization, but if you apply it to an area that doesn’t see a lot of movement, it should do well there.
Areas that don’t see a lot of use would be the attic hatch. Doors on the other hand, get lots of use daily and will fail sooner.
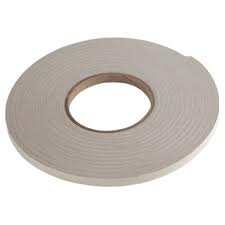
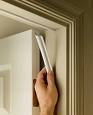
It seems that temperature extremes will cause many peel & stick surfaces to fail and then your weatherstripping falls down. Some tips to get the adhesive to stick longer are to apply the weatherstripping when the temperature is not extreme (between 40-90 degrees). Make sure the surface is clean, dry and grease-free.
Start at one corner, and peel the tape from the back of the weatherstrip. Firmly press the sticky side onto the surface. Peel the tape and continue applying the weatherstrip until the perimeter of whatever you are sealing is covered.
I would use the peel & stick as a last resort though. If your door or window has a groove or kerf for a specific style of weather stripping, I would certainly use that first. It tends to last a lot longer.
 Weatherstripping your door is extremely important for energy conservation and your comfort. If you can see daylight around your door, then outdoor air is entering your house and mixing with your conditioned air. This means your air conditioning/heating equipment must work longer and more often to maintain the indoor temperature. Can you imagine how much air would enter your house if every door were like this? It would all add up to a sizeable hole in your house. A few dollars in weatherstripping can prevent this.
Bare bones weatherstripping is the peel & stick type that just sticks to a surface. It comes in different densities and compresses easily or firmly. It also comes in different widths. I would only use this as a last resort as it doesn’t seem to want to stick very well.
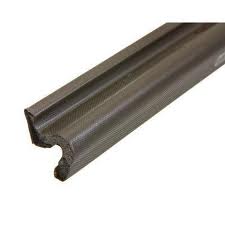
Modern doors have a kerf that allows you to install a vinyl coated weatherstripping. You can simply pull the old strip out and push the new one in. The vinyl has a small barb that pushes into the kerf and holds. This needs to be cut when you come to a corner, and then you start the next strip. When you’ve done the perimeter of the door, check to see that the sweep on the bottom of the door is in good condition. You may be able to adjust the sweep, if not just replace it.
The big test is whether or not you can see daylight anywhere around the door when you close it. If you do can’t see daylight, your job is done.
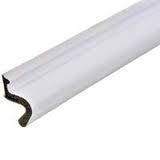 My favorite style of door weather strip is the push-in kerf style. It stays in place and you don’t have to worry about it coming off of the door or jamb when the adhesive wears out.
Not all doors can use the kerf-style weather-stripping though. A kerf must be present in order for this weather strip to work. A kerf is a small groove that sits around the perimeter of the door. Look at the stop (the piece of wood that the exterior side of the door rests against). If you see a groove about 1/8” wide, your door can use this type of weather strip. If your door does have a kerf, you probably already have this weather strip in though. I sure wouldn’t replace it with the peel-and-stick style.
To remove the old kerf-style weather strip, just pull it out of the groove. There is a small barb on it that pushes into the kerf and holds. Measure the distance for the new piece and cut it. Start at one end and push it all the way into the kerf. For the corners, you can either cut the strip straight across (you may have some overlap in the corners), or you can cut the strip at 45-degree angles to make a 90-degree corner (for example, like you would on window trim). You shouldn’t have any problems with it coming out of the groove.
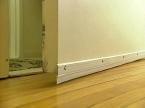
 If you can see daylight coming in from under your front door, you need to replace the strip of weatherstripping at the bottom of the door. It is probably a good idea to remove the strip and take it with you to get the right style. There are strips that slide into grooves in the underside of the door, some get stapled to the underside of the door, and some slide onto the bottom of the door and get attached with screws. The latter is the easiest style as they are a universal fit. The only problem is that they look very universal.
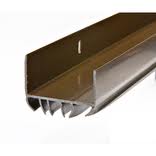
This style looks like a "U" shaped channel with some rubber fins on the bottom. The idea here is to slide the U-channel along the bottom of the door and adjust it for height. Trim the channel with a utility knife so that it doesn't hit either jamb as the door opens or closes. With the channel fitted for length, use a drill driver and insert the screws partially into the bottom of the door (these screws will be visible along the bottom inside of the door). The screws will be inserted into oblong slots. These slots will allow you to move the channel up and down to get a good fit. You want the fins on the bottom of the channel to lightly rub against the threshold to seal the opening. Once you have a slight rubbing sound, tighten the screws until firm.
 If you can see daylight around your door, you are allowing outside air into your air conditioned house. Weatherstrip stops this. It forms a barrier around the perimeter of the door and blocks the air from entering. Without weatherstrip, it’s like having a window partially open.
There are several types of weatherstrip. You can use the peel & stick type, but I don’t much care for this as it requires replacement more regularly. There is rigid metal with compressive hollow tubing on it, and there is the kerf style. I like the kerf style the best, but you have to have the correct door for it. If you look in between the door stop and the door jamb, you should see a small groove. This is the kerf, and the kerf weatherstrip simply gets wedged in this groove.
You can remove the old kerf style weatherstrip by simply pulling it out of the groove. It is held in place by friction. Install the new strip by pushing it into the kerf. Don’t use anything that might cut the weatherstrip, like a screwdriver. Try using a wooden paint stir stick to gently push the weatherstrip into the kerf. This style of weatherstrip has a foam leg encased in vinyl that juts out of it and seals against the door as it closes.
 Garage door weather-stripping is important for several reasons. It will seal out not only the weather, such as rain and wind, but it will also provide a barrier against insects and will even minimize outside noise. This is pretty beefy weather-stripping. It is generally a large oval shape which is hollow inside. When your garage door lowers to contact the floor, this weather-stripping compresses and creates the seal.
Installing this type of weather-stripping is simple. Depending on what type of garage door you have, you will either nail it or screw it to the bottom of the door. Some doors have a channel that the new weather-stripping will slide into.
The kit you buy will include a roll of the weather-stripping and several styles of fasteners. Set the weather-stripping in the sun to warm up and it will be easier to install along the bottom of the door. If you have a wood door, you can use the nail option. Secure the weather-stripping every six inches along the base of the door. You can also screw it to the bottom, but make sure the heads of the screws are flush with the surface of the door.
If you have a metal sectional door, you can use self-tapping screws to secure the weather-stripping or you may choose to slide the strip along the channel, if your door allows for that style.
 If you can see daylight from under an exterior door it is costing you money. Sealing the interior from the exterior is important not only for indoor air conditioned comfort, but it's also an easy way to keep bugs from entering your home.
You might have a door sweep or threshold that is adjustable and may be able to adjust the sweep downward or adjust the threshold upward. Door sweeps are attached to the door and make contact with the threshold underneath the door. The door sweep will wear out over time and need to be replaced by yourself or a handyman. There are lots of different styles of sweeps. Some slide in a track, some have barbs and are secured into some grooves in the bottom of the door, etc. If you want to replace the exact weatherstrip or door sweep, you may have to take it to a door shop. Your other option is to buy a universal door sweep.
This slides down the length of the door bottom and gets secured with screws to the inside bottom of the door. These door sweeps have elongated holes so they can be adjusted up or down to close the gap between the door bottom and the threshold and operate smoothly. When the door sweep is adjusted correctly, you should just barely hear a rubbing sound (between the sweep and the threshold), and you shouldn't be able to see any daylight.
As it gets colder outside, the importance of sealing air infiltration openings in your home grows. The same holds true for the heat of summer. The more the temperature grows away from our comfort level, the more important it is to keep the conditioned air in our living space. Weather stripping is very important for this and it is one of the most overlooked items in the house. Here is a decent article that discusses some low-cost improvements to your home to help keep the warm air inside and the cold air out.
Along with replacing the weather stripping around the doors, also replace the sweep on the bottom of the door. This is usually a rubber or vinyl piece that rubs on the threshold for a positive seal against the outdoors.
Weatherstrip comes in a few different flavors. Much of it is a peel-and-stick foam. However, this is cheap and doesn't last for very long. I prefer the style that actually pushes into a groove around the perimeter of the door. It is shaped like the letter "V" and has a barb that pushes into thesaw kerf around the door. Installing weatherstripping is very easy. You can read about it here.
For the door sweep at the bottom, there are also different styles. A grooved sweep gets pushed into grooves on the underside of the door-it too has barbs to hold it in place. Another kind gets stapled to the bottom of the door. Then there is a retro-fit style that is shaped like the letter "U". It simply slides along the bottom of the door and gets screwed to the inside. The nice feature of this one is that it is adjustable and also comes in several colors.