 A quick handyman fix for avoiding scratches on your wood floor by furniture is only minutes away. Wood floors are beautiful until they get scratched up. I see this often in home offices where a desk is the culprit. Some people will push away from the desk and instead of the rolling chair moving, the desk does…and it leaves marks on the floor in the process.
You can buy little feet for your furniture that will prevent scratches. For desks, there are small feet that have a soft felt-like substance on the bottom, and a pin on the tip (although some are just peel & stick). The pins get tapped into the bottom legs. You may have to turn the desk on it’s side to install the feet, or you may be able to lift the leg and set it down upon the sharp pin. If the wood is soft, the weight of the desk may allow the pin to penetrate fully into the leg.
For larger pieces of furniture, like couches, you can buy feet that have a non-scratching surface on the bottom. These are wider feet that are basically flat with a small rim around the top to keep the leg of the furniture from sliding off. For these you just lift the leg of the furniture and set it on top of the foot.
 Hanging items on a block wall is really a great beginning handyman job. The hurdle is what to use to support the weight, and how to you get it into the block?
Normally, the things people hang on a block wall are somewhat heavy. I’ve seen a lot of Southwestern design items made of wrought iron that hang. They aren’t super heavy, but they aren’t like hanging a small picture either.
I like using masonry screws or tapcon screws for this. In using these, the job does become much like hanging a picture. Most of the outdoor items you will hang will have a point to hang them from or will have a hanger on the back.
Pick a spot on the wall and drill your hole. It is easier to drill into the block itself rather than the mortar in between the blocks. Also, the bit doesn’t tend to wander in the block like it would in the mortar.
Drill to a depth that is appropriate for the screw and then turn the screw into the hole. You obviously want to leave the head out enough so that the item can comfortably rest on it. You may also want to paint the head of the screw so that it blends in with the object you are hanging from it.
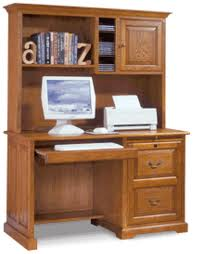 A typical handyman repair is fixing drawers. Another common job is the repair of a pullout computer keyboard. Have you ever noticed that drawers and keyboard trays operate in the same way? Repairing each is very similar.
The interesting thing with computer trays is that people tend to place the weight of their hands and arms on them as they type. This leads to quite a bit of stress where the keyboard attaches to the drawer guides. You might see that there is damage in these areas.
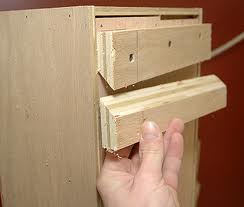
Pull the tray out and examine these areas. Look at both the tray and the cabinet where the mating half is located. Look for looseness or slop in these areas. You might need to remove the guide and glue any splits in the wood tray. Use wood glue and clamp the split closed and let it dry for 24 hours. Then you can reinstall the guide.
For the mating half (it may be in a cabinet or the underside of a desk) you may need to remove it and add some toothpicks or golf tees to firm up the holes. For golf tees predrill the hole and then reinstall the screws. A loose tray will tighten up nicely with these repairs.
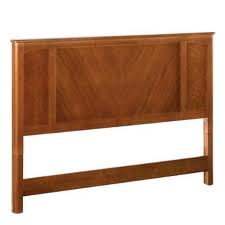 Attaching a head board to a bed frame is a fairly straightforward handyman job. Realize that most beds come with a head board that attaches to a frame, you may find one you want to install. Lots of people make a headboard out of a door or a frame and fabric, but then need to secure them to the frame.
For the most part, bed frames are metal and will have holes at the end for securing a headboard. Head boards typically have legs on them and the legs get bolted to the frame. Not true with all head boards of course, but the vast majority do have legs. If yours doesn’t have legs, you will either need to add legs (to raise it high enough to be seen, as in the case of a door), or you can just bolt it on as well (some head boards made of doors are just hung on the wall at the proper height).
However you headboard is designed, hold it up to the bed frame. It’s a good idea to clamp it in place so that it doesn’t move as you work. Use a pencil and mark the hole pattern and locations on the legs or headboard. Drill out the holes (you might choose to remove the headboard first) and then get the appropriate sized bolts, washers, and nuts. Tighten everything up until snug and then go enjoy a nap.
 Here is an easy handyman job for any beginner. Assuming you aren’t afraid of heights, sure you could climb a ladder to reach the bulbs. But what if the bulbs are crazy high?
I guess it really depends on where the bulbs are located in relation to the walls. Lots of people have extension ladders that they can lean against the wall and climb up to access the bulb…assuming it is very close to the ladder. If the bulbs is too far from the walls, you can certainly rent an “A” frame ladder, but they you have the chore of transporting it to your house. This isn’t an easy task for ceilings that are 20 feet high.
The best and safest option is to use a telescoping pole with a suction cup on the end. You can buy a small suction cup and screw it onto the end of any pole that has the same mating end. The telescoping poles are great for really high ceilings. The suction cup will have a string that hangs down so that you can break the suction. Make sure the cup is clean (which will make it somewhat tacky) and stick it to the bottom of the bulb. Turn the pole to unscrew the bulb and gently lower the bulb. Remove it and stick on a new bulb and reverse the process. Once you have the new bulb snug into its place, pull the string and you can move to the next bulb. You can buy an assortment of screw-on tools for removing different types of bulbs. You just need to choose the one that will work with your style of bulb.
 Repairing a bed is not a very common handyman repair. Beds are personal and people generally don’t want a handyman with dirty hands going near them…except when they are ready to collapse.
Most of the issues lie with where the horizontal mattress support rails meet the legs. There is often a poor connection here and it leads to a good amount of wobble.
If the bed is metal, there will me two bolts and washers at each leg. I’m guessing these are loose. Go to each leg and tighten everything up. It is a 10 minute job and that will likely make the bed much more solid.
If the bed is wood, things get a little trickier. The horizontal mattress support has two downward-facing hooks that stick out of each end that mate with each leg. The leg pieces have a mortised area and a metal face that supports the weight of the mattress as the hooks rest upon them. These are usually very solid because of the way they are designed. If they are loose, you will need to disassemble the bed to get access to these parts. Each male and female part is mortised and screwed into the end of the rail and the side of the leg. Once you have them apart, see what became loose. It may be a matter of simply tightening the screws or using slightly larger screws.
 You can buy a small floor safe at a home center for a few hundred dollars. Although they look small, they are very heavy and can hold plenty of your valuables. However, the size of the safe could potentially allow it to be carried away, so the safe thing is to secure it to the floor.
You can install the safe through a variety of flooring materials. Move the safe into the position you want it to rest. You will need to open the door and find the holes on the bottom of the safe. Use a marker or pencil and run it around the interior of the holes (there will be four). Once you have the holes marked, move the safe out of the way. If you have a wood subfloor you can predrill holes for the lag bolts (the instructions will suggest the correct size).
For concrete slabs, use a hammer drill and drill the holes to the correct size. Push the safe back into position and the holes in the bottom of the safe should be directly over the holes you just drilled. Now you can install the lag bolts for wood subfloors, or install the washers and nuts for the concrete anchors.
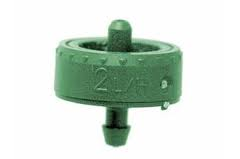 You don’t need to be a handyman to see that some plants in your landscaping may be dying. I was walking up to a customer’s house and noticed that a large plant was turning yellowish brown. It obviously had been healthy at some point because it was large and robust like the other plants surrounding it. Turning on the water told the story.
The plant was dry and digging around the base I found two drip emitters that were not emitting water. By the way, it is a great idea to install more than one emitter per plant just in the event one of them fails. At least the other emitter will keep the plant alive. I guess it was just bad luck that both emitters were not working here.
In this case you can either clean the emitters up and test that they are working properly, or just replace them with new ones. They are held in place by barb fittings (there is no glue used here), and they just pull off of the tube and push back on. If you want to take apart the drip emitters, the flag emitters are really not made to be taken apart, but the button drippers can be unscrewed and cleaned up.
 As a handyman, I have hung hundreds of very heavy items on walls. Sometimes I’ll use fasteners you would get at the store, and other times I use a French cleat. The French cleat is actually very simple. You can use whatever dimension of lumber is appropriate for the piece you are hanging, but you cut it at an angle along its cross-section. A table saw is perfect for this as you can tilt the blade and cut the angle.
You can cut the angle at 45-degrees on the table saw, and what you will be left with is a 45-degree cut on both pieces of wood. You can cut the length of the cleat first and then cut it on the table saw to make it more manageable.
You can hang a variety of things this way, from cabinets to shelves to fireplace mantles. You can use lag bolts into the wall studs for heavier items. The thing to remember is that with the cleat that is mounted to the wall, the lowest end of the cut gets mounted to the wall, and the highest end of the cut is furthest from the wall. This produces downward angle that supports the weight. The opposite is true for the object you are hanging. When you set the object on the wall, the top cleat rests on the cleat affixed to the wall and the angles of the mating cleats support the weight.
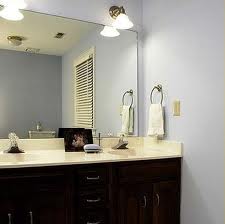 This is a handyman tip that works well with large wall mirrors. These mirrors generally span a good sized area, like over two sinks and sits in a channel at the bottom. It is common that if the mirror will get loose, it will likely happen at one of the top corners.
Mirror mastic is applied to the back of the mirror and then pushed against the wall, but this gets difficult if the mirror is already against the wall. You can probably take your finger and pull the mirror out from the wall only a fraction of an inch. So you can adapt a tube of mastic to fit your needs. You can buy a tube of mastic that fits in a caulking gun and snip the tip off. The tip is far too stiff to work into the small area behind the mirror. Buy some small lengths of hose (doesn’t matter what kind just so long as they are flexible) to put over the end of the tip of the tube. I’ve seen people use duct tape to hold on a flexible tube. It’s not pretty, but the goal here is to get the mastic out of the tube and into the small area between the mirror and the wall. You can buy several small lengths of hoses with different diameters so that the outside diameter of the small hose fits the inside diameter of the larger hose. In this way, one pushes into the other and can be held together with small hose clamps or even duct tape.
Squeeze the mastic out of the tube and into the hoses and point the flexible contraption where you want the mastic to go. When you’ve got a good glob of it back there, you can screw in a couple of mirror clips and be done with it.