 Handyman Tip for Drilling a hole in Glass
It isn't often a handyman needs to drill a hole in glass, but stranger things have happened. If you need to drill a hole in glass, there are tools for this.
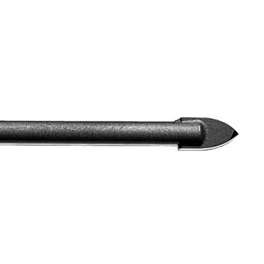
You will need to get a glass and tile bit for your drill. These are unique bits that look like they have an arrowhead stuck on the end of the bit. They cut glass very well and don't take long to do so. The trick is to get the bit to start cutting without wandering off of its original point.
Whether you are drilling into a piece of flat glass or curved, you can get the point of the bit to start cutting where you want it with a rubber mallet. Hold the bit where you want the hole, and tap the shank of the bit so that it drives the point of the arrowhead into the glass surface. This will make a small divot in the surface and will be your starting point.
Put the bit into a drill and place the point of the bit into the divot you created. The bit will cut right at that point and won't wander from it. You can start with a small or large bit, or start small and cut gradually larger holes in the glass.
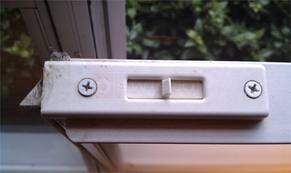 An easy handyman job is replacing a window latch…assuming you have the right part. There are lots of different window styles and types, and even more latching mechanisms. Window latches are made of metal and plastic, and if any moving parts are plastic, you will likely end up replacing them at some point.
When the latch breaks, I would remove it and go find another one. It is doubtful you will find an exact match at a home center, but there is no harm in trying. The latches are held in place with a few screws and they are easy to remove and reinstall. If you have a sliding window and the latch breaks, you can either replace the latch or buy a universal thumbscrew. This slips over the track and you can push it right up against the window before tightening it, which prevents the window from moving. Other window styles are not so easy and you will be forces to buy a replacement.
Take the part with you and go to a glass shop. They will be able to take screw patterns and measurements and order the right part. It might take a week to receive it, but you will get the right part.
 This is a common sense handyman job: using stakes to hold drip emitters in place. You’ve checked the emitters and water is coming out.
How many times have you seen plants dying due to lack of water? “How can that be? The drip emitters are working!” Maybe they are working. To keep the plant alive and healthy, the drip emitter must be delivering the water to the root ball. I can’t tell you how often this happens.
Instead of using stakes to hold the drip emitter in place, some people will just scoop landscaping rock, or mulch, or whatever is nearby onto the drip line to hold it in place. It usually doesn’t last though. Whether it is neighborhood kids, or pets, or pests, the emitter will end up in the wrong place and the plant will die soon after.
Save yourself some aggravation and buy a pack of stakes. They are cheap and will save you from replacing your dead plants. You don’t even need any tools. At the top of the stake are various sizes of cutouts that allow you to place the drip line. Push the drip line into the top of the stake and push the stake into the ground. Make sure the emitter is where you want it. They are easy to adjust if you need to adjust them.
 Different screws are made for different handyman jobs. Ones with larger heads apply more bearing pressure against the surface to which they are attached. This is especially true when a washer is placed under the head. Also, with a larger bearing area, there is a lesser chance the material will pull out from the screw.
A machine screw has finer threads than a wood screw and is made to mate with a nut or a tapped hole. A sheet metal screw is a stubby screw but has coarse threads, and a self-tapping screw drills its own hole as it screws into the material.
A drywall screw is typically a universal screw. They are sharp, come in coarse or fine threads and can make quick work of a project. However, this screw is brittle and has poor shear strength. It can snap or shear with moderate stress so you sure don’t want to use these for cabinets.
When screwing two surfaces together, another trick is to use a bar of soap. Rub the threads of the screw on the bar so there are flakes of the soap all over the screw threads. You can also wrap the screw threads with Teflon tape. Either one of these act as a lubricant to make the screw sink into the hole like a hot knife through butter.
 Save yourself some energy and ask your handyman to insulate your air conditioner lines. It’s probably been at least since last summer since you looked at your a/c insulation, but I’ll bet it needs attention.
You have several lines coming from the wall leading to the a/c unit on the ground. The large diameter line needs to be insulated. It is the cold line as the unit is running. The insulation around it needs to be free from damage and properly secured. The foam insulation needs to be the correct size with the entire length contacting the pipe. You don’t want any gaps between the pipe and the insulation. Measure the diameter of the pipe for a good fit and get the correct size.
Slide the insulation over the pipe. Peel off the self-sticking tape on either side of the cut along the insulation’s edges (the slit allows you to slide the insulation over the pipe. Cut the insulation to length and start at one end and push the sticky surfaces together to close the insulation. You may need to add some tape along this area if you think it may come apart.
Finally, it is a good idea to use some spray foam in the metal shrouds that lead into the wall. This will add another level of insulation, as well as seal out any air leaks that would rise into the wall cavity.
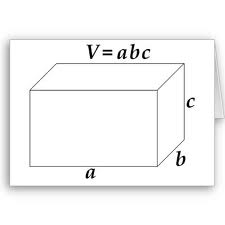 Why would a handyman need to find the volume of a house? I’m sure there are many reasons, but a few come to mind. Sizing swamp cooler cubic feet per minute (cfm) requires a volume of a home, as does running a blower door test for energy efficiency. You need volume figures to ultimately determine proper ventilation requirements.
Determining the volume of a house can be tricky. If all houses were perfect rectangles, the job would be easy, but add in vaulted ceilings and interesting architecture, and the job gets more challenging.
I try to break up the house into basic shapes. It’s much easier to do the calculations that way. As you walk through the house, sketch the floor plan as if it were made of simple shapes. Take the volume of these shapes and add them together for the volume. Most of your shapes will be boxes of various dimensions. For vaulted ceilings you will need to calculate the volume of a triangle. For a box, be it a cube or rectangular box, the formula is: length x width x height. For a vaulted ceiling (in the shape of a triangle), the formula is length x width x height/2.
When you have all of your volumes from the various parts of the house, add them up for a cubic foot total.
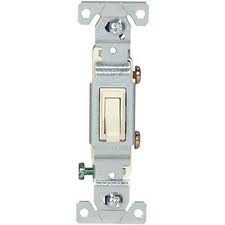 A common handyman task is to diagnose electrical switches and light fixtures. Although it seems nearly impossible, there are times when all the bulbs will go out, especially when you are not there to replace them. Sometimes people get lax and let one burned out bulb go, then another, until finally there is only one working bulb left in a fixture of eight. Naturally, you wouldn’t consider that possibility, but you could have taken a working bulb from another fixture, or even stuck a tester into the socket to check for power before you went to the trouble of replacing the switch.
An essential tool for testing switches is a continuity tester. You can also use a multi-tester by turning the dial to read “continuity”.
Light switches are plastic but have metal parts to conduct electricity. A continuity tester checks if these petal parts are worn or broken, and it will light up if the switch is good, while a multi-tester has a needle or meter that will spring to life. You can test a continuity or multi-tester by touching the probes together and checking for the light or moving needle.
Before you start removing switches from the wall, make sure you turn off the power at the main panel.
To test a standard wall switch, touch one of the probes to each of the screw terminals. When the light switch is in the off position, the tester should not show continuity. But when the switch is on, the light should glow. If the switch fails to do this, then replace it.
For a three-way switch, touch one of the probes to the dark common terminal and the other probe to one of the traveler screw terminals (there are two). Flip the switch off and on. The light should illuminate in one of the positions but not both.
Now touch the other traveler terminal and flip the switch. The light should illuminate in the opposite position from the first traveler terminal. If it doesn’t, replace the switch.
You might also find timer and time-delay switches. These have dials on them and they are tested in the same manner as other manual switches. A timer switch can be tested by touching a probe to the red wire and the other probe to the black wire. Rotate the timer until it passes the “on” tab and the tester should glow. Rotate it again until it passes the “off” tab and it should turn off.
A time-delay switch is one that could be found to turn on a heat lamp in that you have to rotate the dial past a certain point. Then, it counts down on its own and shuts itself off. To test this one, touch a probe to each wire and turn the dial. The tester should glow until the switch turns itself off.
Electronic switches, like programmable or motion sensor switches, are also tested the same way. Each of these will have two wire leads coming out of them. It’s the same deal: Touch one probe to each wire and flip the manual lever from “off” to “on”. The tester should glow in the “on” position, but not the “off” position.
You can see the commonality with testing switches. Before you go through the hassle of testing the switch, try just replacing a bulb. Your weekend will thank you.
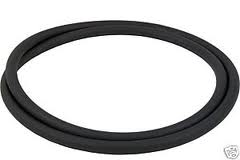 A handyman doesn’t often work on pool equipment, but when you do, you don’t want to get any air into the system. Assuming the equipment is in good shape, you need to pay attention to the o-rings. You will find them where two parts (halves) of the equipment meet. You will see them where the top and bottom of the filter meet, and where the top of the pot joins the bottom. You probably won’t be getting into the valves, but if you do, there will be one there as well.
When you have the equipment apart, the o-ring will sit in a groove. Use a cloth or towel and clean out the groove where the two halves meet. It will be somewhat greasy which will attract and hold small amounts of debris. Clean out this debris as this can allow air into the system.
Use a product specifically designed for pool o-rings and gaskets. You can buy a tube at any pool store. Squirt some product in the palm of your hand and place the gasket or o-ring in your hand. Use your other hand to pull the o-ring through the palm of your hand. You want to squeeze your lubricated hand around the o-ring as it passes. This will lubricate the o-ring as it passes through your hand and clean the debris off of it as well.
 Some shelving is built on site by a handyman, and some is purchased at a store and brought home for assembly. The store bought shelves are certainly faster, but typically don’t support as much weight as the site-built shelves. The biggest challenge is supporting the weight, and that falls to the brackets.
You really have to consider how much weight you are placing on the shelving, as well as how large the shelving will be. If you are building wood shelves, use plywood rather than particle board. Particle board will sag. For the supports, some people use metal “L” brackets which are fine so long as they are not overloaded. If you use metal, make sure the top leg extends to the edge of the shelf. In other words, don’t use a 4 inch bracket for a 12 inch shelf; use a bracket that will support both the shelf and its weight.
Other folks use wood supports. You can make your own in the shape of a triangle with the hypotenuse at a 45-degree angle. This would span from the front edge of the shelf to the wall at that angle. You can also screw a 2”x4” to the wall and use it as a ledger. The rear of the shelf would sit on this ledge but the front would need to be supported with a piece of wood at a 45-degree angle.
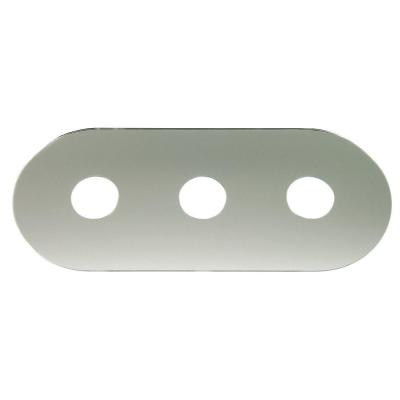 If you have had your handyman work on your shower valve, chances are he had to enlarge the working space somewhat. In the process, the area can get damaged. This is the area right behind the shower handles and if you have tile walls, these can chip or crack. At that point you will be faced with either replacing the damaged tiles, or you may be able to cover them up. A decorative cover, which is also known as a beauty bar, can cover up this area. It basically functions as a large escutcheon plate. You can buy them in whatever finish your handles are in so that they match.
To install it, you will need to remove the handles. The cover will have the holes drilled into it and you can simply push the cover over the stems sticking out of the wall. You can apply some caulking on the back to hold it in place until you get everything situated. On older faucets, you can remove the decorative stem covers, install the beauty bar, reinstall the stem covers and finally reinstall the handles. When everything is back in place, run a bead of caulking around the perimeter of the beauty bar to keep the water out.