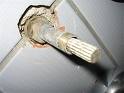
 The other day we were working in a 50 year old house whose bathroom faucet at the bathtub would not stop running. This is a case of replacing (or rebuilding) the stem and seat. The stem is attached to the handle and rises up and down. At the end of the stem is a washer that pushes against a seat to stop the flow of water. Over time, this washer will wear down, or the seat will develop pits that won't allow it to stop the flow of water anymore. These parts need to be repaired or replaced.
So after you turn the water off to the house, prepare for some fun.
1. Remove The Old Handle
This isn't as easy as it sounds. Usually a screw is removed and the handle pops right off. Well in older plumbing, the handle can seem like its welded to the stem. In this case a handle puller can help remove the handle...or break it trying.
2. Remove The Old Stem
Removing the old stem can be a leap of faith. A deep well socket and a breaker bar will usually extract it, but you just hope that nothing else breaks. Once we got the old one out, it was time to go hunting. This stem was nasty and difficult to identify. After searching, we were not able to find a replacement for it. Instead we bought new parts and rebuilt it. But that only solves half of the problem.
3. Replace Or Resurface The Seat
The faucet seat screws into the faucet body and has a hole in the center of it. In this hole you insert a seat wrench to remove the seat and replace it with a new one. If you can't remove the seat, you can use a seat resurfacing tool to smooth out the surface so that the stem washer can stop the water.
Once you reassemble the bathroom faucet, the it should operate as it did 50 years ago. Many modern showers use a single handle to control the hot and cold. Here is how to replace a shower cartridge.
 You notice that there is water on the floor around your refrigerator and decide to pull the fridge out away from the wall to see. Sure enough, there is water behind the refrigerator and the puddle is growing at the icemaker line. First things first, you need to troubleshoot the problem to find out if it is within your ability, or whether you need to call a handyman to do it.
You will notice that behind the refrigerator is a small water line that goes to the wall. In modern houses, there is a small valve that controls the water flowing to the icemaker. Turn this valve off and start cleaning up the water. By the way, in some houses a water line is run from under the kitchen sink and hidden inside the base cabinets. If you don't see a valve right behind the fridge, it may be that it lies underneath the kitchen sink. You can turn off the water at the valve under the sink where this line is fed water.
After you have cleaned up the mess, it's time to turn the water back on and see where the leak develops. It will typically be at the valve behind the fridge, where the water line connects to the valve or icemaker, or that the line itself has a pinhole in it.
If the line is damaged, replace it with a steel-braided line. These are usually guaranteed against leaks for 10 years. If it is the valve, you might be able to tighten the cap nut or you may have to replace the valve. If the leak is coming from the icemaker, check the connection where the line meets the icemaker. You can disassemble it, clean it out and replace a washer, but if that doesn't fix it, you may be forced to call an appliance repair person.
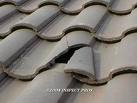 A handyman is asked to do many things, and at some point he or she will be asked to replace a roof tile. Roof tiles sometimes crack when stepped on, or need to be replaced when an overgrown tree knocks one off the roof during a strong wind. Obviously, if you are working on a roof, you have to be careful. Ladder safety is vital.
A big challenge is finding a matching roof tile. This is not as difficult as you might think, and remember it doesn't have to be perfect as the tile will be up on the roof and not as conspicuous.
1. Remove A Roof Tile
If you don't have the damaged tile, get one from the roof and bring it will you as a sample.
2. Visit A Boneyard
Roofing supply companies have areas in their yards that they call the "boneyard". The boneyard is a collection of roof tiles that are leftover, or scrap. Basically, tiles that get picked over to solve a small job. Match up the size and basic color, and style and take it home. If you are just taking one or two tiles, they will probably just give them to you, if you need several, expect to pay a few dollars apiece.
3. Cut And Install The Tile
If you need to cut a roof tile use a grinder with a masonry blade. You must use eye, ear, and breathing protection. The tile will sit on a wood ledger and gas built-in lugs to accomodate it. It's probably a good idea to use some roofing mastic or adhesive to further secure the tile.
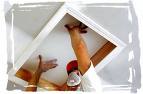 Some homeowners like the idea of using the attic for storage space, and some choose to install an attic ladder, but you can't just leave a big hole in your ceiling.
The hole in the garage ceiling breaches the fire rating, and restoring the rating will take measures that you may prefer not to do. Many homeowners enjoy the attic's storage capacity, but many are unaware of the increased fire risk. It's always safer to repair the fire rating of the ceiling rather than just cover the hole.
It is a code requirement to use fire-rated drywall in the ceiling of your garage. The drywall is five-eighths of an inch thick and has "type-x" stamped on it. It also has noncombustible fibers added to it to achieve fire-resistance ratings, and its thickness slows the transfer of heat during exposure to fire.
If you have a big hole in your ceiling and a fire starts in the garage, it can get into the attic. You can buy a fire-rated access door, but these are typically special-order items and cost several hundred dollars. They are fairly easy to install though.
The fact that you want to cover the hole for cosmetic purposes is personal preference, just be aware that the danger of an attic fire exists.
So, to make your ceiling hole semi-attractive again, you will need a piece of type-x drywall, as well as some molding to hold it in place. Realize that using the fire-resistant drywall panel alone isn't going to restore the fire rating. There will be a gap around the perimeter of the panel, and the panel will be held in place with wood molding.
You want the drywall panel to be slightly smaller than the actuall hole in your ceiling. You can make the panel one-half inch smaller in both length and width, so that when you do go into the attic, the panel will be easy to remove.
You can easily cut the drywall with a drywall saw, or you can use a utility knife and score the paper on one side, break the drywall along the score line, and then cut the paper on the back side.
To hold the panel in place, buy some molding and cut it to fit. You want the molding to have a one-half inch lip along the inside perimeter of the opening. That way, the drywall panel will rest on it as it sits inside the opening. Try using a miter saw and cut 45-degree angles at the ends for square corners and a clean appearance.
Nail the molding to the ceiling and into the ceiling joists so that the nail penetrates the joist by at least three-quarters of an inch. If you feel froggy, you can texture the drywall and paint it to match the surrounding ceiling.
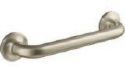 A customer's father was coming home after a lengthy stay in the hospital and he needed some shower grab bars installed to help him maintain his footing as he showered. He wanted some advice on where to install them.
My brother is a licensed Physical Therapist and works exclusively with home bound patients. He runs into this all the time and so I questioned him on his opinions. He said that each situation should be individually evaluated. However, here are the main points:
1. Vertical Bar At Entrance To Shower Or Tub
A 12" bar seems to be a good length, and it is typically located near shoulder-height.
2. Diagonal Bar Along The Back Wall.
This would be a longer bar, typically 36-48 inches, and installed at around arm pit height at its highest point and sloping downward from there.
3. The Length Is Up To The Individual As Is The Finish Of The Bar And The Thickness.
These details would be evaluated on a case-by-case basis. For example, if the patient has smaller hands, then a smaller diameter grab bar would be in order.
4. Don't Forget The Toilet
A vertical bar at the toilet on the wall approx 6 inches in front of knee when sitting and located slightly above the shoulder when sitting, so the patient can pull upwards and go from a sitting to standing position.
If you would like information on how to install grab bars, read my article on Shower Grab Bar Installation.
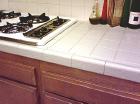 The edge of your kitchen countertop takes a beating. I can't tell you how many houses I've been in where the ceramic edge tiles on a counter are broken or cracked. Either someone drops something on them or hits them from underneath. The result is a sharp edge that needs replacing.
The job gets easy if you have a replacement tile. You can find several colors of white and off-white at home centers, as well as different colors of grout. You will be looking for a V-Cap edge tile. This tile is pre-molded with a round over built in, so instead of creating a corner with 2 tiles, this one tile is shaped like the letter "L".
1. Remove The Rest Of The Broken Tile
You can remove the grout from around the tile you are replacing with a grout grabber tool or a Dremel tool. Once the grout has been cleared, pry up the broken tile with a screwdriver or pry bar.
2. Remove The Old Mortar
Use a flat blade or a scraper and get rid of the old mortar so that you have a nice smooth surface to work with, then vacuum up the debris.
3. Mix Up A Batch Of Thin-Set Mortar
Mix up a small amount of thin-set and let it slake per the manufacturer's specifications (usually around 10 minutes). Use the suggested notched trowel and apply the mortar.
4. Install The Tile
Cut (if necessary) and install the new tile and use blue painters tape to hold it in place. The last thing you want is for the tile to move slightly causing you to do the job all over again. The tape can easily be removed when the mortar hardens.
5. Grout And Clean
Finally, mix up some grout and fill the voids. After that it's a matter of sponging off the excess grout and buffing the tiles with a clean cloth. For more information, read my article on ceramic tile replacement.
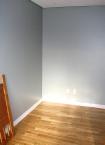 A nice finishing touch in a room is the paint. A big complaint that I hear from do-it-yourselfers is that when they are painting the wall one color and the baseboard a different color, the paint line between them is poor. You've probably seen them...due to the texture on the wall and the roughness of the baseboard, the paint is not very crisp.
What we want is a perfect line between the baseboard and the wall. This is easy to do with a thin bead of caulking and some tape. Use a tube of paintable caulking loaded in a caulking gun and squeeze a consistent bead of caulking along the top edge of the baseboard. The smaller the bead the better, as you don't want a big glob of caulking to paint. Take your finger and, starting in a corner, smooth the bead out along the entire perimeter of the room. If you lift your finger mid-baseboard, the paint will show it, so make one long continuous sweep. When you are done smoothing, let it completely dry.
Getting a perfect line between 2 colors of paint requires that you first paint one surface, let it dry, then paint the other. Which ever you choose to do first, paint beyond where you want the line to fall. For example, if you paint the baseboard first, paint a little of the wall too. Then, use blue painters tape, and in one continuous piece, cover the area you do not want to get the second color of paint on. The edge of the tape must fall on the caulking, so that both colors end up on the caulking. This is crucial because the smooth caulking will allow you to pull the tape and leave a perfect line.
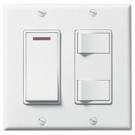 Remember the old skinny light switches that were usually almond color? They were great in the 1970's but now...not so much. It is easy to upgrade that to a more modern rocker-style light switch and while you are at it, upgrade the electrical outlets too. The rocker switches are wider and taller than the traditional switches. You can really go crazy with all the choices you have. Some switches are illuminated, and some don't move at all, instead they operate by sensing your touch.
You can buy new switches, outlets, and wall covers by the box and save some cash buying in bulk. Installing them is easy and requires only a screwdriver. Before you start, take an inventory of the number and kind of switches you will need. For example, the number of regular switches, dimmer switches, 2-way switches, standard outlets, GFCI outlets, etc. It's probably a good idea to get them in white rather than almond, as white looks cleaner is more modern.
Here is some information on how to replace a light switch. Replacing an outlet is virtually identical. Match up the wires to the switch or outlet terminals and connect them in the same positions...just make sure you turn off the power at the main panel.
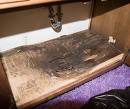 What do you do when you discover a cabinet shelf is sagging? Well to start, it's probably a good idea to remove some or all of the weight off of it. The chances are good that it started sagging due to poor quality of the shelf material, and maybe that the shelf got wet and the weight on it started the sagging process. We see this a lot underneath kitchen sinks...a leak will develop and won't be discovered until it's too late. By that time, the water has saturated the shelf, and the weight of detergent, trash can, water filtration tanks, etc. will cause the sagging.
You can always build a stronger shelf out of ¾" plywood and put a solid edge on it. The edge acts as a brace to stiffen up the shelf. The edge can be made of 1"x2" solid wood and can be painted or stained to match the existing shelves.
When replacing the base of a kitchen cabinet, you really have to plan on the cabinet base getting wet. At some point, there will be a leak and the floorboard will likely be exposed to water for a period of time.
Melamine is a good product to use. It is basically particle board covered by a water-resistant plastic. If water leaks into the cabinet, the wood won't be exposed to the water and won't become damaged. The challenge is that the size of the cabinet floor is fairly large. You can't get a replacement board in there without either cutting it in half or by removing the cabinet support, installing the replacement floor, and then reinstalling the support.
Sometimes the support is held in place with a plastic bracket which can be removed. The other option is to cut the support with a hand saw, install the board, and resecure the support.
Cabinet drawers can also suffer from abuse. Here is some information on cabinet drawer repair.
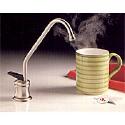 An instant hot water dispenser is a convenient kitchen appliance. Instead of using the regular kitchen faucet and waiting for the water to get hot, an instant hot water dispenser delivers hot water instantly. Very hot water. Although you can set the dispenser to deliver hot water like a traditional kitchen faucet, this dispenser delivers very hot water. In fact, most come pre-set at 200 degrees. You can use them for instant soup, cofee or tea.
Sometimes though, they don't work correctly. However, there are several things you can do before you start thinking about replacing the unit.
1. Press The Reset Button
Some units have a reset button that restarts the unit. If it overheats for example, the heater will stop. Depressing the reset button will restart the unit.
2. No Power At The Outlet
If the outlet that the unit is plugged into is not providing power, the unit will not heat. You may need to reset a circuit breaker or GFCI to restore power.
3. Make Sure The Outlet Isn't Switched
Some outlets are "half-hot" or switched outlets under the kitchen sink. The top half of the outlet is for the garbage disposal to turn it on or off. If the hot water dispenser is plugged into this outlet and the switch is "off", it will not receive power to operate.
4. Adjust The Thermostat
If your hot water dispenser is spitting out steam and water, it is set too high. Conversely, if the water is not hot enough, you need to adjust the thermostat to your desired temperature.
5. Check The Water Supply
If your unit won't deliver a good stream of water, or just drips when you depress the faucet, check to see that the lines underneath the unit are not kinked and that the valves supplying the water are fully open. Also you might check to see that there is no debris in the spout of the dispenser by unscrewing the end piece. Finally, if the water pressure is low (typically less than 30 psi), the unit will not operate.