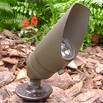
 As you walk up your driveway you notice that half of your landscape lights are on and the other half is off. There goes the weekend. If all of the lights are on up to a certain point and then they are all off, you likely have a damaged cable (the other possibility is that the lights are run by two separate transformers, and maybe one of them needs to be reset).
You can repair the cable, but first you have to locate it. You can get an idea for where it is by following it from the landscape light that is working. It will have a connection from the light to the cable. The cable generally isn't very deep, but you will have to do a little digging. Once you find the cable, look for a break or damage to it. Most of these are pretty obvious as you will see rust from where water has entered an opening in the cable.
You can cut out the bad section of cable and use a cable splice to reconnect the cable. You can find a lot of suggestions on splicing cable that include soldering, etc. I like the splices that are small ridged sections that have sharp points to pierce the cable and maintain the electrical path (they are referred to as "pierce-point"). Some are filled with silicone or jell to fight against water intrusion. Whatever type of splice you choose, make sure they are specifically for direct burial.
 Cutting open a wall to repair a plumbing leak is a pretty big deal. These holes can be a few inches or a few feet large. Once you have repaired the plumbing issue, you have to contend with the drywall repair. That means a good patch, matching the texture, and matching the paint.
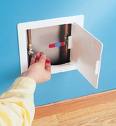
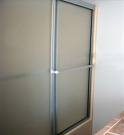
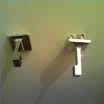
If you want to avoid all the drywall headaches, you can always install an access panel. You wouldn't want this in a conspicuous spot, but it works very well in certain applications. For example, when replacing a shower valve in the wall, it is common to cut the wall open. Your options are either remove and replace ceramic shower tiles, or cut the drywall on the backside of the shower. If the backside of the shower is, for example, in a closet, this is an ideal spot for a plumbing access panel.
The panel will likely be hidden by hanging clothes anyway, and if you ever have a problem with the valve again, you can just open the door on the panel and fix it without having to go through the drywall issues again.
The plumbing access panel is a small door mounted on a frame. The frame is fairly wide compared to the door which allows it to cover a variety of holes from around 6-inches to about 15-inches. It can save a lot of time and frustration. You can paint them to match the color of the wall, or they also come in stainless steel.
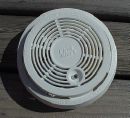 A customer just called saying he wanted to replace his 17 year old smoke detectors. That's about 7 years late, as you should replace them when they reach 10 years old. He was going to try it himself, but he couldn't make the electrical connections work.
Replacing a smoke detector is a pretty basic job. If you don't have to replace the electrical plug, the job will take about 5 minutes. There may be different plug configurations if the old detector is very old, or if you are switching manufacturers. But even then, it's no different than a basic fixture or switch.
Turn the power off to the detector at the main panel and test to make sure the power is off. Remove the wire nuts where the plug connects to the house wiring in the ceiling. Connect the black ceiling wire to the black plug wire, connect the white ceiling wire to the white plug wire, and if you have a 3rd wire (an interconnect wire), connect it to the 3rd plug wire. Use wire nuts for tight connections. The interconnect wire is for systems that are interconnected. That means that if one smoke detector senses smoke, all of the alarms go off instead of just the one that senses the smoke.
Once the plug is wired, install a 9-volt battery in the alarm and plug the alarm into the ceiling plug. Then just mount the alarm to the base plate on the ceiling.
 Sometimes your water heater is just looking for a little attention. After you drain your water heater, there are times that the drain valve won't shut off, or maybe it just decides to start leaking all on its own. Either way, it means you get to perform a little service work.
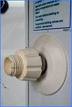
The valve to drain the tank is located at the front of the water heater near the bottom of the tank. Some people call it a drain valve, hose bib, hose faucet, drain cock, etc. They all are a means to drain the tank.
These valves are all usually plastic and are fairly easy to install. You must turn off the water entering the tank. You can do this by the shut-off valve at the top of the tank, or you can turn off the water to the house. It's not necessary to drain the tank to do this repair, but when you open the drain valve you will get a few cups of water that spill out. Think about this: if you have a straw in a glass of water and you put your finger over the end of the straw and pull it out of the glass, the water stays in the straw right? Well it's the same for your water heater, as long as nobody in the house opens a hot water faucet you will be fine. However, if someone does open a faucet and allows air into the hot water line, you will get plenty of hot water running out of the drain valve...just like if you remove your finger off of the straw.
Replacing the valve is a matter of unscrewing the old one off and twisting a new valve back on. Just wrap the new valve's threads with several wraps of Teflon tape to seal out any leaks.
 I visited a customer's home yesterday after she complained about water hammer. Water hammer is a loud banging noise caused by a shock wave when the flow of water is abruptly stopped. Electric valves, such as washing machine valves. You can also get water hammer if you manually shut off a valve, for example if you slam you hand against the knob on a faucet. Here is an article on installing water hammer arrestors.
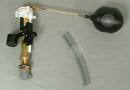
That isn't what I found at the customer's house. Instead, of a loud "banging" of the pipes, I found a repeated rumbling noise, almost like a machine gun. The vibration was enough to drive anyone crazy. This turned out to be a toilet fill valve that wouldn't shut off completely. When someone would flush a particular toilet, the water would refill in the tank as normal, but the fill valve wouldn't stop and consequently let water flow down the overflow tube and into the flush valve. The sound was the water repeatedly being turned on and off by the defective valve. This occurs more often with the old-style ballcock, the rod and float, than the newer style.
A simple job of replacing the old-style toilet ballcock with a new toilet fill valve solved the problem.
 If you're at the point where you have to lift up your sliding tub doors to get into the shower, you need to do a little door repair. It is usually the case that the wheels at the top of the door need to be adjusted.
Sliding tub doors, or sliding shower doors, hang from a rail at the top of the opening. There are wheels at the top of these doors that ride in grooves on the rail. Over the course of time, gravity and water play a role in throwing these doors out of alignment. There are a set of wheels on each side of the door. In many cases, it is only one side or the other that needs to be adjusted, and you can do it with just a screwdriver.
Before you try adjusting the door rollers, make sure that the rollers are in the track. Many times, the rollers have come out of the track and the door gouges the bottom rail. If you see metal shavings and scratches, this is probably what has happened. Once the rollers are back into the track you can decide if they need adjusted.
A phillips head screwdriver is all that is needed to adjust the wheels. You typically have to remove the door out of the top track to gain access to the screw. Lift up the door and swing it out to remove it. If you loosen the screw and move the wheels downward, the door will ride higher, that is to say there will be a larger gap between the bottom rail and the bottom of the door. This is good if your door has been grinding the bottom of the rail. Adjust each wheel assembly until the door is level and can fully close to each side of the tub or shower. This will also help to prevent water from leaking out of the tub/shower enclosure.
If the wheels are damaged or broken, take them with you to get a replacement. When you get them back home, replace and adjust them.
 Cabinet drawers seem to be made with cheaper and cheaper material. Have you noticed that if you set something moderately heavy in the drawer that the bottom will flex? It's almost like the drawer is ready to pop out of the groove that it sits in. Well, here is a handyman fix for the weak drawer bottom blues.
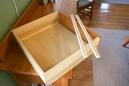
Builder grade cabinet drawer bottoms are made of a thin plywood or hardwood. It sits in a groove and moves freely in it. Larger cabinet drawers are more suseptible to the bottoms bowing out from the weight and consequently benefit the most from reinforcing it.
You can reinforce the drawer bottom by using a piece of plywood. Cut a 1/4" piece of plywood to fit under the drawer bottom but leave a 1/4" gap around the perimeter of the plywood. You will need to remove the drawer and turn it over. Once you have cut the plywood to fit, use yellow carpenter's glue and glue the plywood to the underside of the drawer, leaving a uniform gap around the perimeter. The gap will allow for seasonal movement yet make the drawer bottom rock solid. Place some weight on the mating pieces until the glue cures, approximately 24 hours.
 A friend called with a door problem. His front door was sagging a little bit and he was tired of lifting it up to get it to close and latch. He is no dummy and can generally tinker with something and get it to behave.
He tried to tighten the hinges but the door was still dragging. Over time, this door had been opened and closed hundreds or thousands of times, and gravity had helped to bring the door to its knees. When a door is installed, the typical screws used are only ¾" long. This is fine for the door-to-hinge connection, but for the hinge-to-jamb connection, it is too short, particularly at the top hinge.
There are a thousand things that could go wrong with a door, and one long screw can fix many of them. After I removed one of the short screws, I used a 3-inch screw and screwed it into the top hinge of my friend's door jamb. The length of the screw is important. You want the screw to be long enough to drive through the door jamb and into the rough framing of the house. This will give plenty of force to pull the hinge, and consequently the door, snug against the jamb. Since the screw is sunk into the rough framing, there is little chance of it working its way out. This repair should last a long time.
 I can't tell you how many times I go into a house and the toilet paper holder is about to come off of the wall. People lean on them, use them as a grab bar, set coffee on them...and this Las Vegas handyman gets to fix them. These are held in place by some pretty flimsy hardware.
It's usually the case that one or both of the arms get loose and the plastic spring-loaded tube falls out. Most people can fix these but it takes a very small standard screwdriver (think eyeglass repair). Underneath each arm is a small screw that tightens against a bracket screwed to the wall. In most cases, if you can't just tighten the small screw, the bracket at the wall has lost it's bite and is loose. So you have to unscrew the arm and remove it to get access to the wall bracket. This will likely be source of the problem.
Over time with people putting weight on these, the weak wall anchors will create an oblong hole caused by the movement. You have a couple of options here. You can use a larger wall anchor, a molly bolt (aka butterfly bolt), or an EZ anchor. You could also move the location of the toilet paper holder, but if the decorative arms don't cover the old holes, you will have some additional repairs.
Once the bracket is secured to the wall, tighten the small screw on the arm to complete the repair. Then you can load the roll of toilet paper and you're in business.
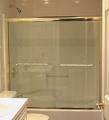 You get done showering and there is water on the floor outside of the shower. How does this happen? Well, if you are the owner of a tub/shower enclosure (aka tub doors), it may be the result of a poor installation and lack of caulking.
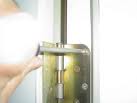
Many people get tired of a shower curtain. You have a tub/shower combo and finally decide to install some sliding doors on the top of the tub. If these aren't installed correctly, you can get a leak, particularly if they haven't correctly done shower caulking.
The tracks to these types of doors are secured to the top of the tub with a couple of thick beads of caulking, which will keep water from running underneath the track and over the top of the tub. This bottom track is held in place by the side rails which sit in the bottom track and keep it place. This connection must be caulked or when water gets into the track it will leak out and over the tub. These side tracks are then screwed into the walls of the surround.
Once the enclosure is in place, the inside perimeter of the tub enclosure is caulked to keep water from leaking. You should have caulking under the bottom track, where the side tracks meet the bottom track, and along the inside perimeter of the enclosure.
Additionally, the tub doors should be adjusted so that they completely close against the side rails.