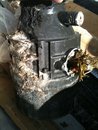
 I'm sure there are many ways to screw up a garbage disposal, but here are 6 common ones.
1. Don't Remove The Knockout Plug
When installing a new disposal, if you have a dishwasher you are supposed to remove a small plug in the side of the disposal inlet. This allows the dishwasher to drain into it instead of draining out of the air gap and onto your counter. When someone calls saying they have water on the countertop, I always ask if the disposal is new. If it is new, whoever installed it forgot to remove the plug.
2. Don't Trim The Airgap Hose
This hose runs from the air gap (that little nubby thing on top of your counter) to the garbage disposal and is made of thick rubber. If this hose is even slightly too long, it will tend to crease and obstruct the flow of water as the dishwasher drains. You guessed it...more water on your counter.
3. Don't Fully Tighten The Disposal's Collar
Where the disposal mounts to the underside of the sink is a collar will little tabs around it. These round tabs allow you to stick a screwdriver in and fully tighten it until it "bottoms out". Well a disposal vibrates as it grinds, especially when it's full of food, and if the collar isn't totally tight, the disposal could work it's way loose.
4. Grind Things You're Not Supposed To
We all know that there are foods that don't belong in a disposal. Grind them at your own peril. Things like potato peels and celery are kryptonite to a garbage disposal. These types of things will cause a backup and lots of unpleasant smells.
5. Let Food Scraps Pile Up In The Disposal
You have a disposal, right? Then turn it on! It is surprising to me how many people will put food down there but won't grind it up. The smell of rotting food will make you run.
6. Don't Upgrade To A Stronger Disposal
For another $20.00 you can go from a 1/3 horsepower disposal to ½ horsepower. The money is well worth it. A stronger disposal will plow through things that the weaker one will not, and that means you get to unjamb the weaker one or call someone who can.
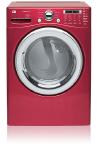 Every week, a customer will call asking to convert their laundry area from gas to electric. Specifically, they have an electric clothes dryer but they don't have the electric plug in the wall. Typically, these are customers that have moved from the East coast out to the west. So they move into a house with a gas hookup but without the 220 volt electical outlet to power their dryer.
They usually don't like my answer. When I ask them why they would want to switch from gas to electric, they say that their clothes dryer runs on electricity. Fair enough. I tell them that an electrician is going to charge them a minimum of several hundred dollars to run power to the location, plus electricity is more expensive than gas to power their dryer over the next umpteen years. The answer is to buy a gas dryer.
Over the long run, it's going to be cheaper to purchase a gas dryer. Although a new gas dryer costs slightly more than the cost of a new electric dryer, the cost per load of clothes is lower for a gas dryer. A gas dryer heats up faster and runs hotter than an electric dryer. According to Southwest Gas, a gas dryer will dry clothes 20% faster than an electric dryer. According to NV Energy (at the time of this writing), drying a load of laundry in an electric dryer costs $.17 per load while a gas dryer costs $.05 per load. If you are considering replacing your washer and dryer, here is an article on how to install a washer and dryer.
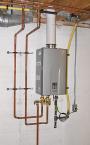 A customer called the other day asking about a problem he was having with his tankless water heater. He said it was just installed and he bought it new from a home center. His complaint was that when he ran a faucet everything was fine and he got hot water, but when he ran a shower or bathtub...no hot water!
I started asking questions and he sheepishly told me he paid someone he just met to install it. Apparently, he met the guy in the parking lot of the home center and he was believable enough to get the job. The reason he was calling me was that he couldn't get ahold of the guy he met in the parking lot. Hello? Are you serious? This customer paid $1,500.00 for a new tankless water heater and let some shark trolling the parking lot install it on the cheap. This guy made a bad decision and he knew it.
After speaking to the customer, it was pretty obvious the installer didn't know what he was doing. This was a gas tankless water heater, and although they will save energy on your monthly gas bill, they demand a lot of energy when they are actively heating water. Most of our homes have a ½" gas line which is fine for a typical tank-style water heater. For a tankless, the gas line needs to be upgraded to a ¾" gas line. That was one of the problems with this installation. The installer (and I use the term loosely), simply added a ¾" adapter onto the existing ½" gas line. Big mistake. Although the guy was able to connect the gas line to the water heater, it still was a ½" gas supply. A new ¾" line needed to be run to properly supply the water heater.
With a tankless, there are typically venting considerations also, due to the venting being much closer to the burner, and consequently burning much hotter. The point is, this probably isn't a job for someone inexperienced in installing a tankless water heater.
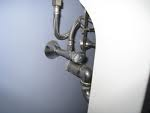 If you have a leak on the water supply line heading to a faucet (or a toilet), you need to do a little inspection. This is a very common repair...a slow drip coming from an angle valve or water supply line. Just because the water is dripping off of the valve doesn't necessarily mean the leak is at the valve. The valve just happens to be the lowest (and last) fitting before the direction changes, and so the water drips from the valve.
You need to check the length of the water supply line for any wetness. It may be that the faucet is leaking and the water is traveling down the supply line and finally dripping off of the valve. An easy way to determine wetness is to get some toilet paper and touch the water line with it. It will pick up any wetness and clue you in as to where the leak is originating.
I would start high near the faucet (or toilet) and work downward. The most likely areas are going to be where you have water connections. For example, where the angle valve attaches to the pipe in the wall, where the supply line attaches to the angle valve, and where the faucet attaches to the supply line.
Once you have found the cause of the problem, the repair of these items are all easy. If the supply line is corroded, you may have to replace it, but you can first try a new rubber washer. If the angle stop is dripping, you may have to replace it, but first try to tighten the nut just underneath the handle. You might even need to replace the packing underneath the nut to stop the leak.
Here is an article on repairing a drain leak at a kitchen sink.
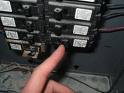 A realtor called yesterday saying that she had no power in her garage and several other outlets. This is a pretty common call and so rather than head out to her home and start troubleshooting, I asked her to do a couple of things. Her husband is not afraid to get his hands dirty, and she said he had already replaced the GFCI outlet (ground fault circuit interrupter) and they still had no power.
I asked her to go to the main electrical panel and check to make sure that none of the breakers had tripped. She said she had already done that and the breakers were all on. I then asked her to walk around the house and check to see if any other GFCI outlets had tripped (GFCI outlets have a button that says "test" and another button that says "reset"). These outlets will trip off and stop the power flowing to the outlets downstream of it, if the outlet senses a ground fault. She hastily said she had, but I doubted it. Okay, so she did the easy stuff and still had a problem.
Upon arrival at the house, the first thing we checked was the main electrical panel. Sure enough, a circuit breaker had tripped off. We flipped it back on and her problem was solved. She was embarrassed.
Typically, when a breaker trips, it will end up sitting in between the "on" and "off" positions. It is pretty obvious when this happens. You first need to push the switch all the way to the "off" position and then flip it to "on".
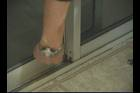 Sometimes getting your sliding glass door to open and close takes raw, brute strength. Your door can certainly be improved with a little tuning up...If you clean, straighten, and lubricate the door, it will slide much easier.
The track of the sliding glass door is where years of nastiness builds up. Dirt and oil combine to make a sludge that can get into the doors wheel bearings and cause them to break down. Sliding glass door rollers are not always metal either, some are made of plastic.
Use a small standard screwdriver and scrape up all of the sludge in the track. Then use a clean cloth and wipe up any remaining remnants of dirt. You will need to move the door back and forth to get access to the entire length of the track (assuming you aren't removing the door). Once everything is nice and clean, check to see that the track is in good condition. If the track is bent and rubbing on the door as it moves, use a block of wood and a hammer and tap the edges back into place.
The sliding glass door rollers can be adjusted for height using a screwdriver. At the front and rear edges of the door are holes that allow you to insert a screwdriver in them. Inside the holes are screws that raise and lower the rollers. Adjust the rollers so that the door is level and not rubbing on the track. If you are considering replacing your rollers, read this article on how to replace sliding glass door rollers.
Once the door is level, you can use a graphite or silicone spray to lubricate the rollers. I would avoid using WD-40 as it tends to attract dirt and will shortly gum up the surfaces.
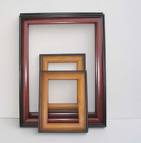 Making your own picture frame is an easy carpentry job. You will need a few specialized tools or you can get creative.
As is frequently the case, the level of difficulty depends on the look you're creating. You can use moldings for the frame and generally these are finished by either painting or staining and varnishing. As far as the molding material, you can choose regular base molding or crown molding. The latter will give the picture some depth.
The size of the picture will dictate the frame's dimensions. For example, if you have a 5"x7" picture, you don't want a frame that is 6 inches wide, as it would look disproportionate and overwhelm the image. Choose a width and style that will accent the picture, but not steal its thunder.
You will also need some specialized tools. A router, for example, will cut a groove in the back of the frame to accept the glass, matting and picture. A bisquit jointer will cut a slot in the mitered corners to lock them together, and special clamps will hold the frame together until it dries.
When you choose the frame's material, but a single length of molding. This is important if you will be staining the frame to accent the grain of the wood. When you cut the mitered corners, you will start at one end of the molding and cut along the length of the piece, following the grain around the frame so that it looks like the grain is one continuous segment of wood.
Before you cut the corners, grab the router and cut a rabbet (a groove) using a rabbet bit with a pilot bearing. The rabbet will hold the glass and picture and make it so that it is recessed into the back side of the frame.
Run the router from left to right on the inside edge of the molding. Make sure the molding is clamped to your work surface and slowly move the router.
Wear eye, ear, and breathing protection as you use the machine. You can rent a router for less than $20, or you can buy one for about $60.
Now you can cut the mitered corners. You will have four lengths of molding with a 45-degree cut on each end. Make sure you measure correctly.
Then, using a miter saw, cut the angles to length. Dry-fit everything together and make sure your corners contain no gaps.
To connect the mitered corners to each other, I prefer a biscuit jointer, as it cuts a slot in each edge of the miter. You will slather a football-shaped "biscuit" with glue and it will sit in the slot.
Mark the midpoint of the edge and cut the slot on each miter. There are different sized biscuits, but use the smallest one necessary. cover the biscuit with yellow carpenter's glue as well as adding glue inside the slots.
Place the biscuit inside the slot and bring in the other side of the molding to form the corner. The biscuit will slightly expand as the glue dries, helping produce a rock-solid joint.
As the glue is drying, you will need to clamp everything together to keep it nice an square. There are clamps made specifically for picture frames that use rods you can adjust to square up the frame.
You can also use corner spring clamps, or a band clamp and cinch the frame tightly. Wait at least 24 hours before you remove the clamps.
After everything has dried, you can install a piece of glass, the matting and the picture. Then just install a picture hanging bracket on the back of the frame, and you are ready to start admiring your work.
By the way, if you are looking to add a dramatic look to the room, I can send you my old high school picture. It's as dramatic as they come, especially when you see my hairstyle.
 Kids like to throw things right? Would you like to guess what happens when your child throws a shoe at your mirror? That's right. You get to replace the mirror.
Removing a broken mirror can be dangerous. They are sharp and additional pieces can fall off of the wall and shatter while you are working on or around them. Always use gloves and eye protection when doing this. After removing what's left of the mirror on the wall, you will likely have some drywall holes...in some installations hot adhesive is used and removing the mirror can leave some holes in the wall. You can certainly do some drywall repairs, but they don't have to be pretty as you will be covering up the area with the new mirror anyway.
You can use mirror mastic to glue the mirror to the wall. This is sold in tubes and fit into a caulking gun. Basically, you will lay down some thick beads of the mirror mastic and push the mirror to the wall. If you aren't using any other type of fasteners, it would be a good idea to tape the mirror to the wall until the mastic sets up and reaches its full holding strength.
Some mirrors sit in a track which will help hold it, and still others have clips around the perimeter. The more methods to hold the mirror in place the better.
 If you've ever had to patch drywall, you know that it is a process. After you patch the hole, you have to tape the patch and float out some drywall mud (compound). Typically you have to sand the mud after it dries to level out the patch with the surrounding area. Then you can texture the patch, if necessary.
Sanding the patch is a very messy job. If you are careful, you may not have much sanding to do. If at the end of the mud job you can smooth out the mud and get most of it off with your taping knife, you may not have much to sand away anyway.
The sanded drywall mud is a heavy dust that seems to cake on everywhere it lands. The cleanup of sanded drywall mud is awful. It will clog vacuum filters, and you will have to sweep it off of hard surfaces many times. One alternative is to use a damp sponge. You can wring out a sponge until there is no water left in it, and then use a slight swirling motion on the mud. When the sponge gets filled with drywall mud, dunk it in a bucket of water and again wring it out until it is just damp. This will keep the clean up to a minimum. Once the drywall patch is flat, you can texture and paint it. Here is some additional information on drywall repairs.
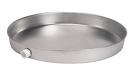 You've probably been through it. The water heater leaks and ruins the drywall it is surrounded by. Water saturated drywall may sit there for weeks or months until you notice the leak at your water heater. And to think the damage could have been prevented...with a drip pan.
A water heater drip pan catches the water that leaks and diverts it to wherever you pipe the drain. You'll have to figure out whether to repair or replace your water heater, but the pan will at least save your drywall. Incidentally, the best time to install a drip pan is when you are replacing your water heater. Installing a drip pan under an existing water heater is about as much work as installing one when replacing the water heater anyway, since you have to drain and move it.
Many people ask if they can install a drip pan without draining the water heater. A gallon of water weighs just over 8 pounds, so if you have a 40 gallon tank, you are looking at 320 pounds of water plus the weight of the tank. Don't even think about it. You must drain the water heater!
Once you turn off the water heater and drain it, it is safer to disconnect the flexible copper supply lines and remove it off of the stand rather than trying to lift it up and sliding the pan underneath.. Once you have the stand clear, you can set the pan down and place the water heater inside the pan (the pan is approximately 3 inches tall). With the pan down, you can run the drain line to the exterior or wherever is appropriate.