Old Bathroom Faucet Stem And Seat Repair In 3 Steps
 The other day we were working in a 50 year old house whose bathroom faucet at the bathtub would not stop running. This is a case of replacing (or rebuilding) the stem and seat. The stem is attached to the handle and rises up and down. At the end of the stem is a washer that pushes against a seat to stop the flow of water. Over time, this washer will wear down, or the seat will develop pits that won't allow it to stop the flow of water anymore. These parts need to be repaired or replaced.
So after you turn the water off to the house, prepare for some fun.
1. Remove The Old Handle
This isn't as easy as it sounds. Usually a screw is removed and the handle pops right off. Well in older plumbing, the handle can seem like its welded to the stem. In this case a handle puller can help remove the handle...or break it trying.
2. Remove The Old Stem
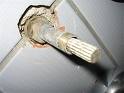
Removing the old stem can be a leap of faith. A deep well socket and a breaker bar will usually extract it, but you just hope that nothing else breaks. Once we got the old one out, it was time to go hunting. This stem was nasty and difficult to identify. After searching, we were not able to find a replacement for it. Instead we bought new parts and rebuilt it. But that only solves half of the problem.
3. Replace Or Resurface The Seat
The faucet seat screws into the faucet body and has a hole in the center of it. In this hole you insert a seat wrench to remove the seat and replace it with a new one. If you can't remove the seat, you can use a seat resurfacing tool to smooth out the surface so that the stem washer can stop the water.
Once you reassemble the bathroom faucet, the it should operate as it did 50 years ago. Many modern showers use a single handle to control the hot and cold. Here is how to replace a shower cartridge.