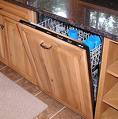
 If you've been looking to upgrade your kitchen, particularly you appliances, you might consider changing the panels on your appliances. As a handyman, I have replaced panels and it really makes a difference. It is a quick job and it is cheaper than buying new appliances, assuming your current appliances are in good shape. You can change the panels in your dishwasher and refrigerator for a simple color change, or install different styles, such as wood panels to match cabinet doors.
The manufacturer of your appliances may carry panel kits for this or you may have to buy from suppliers. You must provide your model number and dimensions for them. Some cabinet manufacturers may also carry panels, or at least create one for you based on your measurements. You will want to let them know if the door panel has a hinge on the right or left side of it.
Once you have a suitable panel, it is a matter of unscrewing the retaining pieces, pulling out the old panel and installing the new one. The dishwasher will have a base panel and a larger main panel underneath the controls. The refrigerator will have various configurations, whether top and bottom or side-by-side.
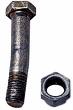 A neighbor was working on a project in which he couldn't remove a bolt from a piece of metal. He was working with a set of channel locks and was gradually chewing away the corners of a hexagonal bolt head into a round head. That's when he asked the handyman for help.
A couple of ideas came to mind.
1. Try To Tighten It
I know it sounds counter-productive, but sometimes if you try to tighten the bolt first, it might move enough to allow you to back out the bolt.
2. Use A Larger Wrench
You can gain leverage with a larger wrench or even a wrench with an iron pipe slipped over the handle for more leverage.
3. Try Some Heat
Apply the tip of a torch to the head of the bolt to expand the metal. Let it cool and then add some penetrating oil.
4. Grind The Surface
If the head of the bolt has become round, try grinding off two opposing sides of the bolt's head so that you can use a wrench on it again.
5. Cut Some Grooves
Use a hacksaw blade (or 2 of them side-by-side) and cut a slot in the middle of the head. You can place a large screwdriver in the slot and may be able to unscrew it.
 We went to see a customer who called about a leaking toilet tank. There was a leak in between the tank and the bowl, and the customer said he had removed the tank to see if he could find the problem. When he couldn't find anything obviously wrong, he reinstalled the tank and it leaked worse. That's when he called this Las Vegas handyman.
When we looked at the tank, the problem was fairly obvious. The toilet tank had a crack from one bolt to the other. Although this may not have been the cause of the original leak, it appeared he over-tightened the bolts and cracked the tank. This caused the more predominant leak.
I'm guessing that the flush valve was initially leaking but now the bigger problem is that the tank needs to be replaced. Some decisions need to be made here. If the toilet is inefficient, it's probably a good idea to buy a complete toilet and make up your expense in water savings. If you opt just to replace the tank, you might find a match, or you may have to buy a generic tank of the same color. The important thing here is to get the same hole pattern in the new tank. Some have a 2-hole pattern and some have a 3-hole pattern in a triangle shape, so measure the distance from the holes before you buy. While you are at it, replace the flush valve, fill valve, and the flapper. Just don't overtighten the tank bolts.
You can see why it might make sense to buy a new toilet, especially if you can get rid of an old inefficient model in exchange for a water saving model.
 I was at a house the other day and the customer shut her kitchen cabinet door and it slammed so loudly against the cabinet that I thought the pictures would fall from the walls. It was a bare wood-on-wood sound. I looked at her cabinets and most of the door bumpers were gone. Time for a handyman rescue.
Cabinet door bumpers are those little rubbery pads that cushion the door from slamming against the cabinet. They are usually at the top and bottom of the doors, although if it is a large door, there may also be one in the middle of the door.
I don't know if it was the finish on the cabinets or cheap door bumpers, but the majority of them were missing. The cheaper door bumpers look like felt, and the next step up in quality is a bumper that looks like a stiff foam pad.
The door bumpers I like best look like clear rubber. They are firm but absorb the impact of the door closing against the cabinet and will last. These simply are peel-and-stick, but before you install them you might want to clean off the residue from the old bumper. For a few dollars you can do the entire kitchen. By the way, they also work great on drawers.
 At some point or another you or your handyman will have to replace florescent tubes or a ballast in a light fixture, and that means removing and re-installing the plastic light diffuser. People also call these a lens, but regardless, I have learned the hard way, that they break...easily.
These are basically 2'x 4' pieces of very thin and brittle plastic. One side is smooth and the other has a texture to it to diffuse the light as it shines down into the living space. These large, thin pieces of plastic are very flimsy and are prone to breaking or cracking when they are handled. This leads to replacing them.
Very often these pieces don't exactly fit into the space which means they need to be cut. This is not easy to do since they are thin and brittle. If you try to cut them with scissors they will chip, although if you are lucky the chip will be small and may be hidden by the frame.
I have found the easiest way to cut them is with a straightedge and a sharp utility knife or razor. Place the plastic diffuser on a hard surface with the smooth side facing up. Place the straightedge on top of the sheet and press down firmly enough to hold it in place, but not so hard that you crack the panel. Use the utility knife or razor and make light passes along the straightedge to score the sheet. Press a little harder each time to score it deeper and deeper until the pieces separate.
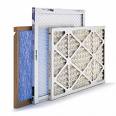 Before, people used air conditioning filters to protect their air conditioning and furnace equipment. That is still their main purpose, but they also purify the air in your house, and can even add a pleasant scent to it. By the way, it doesn't take a handyman to install them either.
Your heating and air conditioning system is most efficient when the air flow is at its peak. If your air conditining coil or ductwork is clogged, then the air flow will be poor, much like you trying to run a marathon with a barlap sack covering your nose and mouth. Your system would have to run longer to heat or cool the same amount of space.
The wise people who design air conditioning systems placed a filter at the spot where air enters to get rid of the gunk that might cause a clog.
If you don't use a filter or just leave a clogged one in long enough, the coil will get so stopped up that the air conditioning evaporator coil will freeze. Then you have to call a technician to make repairs. The cost will likely set you back more than the price of a lifetime's worth of cheap filters.
You can buy the cheapies for under $1 or you can spend several hundred dollars on filters that require electricity to operate.
The cheap filters are composed of either polyester or fiberglass, and can effectively protect the mechanical equipment, but they must be changed monthly, which is no big deal.
The next step up is a pleated cotton/polyester blend filter that should be changed every 90 days, according to the manufacturer. They sell for around $5.00 per filter. they cost a little more but last longer and trap more particles.
At the next highest notch in quality is a filter 30 times more efficient than fiberglass filters.
They can trap airborne allergens, including pet dander, mold spores, bacteria, dust, smoke, and smog particles. These are typically 90-day filters and cost $10-$15 each.
There are permanent and washable electrostatic filters that use electrically charged polypropylene and polyurethane filtration material that attracts airborne particles like a dog to its dinner.
These filters typically carry a lifetime warranty, but you still should clean them once per month.
Finally, there are electric filters that require good old electricity to operate. They are at the top of the food chain, costing several hundred dollars. Generally, the more you spend, the better the filter.
Installing a basic filter can be accomplished by any third-grader not afraid of standing on a ladder. Unclip the grate at the intake register, remove the old filters, and stick the new ones in. Pay attention to the arrow on the frame of the filter as it tells you the direction of the air flow.
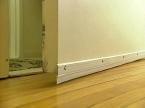
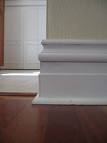 If you've ever installed baseboard, you've probably experienced the frustration gaps in the baseboard. These are not defects in the baseboard, I'm talking about "operator error". Not that it would totally be the installer's fault, but let's face it, you installed it.
Walls don't run perfectly straight, or maybe there is an issue with the flooring...whatever the reason, you need to make the job appear to be perfect.
If you or your handyman are installing baseboard that will be painted, you are in luck. Caulking can make lots of gaps go away. In fact, I know production installers that don't even miter the inside corners. Instead, they cut all inside corners to 7-degrees, put the ends together and caulk the entire corner. Most people wouldn't even notice once it's painted.
For the rest of us who try to do a nice job, you will miter the inside corners. This will get the corners very close and allow you to use a minimal amount of caulking to conceal the gaps. Once the caulking dries, the paint will blend everything in.
If you are installing hardwood baseboard that will be stained and varnished (i.e. very noticeable and difficult to conceal gaps), you can also cope the inside corners. Coping is the practice of cutting the profile of the baseboard into the adjoining piece. It is time consuming and exact work...not something you would want to spend the time on unless you are using baseboard that will be stained and varnished, such as oak or maple.
For outside corners, you have a couple of options. You can increase the miter cut by 1 or 2 degrees which will give you a tight corner at the front, but a tiny gap at the wall. This can then be caulked and painted. You really don't have the option of caulking if you are going to stain and varnish the wood. Instead you can burnish the corner. Burnishing compacts the wood fibers. If you have a small gap at the front of an outside corner, you can burnish it by using the round shank of a screwdriver. Run the shank along the gap and the wood fibers will compact together and close the gap.
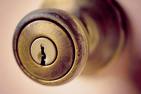 I was at a house yesterday and the door knob was literally falling off of the door. It was very loose lacked any kind of handyman maintenance for years. Door knobs are a fickle group. Some are well made and last for a long time. Others get neglected. With just a little TLC, a door knob will last for a very long time.
A door knob is installed after the latch assembly gets placed into the edge of the door. The latch is held in place with 2 small wood screws. Then the exterior side of the door knob is installed through the latch assembly. This is a good time to lubricate the hardware because you can turn the handle and see the mechanics of the latch move. Spray lubrication works great. Spray a light coat on the moving parts and rotate the handle to make sure the lubrication works its way into all the moving parts.
Mate the interior side of the door knob to the exterior side and tighten the two screws that hold it all together. There is a certain tightness that requires a little "feel" to it. If you over tighten the screws, the knob and/or latch tend to stick. If you under tighten, there is will be too much play and the knob won't operate well. Tighten it snugly but so that it operates correctly.
 If you can see daylight from under an exterior door it is costing you money. Sealing the interior from the exterior is important not only for indoor air conditioned comfort, but it's also an easy way to keep bugs from entering your home.
You might have a door sweep or threshold that is adjustable and may be able to adjust the sweep downward or adjust the threshold upward. Door sweeps are attached to the door and make contact with the threshold underneath the door. The door sweep will wear out over time and need to be replaced by yourself or a handyman. There are lots of different styles of sweeps. Some slide in a track, some have barbs and are secured into some grooves in the bottom of the door, etc. If you want to replace the exact weatherstrip or door sweep, you may have to take it to a door shop. Your other option is to buy a universal door sweep.
This slides down the length of the door bottom and gets secured with screws to the inside bottom of the door. These door sweeps have elongated holes so they can be adjusted up or down to close the gap between the door bottom and the threshold and operate smoothly. When the door sweep is adjusted correctly, you should just barely hear a rubbing sound (between the sweep and the threshold), and you shouldn't be able to see any daylight.
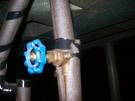 The moment comes when you have to turn off the water to your water heater. You get a ladder to turn off the knob at the top of the water heater and it keeps turning...and turning. Over the years, the valve has corroded and won't turn the water off.
Your choices at this point are to turn off the water at the main shut-off valve in the street (here's how to turn the water off at the street), or you may have another shut-off valve at a different location, such as your garage.
At some point you will need to replace the faulty valve at the top of your water heater. You probably have a gate valve (it's about $2 cheaper than a superior ball valve and that's why the builder installed it), but it is far better to install a ball valve. Here is a discussion on a ball valves vs. gate valves. They both will install in the same manner but the ball valve is far more dependable in a time of crisis.
You will need to break out the torch and sweat the new valve on to the water supply line. Here are details on how to solder copper. Once you have the new valve installed you can turn on the water at the street to test for leaks, and the next time you need to service the water heater, this new valve will isolate it from the rest of the house water supply. That means you can flush the toilets to your heart's content while the water to the water heater is off.