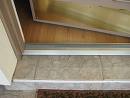
 Over time, a threshold can become damaged and need replacement. If you have a gap between the bottom of the door and the threshold, you may be able to avoid replacing the threshold and have your handyman install a new sweep on the bottom of the door instead.
The proceedure is easy: simply slide the sweep along the bottom of the door and secure it. If this doesn't do the trick, then replacing the threshold is the next step.
The threshold is originally installed as a pre-hung door unit along with the jambs and it slides into the framed opening for the door. The threshold is usually nailed or stapled to the side jambs. Usually, adhesive or caulking is laid down under the threshold to keep out the weather and bugs.
To remove the threshold, you will probably need to cut it in the middle and shimmy it out. You can do this with a back saw or a reciprocating saw, and you may need to break the bead of caulking or adhesive to free it up.
Removing it from the side jambs is next, and you may be able to lift up the threshold from the point where you cut it and pivot the end up to pull it away from the side jambs. you can also try moving it in a back-and-forth motion. It's a little like yanking out a tooth, minus the blood. Once the old threshold is out, pull out any remaining nails from the side jambs.
You must buy a threshold of the same style that will fit the opening. I had a customer that had a double door and she bought two smaller thresholds with the idea that she would just butt them together to span the opening-bad move. If you need to special order a size, then do it.
Once you have the correct one, swing the door out of the way or remove it so you can install the new threshold, which will screw into the floor. If you are installing over a wood subfloor, you can screw it into the wood. If you are installing into concrete, lay the threshold into place and mark the spots on the concrete and then you can drill the holes with a masonry bit.
Lay down a couple of thick beads of adhesive caulking so that when you install the threshold there won't be any gaps for insects or breezes. Use Tapcon anchors (about $10 per package) and screw the threshold into place.
Swing the door (or rehang it if you had to remove it) back into place and check the fit. The door should close easily and the sweep on the bottom of the door should just make contact with the top of the threshold. A slight rubbing of the sweep against the top of the threshold is expected. There shouldn't be any gaps under the door whatsoever.
From inside the house with the door closed, look under the door for
daylight. If you see daylight (assuming you are doing this during the daytime) then you need to make some adjustments.
The threshold will have some adjusting screws which are countersunk into the top of it. You can turn the screws clockwise to decrease the rubbing and increase the space between the door and threshold.
By turning the screws counterclockwise, you will close this gap. If you have adjusted the screws as far down as they can go and you still have difficulty closing the door, as a last resort you may have to remove the door and plane off a small amount from the bottom of it.
When you're done, lay a bead of clear silicone along the sides of the threshold where it meets the side jambs of the door. Then you will be ready to start swinging and slamming.
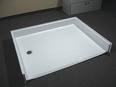 When it comes time to replace your fiberglass shower pan, you obviously don't want to have any movement in it. So whether you or your handyman is going to install it, pay attention.
Under a fiberglass shower pan is a webbing of sorts, small vertical supports that make it so that the shower pan won't "give" when a heavy person steps on it. This deflection can crack the pan, or even cause the drain connection to fail where it connects to the pan. Well made shower pans have more substantial supports, while the cheaper pans have less substantial ones. The floor upon which the shower pan rests might also be a factor if, for example, it is damaged or not level.
The answer then is to make the shower pan solid...very solid, particularly around the drain. You can do this my adding some thin-set mortar onto the floor before you seat the shower pan.
Once you have the pan lined up, mix up some thin-set mortar and pour it around the perimeter of the drain hole on the surface of the floor, whether it is the slab or an upstairs sub-floor. I would stay a few inches back from the drain hole and pour a ring about 12 inches wide around it. Then install the pan. You want the pan to sink in to the mortar. This is what will make the shower pan rock solid, and what a difference it will make.
 Have you ever had to install a screw into a piece of wood and it split open? I have too and I've learned a few handyman tips along the way.
If you have ever worked with solid hardwoods like oak or maple, if you've tried to install a screw into these without taking precautions, you have probably split the wood open. By that I mean you throw it into the scrap pile. Oak is particularly hard and troublesome.
1. Pre-Drill The Screw Hole
By pre-drilling a screw hole, you are removing a small amount of wood to make up for the otherwise displacement when you insert a screw. By pre-drilling, the hardwood doesn't have the pressure to split open as it would had the hole not been drilled. In other words, the space of the hole allows the screw to be inserted without placing the stress on the wood.
Sizing The Hole
I generally will hold the screw up and place a drill bit behind it. I want the hole in the wood to accommodate the shank of the screw, but allow the threads to bite into the wood for good holding power. So if I can see the drill bit peeking out on either side of the screw when I hold them front-to-back, the drill bit is too large and I move to the next size down.
2. Lubricate The Screw
Lubricating the screw before you insert it in a hardwood will help it go in a little easier. I don't mean to put liquid on it, but what works very well is a bar of soap. Take the bar of soap (any brand will do), and run the screw threads against it. This will leave the threads with flakes on them, and as you twist the screw into the wood, it will sink into the wood very easy. Without doing this, you risk breaking off the screw or bolt in the wood.
 So your sliding screen door is trashed. Maybe the dog shredded the screen or the rollers don't roll so well anymore. You probably don't need a handyman for this repair, unless there is a good game on you want to see.
Screen doors are light-weight and roll on plastic (and occasionally metal) wheels. You can buy replacements for these wheels if the door is not rolling smoothly. You will have to lift the door up and out of the track, and lay the door on it's side. The wheels are held in place with one or two screws.
If the screen is damaged, you can re-screen the door in under one hour, but if the frame is at all damaged you might as well replace it. You might consider replacing anyway if you want to save some time.
A new sliding screen door costs about $50.00 and installs very quickly. Once you remove it from the packaging, set it in the track and turn the wheel adjustment screw on the bottom rail (although rarely you might find this on the edge of the door). You want the wheels to travel freely down the length of the track. Although the adjusting mechanisms are slightly different, you just need a screwdriver to raise the frame of the door off the track.
On some models, there is a top piece that is spring-loaded to allow the door to be tall enough to ride in the top track. You can adjust this in the same manner so that the door is tall enough not to fall out.
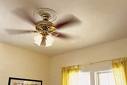 As it gets warmer outside people start to think about staying cooler inside. Many will buy ceiling fans to help feel cooler. But what size ceiling fan should you buy for a particular room? The answer is: it all depends.
Ceiling fans are sold in a variety of sizes for a variety of rooms. At home centers, you can find them in 32", 42", and 52", but specialty stores have them from under 30" to 60". Many retailers suggest the following:
Room Dimensions Fan Size
8' x 8' 32" Fan
12' x 12' 42" Fan
15' x 15' 52" Fan
Generally, people used to think that a small fan was for a small room and a large fan for a large room, but you need to take into consideration the volume of the room as well as where people spend time in the room.
Check the cubic feet per minute (cfm) of the fan. You should find this information on the box. The cfm will typically range from 2000cfm to 8000cfm. This cfm rating is the fan's maximum output. Next you want to calculate the volume of the room, and this is a change from the old school of thought. The volume takes into consideration the height of the ceilings. In a room with tall ceilings, the temperature at the ceiling can be 15 degrees warmer than at the floor. Multiply length x width x height for the volume of the room. For example, if your room is 12' x 12' with 10' ceilings, the volume would be 1,440 cubic feet. A fan rated at 2000 cfm or slightly higher should do the job. The cfm of the room would probably be served using the fan's medium setting.
 We were asked by a customer to do some drywall repair that had been damaged by the backs of some chairs. These were wooded chairs that when people would push away from the dinner table the chairs would ram into the drywall and chip away the paint and texture. Sure, this handyman can do that. However, there may be a better solution.
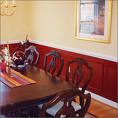
Repairing the drywall will look great....until someone rams the same chair into the same spot...again and again. It seems to me that installing some chair rail is a great option.
Chair rail will not only cover the damage and be more resistant than drywall, but it will make future damage easy to repair. You can buy a variety of sizes and profiles of chair rail to fit against the wall. In this case, simply buy a height that will cover the repetitive damage, but also works will with the size of the room. If the ceilings are high, you can go with a taller chair rail. If you have 8 foot ceilings, try to minimize the height so as not to make the room appear small.
You can paint the chair rail before you install it, nail it to the wall, and then fill and touch up the nail holes. The next time someone damages that area of the wall, the wood chair rail will probably be undamaged, but when it gets time to repair it, just fill in the dings and touch up the paint.
 Our customer had rust coming out of her bathtub when she turned on the water. Certainly not a good sign with some expensive solutions.
There are several considerations here that will help lead to a diagnosis. The two most likely problems are either the water heater tank is corroded and rust is present. The second possibility is that a fitting used in the faucet is corroding. The more likely of the two is that the water heater will need replaced.
Is the rust coming out of just one faucet or many faucets? If rust is present at just one faucet, it may be that the installer of that faucet used an inferior fitting and that fitting is rusting, which would explain the rust in that one fixture. Another clue is that if rust is present when both the hot and cold water run separately. If the problem is actually the water heater, you should have rust when running only the hot water. If you have rust when running only the cold water, it might suggest the installer used inferior fittings on both the hot and cold sides, and therefore may not be the water heater.
It is a good idea to note the location of the fixture in relation to the water heater. For example, if the water heater is on the opposite side of the wall from the suspect fixture, it may just be that that fixture is closest to the water heater and will receive the brunt of the rust. So other fixtures farther away from the water heater may receive very little rust, and may suggest that the fixture is rusting when in fact the water heater is to blame. If the suspect fixture is in a bathroom with other hot water fixtures, let the water heater sit for a period of time so that the rust has time to accumulate in it. Then turn on the hot water in a different fixture to see if you get rust from it. If you get rust coming from a previously unaffected fixture, you might consider a water heater replacement.
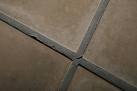 Grout is everywhere and grout cracks are pretty common. I see a lot of people (homeowners and their handyman) cover grout cracks with caulking. Well, I guess that will stop water intrusion, but it won't look very good. Caulking doesn't have the same appearance as grout, and it likely won't match the color either. The best way to solve this problem is to replace the grout in that area.
Replacing the grout involves digging out the old grout, filling in the grout lines, and finally cleaning the area.
You have a couple of choices when removing the old grout. You can manually remove it or use a motorized tool. If you choose to manually remove it, use either a grout saw or a tool called a "grout grabber". They both work in the same manner which is placing the tool against the grout and running the tool against the grout while applying pressure. This almost guarantees blisters.
Your other choice is to use a Dremel-type tool. This is a fast spinning tool that spins a bit. The grout removing bit is placed against the grout and it turns it to dust. The only caution here is to have a steady hand as the bit will tend to break if you hit the surrounding tiles.
Once the old grout is removed, mix up a batch of grout, let it rest, and then use a float to stuff the grout into the voids. Use the float to remove the excess grout, let it dry to a haze (about 15 minutes), then buff with a clean white rag.
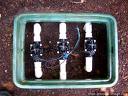 It's a sad sight when your handyman lifts the top off of your sprinkler box and it is full of water. You likely have a sprinkler valve or fitting leak...and it's leaking 24/7. You will need to troubleshoot the leak and fix it.
Turn the water off at the main and, using a paper cup, start removing as much water as you can. You will have to wait for the rest of the water to be absorbed into the ground. Once the water is gone, turn the water back on and race over to the box to see where the leak is. Then you can turn the water off and go to work. If the leak is at a fitting, you will have to cut the pipes and reglue a new fitting in. This is not easy since the box will be small relative to all the pipes and valves in it. Use PVC primer and glue.
If the leak is caused by a spinkler valve, carefully check where the leak is located. It is often the case that when the valves are initially installed, there are placed so close together that you can't unscrew them from the fittings. This of course is a problem if you have to replace one.
If the leak is coming from the top of a sprinkler valve, don't replace it. Instead, go buy an exact replacement valve, and strip it for the parts. You can unscrew the top half of the valve which will include the diaphram, solonoid and cover, and screw the top onto the old valve body. Essentially you will have a new valve without all the headaches of cutting it off of the old piping and re-gluing it.
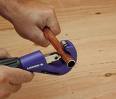 At some point in your life, you will likely have a leak on a copper pipe. Should you choose to repair it yourself or hire a handyman, you may need to actually cut a copper pipe. Don't break out the hacksaw just yet though.
When you need to cut a copper pipe the cut should be square, smooth, and free of burrs. A hacksaw just won't provide this. The copper pipe will mate with a fitting that is very snug, and the more surface area contact between the pieces the better. A non-square cut will minimize this, and burrs on the end of the pipe may not allow it to seat fully into the fitting.
A pipe cutter is the ideal tool to use. This tool grips the pipe between rollers on one side and a cutting wheel on the other. Once you grip the pipe, simply rotate the tool around the pipe to score it. Tighten the cutting wheel and rotate the tool again. Continue doing this until the tool has cut through the pipe, which will be less than a minute. Once the pipe has been cut, the tool has a reaming attachment to get rid of any burrs. You will then be ready to solder copper pipe.