 We've all had to deal with broken bulbs. They scare many homeowners to work around as there are sharp pieces of glass and exposed electrical filaments. So how do you remove them? Well, you start off by making sure the electricity is off.
There are many ways to remove it, but basically you have to get the socket to start moving counter-clockwise. On larger bulbs, you may have a thick filament you can grab with pliers and turn, otherwise, most smaller bulbs don't leave much of anything to grab.
I've heard people using half of a potato to push it into the socket and turn it out, but there is something about a wet potato and potential electricity that really bothers this handyman. If you plan on pushing something into the socket to turn it, try crumpling up some newspaper and stuffing it into the socket. The friction should be strong enough to get it started.
I like using needle nose pliers. You can place the pliers inside the socket and open them. That's right...open them. By opening the needle nose pliers, each arm of the pliers will contact opposing sides of the inside of the socket. This should allow you turn unscrew the base of the bulb.
I have also used two small needle nose pliers and actually grabbed 2 opposing sides of the bulb's base. The key is to use 2 very small pliers, and you have to slightly bend the metal bulb base inward to have something to grab onto, without chipping the fixture's socket.
 Wiring your electronic sprinkler valves is certainly within the realm of most homeowners. If you don't feel comfortable doing it you can always ask your handyman, but for the most part it is following colors on the wiring and connecting the wires.
Each electronic sprinkler valve will have two wires coming out of the solenoid. One wire will get connected to a white "common" wire and the other wire will get connected to an individual wire connected to the sprinkler timer control box. Each wire coming out of the cable connecting the sprinkler valve manifold to the timer will be a different color.
To wire the timer, just attach an individual wire to each of the station terminals you plan to use. For example, if you have four sprinkler valves, you will strip the ends of 4 wires and attach one to each screw terminal. The white wire is always the common wire and must be attached under the screw terminal marked "common" or "com".
Now go to the sprinkler valve manifold and whichever color is attached to the timer's first station terminal, connect one wire of the sprinkler valve to this color. Strip the insulation from the end and use water proof wire nuts. Do this for each sprinkler valve, attaching only one wire of each valve to each different color wire corresponding to the timer station screw terminals.
Once each sprinkler valve has one wire connected, take the remaining wire of each valve, strip the insulation, gang them together and attach them all to the white common wire coming from the cable, again using a waterproof wire nut. Now you can program the timer to run.
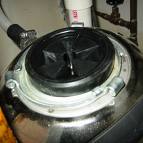
 A handyman is frequently called to unjamb a garbage disposal. In that case I generally try to coach a customer through the process rather than visit the house and charge them for a 2 minute job. In those cases where glass breaks and goes down the disposal, there are some tricks to removing the glass before you have to remove the disposal from the sink. Naturally, unplug the disposal to avoid injury.
Try to avoid running the disposal if you know there is glass in there. This will further break the glass which will increase the chances of a small piece of glass becoming lodged in between the grinding plate and the side of the grinding chamber. Instead, use a wet/dry shop vacuum and suck out the broken glass. This should clear most, if not all, of the glass. Alternatively, you can pick out the larger pieces of glass with tongs, and then place the vacuum in to the hole.
Although I have never tried it, I have been told cutting a potato in half and pushing it into the disposal to grab the broken glass is effective if you don't have a shopvac.
If the disposal is jammed with broken glass, you can try freeing it up by using an allen wrench or the unjambing tool that came with the disposal. Stick the tool in the bottom of the disposal (underneath where the cord enters the housing) and rotating it back-and-forth. You might find this frees it up temporarily until the loose glass jambs it up again.
As a last resort, remove the disposal form the underside of the sink. You will have to remove the discharge piping and then loosen the collar with a screwdriver. Turn the disposal upside down so that the opening of the disposal is resting on the floor. Use the allen wrench or unjambing tool to try to get the blades to move. With luck, the blades will move enough to allow the small glass fragments to fall out. With the disposal still sealed to the floor, briefly plug the disposal into an outlet to guarantee that it is clear. Be careful on this one. Even though the glass should be contained, it is a good idea to wear safety glasses and take the proper precautions. When it spins freely, re-secure the disposal to the sink.
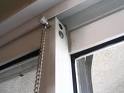 Many of us have sliding glass doors, and maybe the handle lock has stopped working. Many homeowners will wedge a broomstick or some other piece of wood behind the slider to prohibit it from opening. Well if you are tired of looking at the broomstick, read on. There are many mechanisms to lock your sliding glass door.
Aside from repairing or replacing your handle lock, you can install a locking mechanism at the base of your sliding door. There are many choices here, but it seems the two most popular are a pin lock or a charley-bar type lock.
A pin lock looks like a long nail that you install in a hole you will have to drill through the frame and track. Basically you will close the door and drill a hole large enough for the pin to slide into. If someone tries to open the door, the pin will stop the door from moving.
A charley bar works the same as a broomstick, but it looks a little nicer. It is a hinged metal bar that telescopes out to snug against the back of the sliding glass door. Here you mount the mechanism to the opposite inside jamb. The bar will swing downward and rest in a bracket you will secure to the back of the sliding door.
Either style of lock works fine and you probably won't need a handyman to install them for you.
There are many styles of sliding glass door locks and they are actually very similar. Each will secure to either the door or the track and have a means to stop the door from traveling.
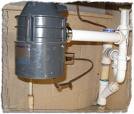
 Look into your kitchen sink down at the garbage disposal. You should see a black folded rubbery thing with a hole in the middle of it. This is called a splash guard and allows it so that you can push food down into the garbage disposal, but keeps flying food from exiting the disposal grinding chamber. I know I'm guilty of scraping food off my plate into the sink and, after it piles up in the sink, pushing it into the disposal for grinding. Most people push the scraps on down with whatever is in their hand...a fork, knife, or spoon. Well if you fork or knife is pointed in such a way that it contacts the splash guard, it will tear.
Replacing a splash guard is done frequently by this handyman, but the job is easily performed by the average homeowner.
Unplug the disposal to stop the flow of power to the unit, even though the switch if in the off position. The disposal will need to be lowered from the sink bottom by at least a few inches to free the splash guard, as it is sandwiched between the top of the disposal and the underside of the sink. You will need to relieve the tension at the discharge pipe at the side of the disposal, so either remove the pipe via the two screws at the side of the disposal, or remove the other end of the piping further down the drain via the slipnuts. I use a small screwdriver to loosen the mounting collar at the top of the disposal.
Once the collar is loose, I place my knee under the disposal to set it on for the few seconds it will take to remove the old splash guard and place the new one on top of it.
After you have the new guard on, just tighten the collar and reinstall the discharge pipe.
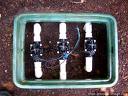
Have you ever lifted up the cover of your sprinkler box? The first thing this handyman notices is all the bugs that scatter when they see daylight. You might also notice a tangled mess of wiring that may or may not be laying in water. This water can be a big source of problems for the wire connections, not to mention the fact that you have a leaking sprinkler valve.
When sprinkler valves are wired together, it is common for most homeowners to use regular wire nuts. These do a great job of holding the ends of the wires together, but not so good at keeping water out of the connections. For this you can use water-proof wire nuts.
Water proof wire nuts are larger than standard wire nuts and are filled with silicone to form a barrier against water infiltration. With standard wire nuts there is a female threaded fitting inside the wire nut and all you need to do is stick the wires inside the nut and screw it on. This twisting action joins the ends of the wires and hold them for a good connection. With water proof wire nuts, I generally hold the ends of the wires together with pliers and twist them together before sticking them into the wire nut. At least in my mind, I want to disturb the silicone filled wire nut as little as possible. Once inserted into the wire nut, I will give it a gentle twist and then use black electrical tape at the base of the nut to hold it to the wires so that nothing moves. This will also form another barrier against water.
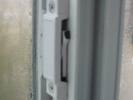 Many window locks are plastic that break off or crack when you try to lock them. These are integral locks that are built-in to the frame and replaceable. Your choice is to find a replacement (which won't be available at a home center) or buy a generic thumbscrew type lock mechanism. You shouldn't need a handyman to install either style of lock.
If you want to install an exact replacement, you will need to remove the old lock and take it with you to a glass shop. The old lock will be held in place by 2 screws. The bulk of this job is in finding the right lock and color. When you find the right lock (it‘s actually more of a latch), just screw it back into place.
If you want a locking window at minimal effort, you can buy a thumbscrew type lock. These generally come in black or white and take about 2 seconds to install. They simply secure to the track next to the window and stop it from moving. They will match the color of the window frame and will definitely prevent the window from opening, but they will be slightly noticeable so if you are picky, you might consider spending the time to find a matching replacement.
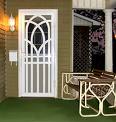 As a handyman, I've worked in some rough areas before...areas with lots of chain link fencing. Besides chain link, these areas all have security bars on the windows and doors. You may not live in a rough area, but you can take a lesson here, many residences have security doors on them to avoid a break-in.
It used to be that a security door was plain ugly...just bars and maybe some mesh on them. Very seldom was there any type of decorative features. You can get designs that make these much more attractive than in the past.
If you want to install a security door, there are fairly straightforward. You need to determine how you want the door to swing, either right-hand or left-hand hinge.
If you install the hinge on the same side as the door it is protecting, the door handles will hit when you close the security door. The nice thing about this configuration is that you it is easy ingress and egress without having to fight the doors. If you install the security door so that the hinge is opposite the home's door, the handles won't hit but it is strange and somewhat backwards to go from side to side to get into your house. Plus, when the wind is blowing just right, you will get bumped around fighting with the security door to get your main door open.
For me, I would rather have both doors hinged on the same side, and just reverse the lockset and knob on the security door.
A customer was out of town for a few days and came back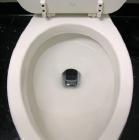 to discover that the toilet bowl was empty. Usually there is standing water in the bowl, but it was dry. She called her favorite Las Vegas handyman to determine why.
There are only a few reasons why this would happen. The first reason turned out to be the cause. The had a crack in the trapway of the toilet, which caused the water to drain out into the drain pipe below. This wasn't obvious because the crack was centered over the drain, and therefore didn't leave any water around the base of the toilet. Since the crack was small, it took some time for it to go dry. Naturally, if the toilet is being used regularly, the bowl will get refilled after each use, and you probably wouldn't notice a slightly lower water level. However, when the toilet wasn't used for a few days, it had time to go completely dry. The fix here was to replace the toilet bowl.
Another reason a toilet bowl will be dry is due to the vent. Drains require air, and the vent provides this. If the vent is clogged then as the water goes down the drain it tends to pull air with it from any source. This creates a siphon and pulls the water left in the bowl down with it. It won't pull all of the water down with it, but if the toilet is not used for a while the small amount of remaining water may evaporate. The fix for this would be to clear the vent from the roof.
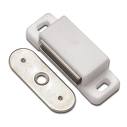 Have you ever closed the kitchen cabinet and it doesn't close all the way? Maybe the door is warped, or there is a problem with a hinge, or whatever. The answer is a catch.
A catch is a term for a mechanism that holds the door to the frame. There are many types of catches, that work with friction. For example, a female receiving piece that mounts to the frame receives a mating male piece that mounts to the door. When closed, the pieces interlock and force is required to separate them to open the door.
The type of catches this handyman likes are magnetic. They are easy to install and operate with very little effort. The magnetic piece mounts to the side or top of the cabinet frame and a flat metal piece screws to the inside of the cabinet door, so you will never see them when the door is closed.
The only thing to be careful of is that you must pre-drill the holes for the screws, especially in solid wood. Also be careful not to drill to deeply in the cabinet door. Drill just deep enough so that the hole accepts the screw, but no deeper. The last thing you want to do is drill a hold through your cabinet door.