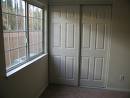
 Many homes have sliding doors in closets, or a laundry room. These are commonly called bypass doors and it's something a handyman consistently works on. The doors will either slide along a track secured to the floor, or will hang from a header and ride in a track from above.
On the doors that hang from above, there is a divider mounted to the floor that keeps the doors separated and prevents the doors from swinging in-and-out. We see this commonly when homeowners will have the flooring changed, such a having the carpet replaced, and the installers won't re-install the divider. That leaves the doors to swing in-and-out, and the divider piece disappears.
You can buy a new divider and install it simply enough. If there is so much space between the top of the plastic divider and the bottom of the door (making it so the divider won't even touch the doors), you will have to use a spacer installed underneath the divider. Some dividers come with plastic spacers, but in some cases you may have to fabricate something that is functional and attractive. You can screw the divider into the floor to hold it in place. For carpet laid on top of the slab, you will have to screw the divider into the slab with a small anchor or tapcon screw.
 If you are planning on replacing a door with a pre-hung door (meaning the door and it's frame together), you're going to have to do some cutting. This isn't major surgery, but it's a job of finesse.
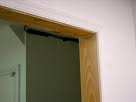
You are going to need to first pry off the trim molding around the perimeter of the door. Use a utility knife and cut through the caulking. If you plan on reusing the trim, be very gentle with it as you don't want to break it. The trim will be held in place with nails. Goose the trim up carefully with either a standard screwdriver or a putty knife. Start at the bottom and gradually move up until the entire piece of trim is free. Do this for all of the trim on both sides of the door.
With the trim removed, you will probably be able to see daylight between the door jambs and the door framing, with the wood shims nailed in place. Use a reciprocating saw with a demolition blade in it and run the blade around the perimeter of the door in between the door jamb and the house framing. The demolition blade will cut though the nails and shims without any trouble. Once the old door and frame has been removed, it's time for the new door installation.
 Alright landlords, after a tenant moves out of your property, how often do you end up doing some painting? Maybe not a full paint, but at least some touch-up painting. As a handyman, I see it a lot, and I'm talking nearly almost all move-outs.
In my experience with landlords smarter than I, the landlord will have us paint the entire interior with the most popular color of white paint, in semi-gloss.
Why the most popular color of white? Because it is likely to be around for a long time, so matching it should be easy. For the last several years, a very popular flavor of white paint has been swiss coffee. All major paint manufacturers have their version of swiss coffee, although it will have a different name.
Why semi-gloss paint? Because it is easy to wipe clean (which saves the landlord money over a re-paint), and it is easier to blend in when you do have to touch it up. Typically builders paint the entire house with flat paint (because it is slightly cheaper), with the exception of the wet areas (kitchen, laundry, bathrooms).
This seems to be a good strategy for not only landlords, but owner-occupied residences as well, particularly if you have small kids.
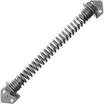 Houses with pools are required to have a self-closing and latching gate. This is accomplished by installing a self-closing gate spring on the gate, so when someone passes through the gate, the spring forces the gate to close and latch. This is an easy job for a handyman and it may not even need to be replaced.
If you don't have a self-closing mechanism on the gate, you certainly have to add one. However, if you have an existing one that has stopped working, you might be able to bring it back to life. At the end of the gate spring you will see a series of holes. These holes are attached to a mechanism that torques the spring to a tension and causes it to self-close. There is a pin, or should be a pin, that holds the mechanism and it's tension in place to keep the spring tensioned and functioning. It is common to see this pin shear off which makes the spring lose its tension, causing the gate to no longer be self-closing.
There is a lot of pressure on this pin which is why it shears off. You can use a large nail as a temporary solution, but the softness of the nail will also cause it to eventually fail. The trick is to find an alternative that fits the hole but is hard enough to stand up to the tension. You can try a quality drill bit. Choose the largest diameter that will fit into the hole. Use a nail to start tensioning the spring. Stick the nail in the hole and move it to tension. Hold the tension in place by inserting the drill bit into the hole. Repeat this until you have enough tension that the gate closes and latches when the gate is held at a 45-degree angle to the wall. There is a fine line here too...don't tension it so tightly that the wall shakes.
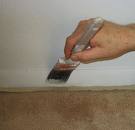
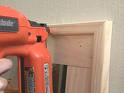 If you are going to be working with real wood grain baseboard or trim you will need to fill holes that you make with nails or brads while securing it to the wall. Nailing the trim to the wall not difficult and can be done by you or your handyman. Use the appropriate finishing nail or brad at the wall studs and countersink the nail head so it lies below the surface of the wood. A pneumatic nailer will do this for you, but you still have the hole to fill in.
The challenge is that wood putty doesn't accept stain like your wood trim does. Wood putty or filler will absorb more stain and turn darker than the surrounding wood. This won't look very nice on the finished piece as you will see exactly where the nail holes are.
If you can, hit the nails into the grain of the wood. The grain tends to accept stain more than the surrounding wood. If the grain lines up with the wall stud, hit it into the grain and fill it with putty. Sand or scrape the putty off so that the filled hole is flush with the surface, and then add stain and varnish. With an open grain like oak, you won't be able to tell where the nail holes are. You can also make your own putty using sawdust from the off cuts mixed with a little wood glue and stain.
 Sometimes nothing seems to work when unclogging a toilet. You've plunged it over and over and still it doesn't seem to work. Even the toilet snake won't clear whatever is blocking it. I've pulled a lot of unusual things out of toilets...things that have no business being in toilets like pens, eyeglasses, toys, etc. Pens and eyeglasses typically fall out of a shirt pocket when a male bends over to lift the lid of the toilet. You would never see these items by looking down into the toilet bowl. Rather, they get caught in the trapway, which is beyond where you can see.
Small, thin items can cause a lot of frustration. They hide along the trap and occasionally will stop waste from flowing down the drain. Sometimes the only thing to do is remove the toilet from the floor and snake it from underneath the toilet, which is the reverse of how you would normally do it.
Once you drain and remove the toilet, gently set it on it's side. Push the snake up through the bottom of the toilet until it comes out of the bowl. Be careful at this point because you can scratch the bowl. Tie an old rag onto the end of the snake and pull the snake back through. The rag will fill the trapway and should bring out the blockage with it. As a last resort you can put on a rubber glove and see if you can grab the obstruction from the bottom of the toilet.
 It's pretty common to want to replace a regular light fixture with a ceiling fan. The only issue is that a ceiling fan often weighs more than a builder-grade light fixture. The last thing you want to happen is for your new ceiling fan to fall out of the ceiling in the middle of the night. It's a good idea to install a brace bar.
A brace bar in placed in the ceiling and spans the opening by pinning itself into the sides of the ceiling joist. To install one, you have to remove the old junction box in the ceiling, after you make sure the power is off. The electrical cable (romex) will be held in the box by a cable clamp. After you free the cable, the box will need to be removed. It will be screwed or nailed in place, and sometimes the easiest way to remove it is to run a recuperating saw blade around the perimeter of the box to free it.
Use a stud finder to locate the direction of the ceiling joists and insert the bar into the hole in the ceiling. Once it's in the ceiling, turn it perpendicular to the joists and start turning the shaft. As you turn the shaft, the legs telescope out until they push into the side of the joists. They have little spikes that wedge into the wood. Just make sure that when you tighten it, the shaft is located directly over the hole in the ceiling.
Once the brace bar is installed, hook the "U" bolt over the bar and secure the junction box to it after you run the cable through the box. Then it is a simple matter of installing a ceiling fan to your brace bar.
 As warm weather approaches and the air conditioners invariably get turned on, it's time to have the handyman head into the attic to stop any air leaks. I see this a lot in the summer when working in the attic...it will be 30-degrees cooler in the attic than it should be due to a leak that puts cool air into the attic rather than in the living space.
Venture to where your unit is (it may not be in the attic) and turn it on. You will be feeling for cooler air escaping and listening for a hissing or blowing sound. Pay particular attention to areas of transition. Think of your air conditioning system like the human body. Just at the heart pumps blood into larger arteries that branch off into smaller veins and finally capillaries, so does your air conditioner pump cool air into large ducts which finally branch off into smaller ducts going into each room. It is at these transition areas, where the size of the duct changes, that you should focus on. Also pay attention to where the plenum transitions into the ductwork.
When you find an air leak, you can use metal tape (aka foil tape) or a duct sealant. I like the foil tape as it is very sticky and easy to use. Seal any leak that you find by covering the leak with tape or sealant (with the tape you can use the air conditioner immediately). Tape over the leak and push down all edges of the tape.
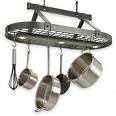 Hanging a pot rack can be easy or tough for any handyman. It all depends on the where the lumber is above you and the configuration of the pot rack. Some pot racks are meaty...thick gauge steel and heavy chains to hang it from. They will hang from several lag bolts to balance their weight.
Most people want the pot rack centered over kitchen island, cooking area, or preparation area. If you have a single story house, this is fine so long as the ceiling joists above the area are located where you need them to be. Much of this job is measuring.
Manufacturers typically spell out the distances for the mounting points of the pot rack You will need to use a stud finder and mark out the locations of the joists. You get a nice surprise if the joist is not where you need it to be. If this is the case, you have a choice of either moving the pot rack over to accommodate the joists, or going into the attic to add some lumber in the aforementioned location.
If your choice is to add lumber, use the same dimension size so that it secures easily to the surrounding joists. Use 16d nails and framing anchors for a rock-solid installation. Once the lumber is in place you can pre-drill the holes for the lag bolts, through the ceiling and into the joists. After the lag bolts are installed it is a matter of hanging the pot rack and balancing it.
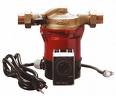
I got a call from a customer that was having problems getting hot water. He had a 75 gallon water heater with a recirculating pump on it (the recirculating pump pumps hot water through a loop in the house so you get hot water within seconds rather than minutes). The complaint was that they would sometimes get hot water immediately and then it would cool off within 2 minutes, and sometimes they wouldn't get the immediate hot water, but rather would have to wait several minutes for hot water to start. They said the problem was intermittent but that it affected all fixtures in the house.
There are many things that could cause the water to cool after it was hot. A dip tube could be broken or cracked, a recirculating pump check valve could be bad, etc. I like to start out with the simple things first, and so I ventured into the garage to look at the recirculating pump.
I was there in the early morning and saw that the pump was plugged into a timer which was plugged into the wall. The first thing I noticed was that the timer was not set to the correct time. It was off by over an hour (coincidentally we started daylight savings time about the time they noticed the problem). I forwarded the timer to the correct time and the pump started pumping. It seems that the "intermittent" hot water problem was only occurring in the early morning when the pump was turned off. Problem solved.
Lesson: check to make sure the timer is set correctly and the pump is running.