 Have you ever pulled on the shower handle to start the flow of water and the valve partially moves with the handle? This is typically because the pipes were not strapped to the wall framing, which allows for some play in the valve and piping. You wouldn't really notice this in a valve where you just turn the handle side-to-side, such as a Moen Positemp or Delta Monitor. However, with a valve and handle that you have to pull out to start the water, particularly when the handle or cartridge is sticky, you really notice the problem.
You can have a handyman strap the pipes to the lumber in the wall, which will solve this problem, but it creates a lot of additional work. You have to gain access to those pipes, which means cutting the wall open and then repairing the wall. With the wall open, you simple secure a couple of pipe straps with screws near where the pipes enter the shower valve. Then you have the drywall repair.
You can try to avoid this by doing a couple of things. Try shooting expandable foam into the wall cavity and let it set up and get hard. This may give the shower valve enough resistance that it won't move when you pull the handle out. Additionally, replace the shower cartridge. This should make it so that minimal effort is required to pull the shower handle out. These two items may help you avoid the job of strapping the pipes.
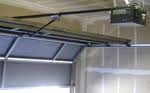 It sure is nice to have the luxury of hitting a button and the garage door opens up... No more having to clean & jerk the door open during bad weather. Garage door openers all serve the same purpose, but their methods sometimes differ.
On the low end of the price spectrum is the chain drive system. This resembles the old bicycle chain and it works well, but it is noisy. So when you are in the living room you can hear the "hum" of the chain drive operating the door. The chain drive is also a chore to install. You have to uncoil it and wrap it around the sprocket, getting your hands greasy in the process.
The next step up is the screw drive opener. These assemble easier and faster than the chain drive units, with each end screw section secured together to form the length of the rail. These are only slightly more expensive than the chain drive units, and they don't seem to have the vibration and subsequent noise that the chain drive's have.
Finally, there are the belt driven models. These run the quietest of all the styles and install very easily. The belt slips over the sprocket and is tensioned with a mechanism that makes quick work of the process.
My choice would be the belt driven model, because it really doesn't cost much more than the less expensive units, and over the life of the unit I don't have to worry about being awakened when someone opens the door late at night.
 I have some customers who went to Europe for several weeks only to come home and find their house flooded. The culprit: a $10.00 rubber washing machine hose. They spent an additional 3 weeks out of their home while the construction crew went to work.
As a handyman, we see many different types of customers. Some want the cheapest parts available and others want better quality. This is one of those times you want to use quality parts.
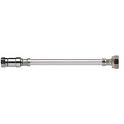
You can buy water supply lines that have a built-in shut off in the event they sense a large water loss. They are sold under the brand name "Floodsafe" and are installed like any water supply line...they simply screw on to the water valve and the fixture.
Floodsafe lines have a mechanism just behind the inlet that senses the water flow for the fixture it is made for. For example, on a faucet that flows 2.2 gallons per minute, the Floodsafe shuts off at 2.8 gallons per minute. The difference is for water pressure fluctuations. These supply lines are made for faucets, toilets, washing machines, dishwashers, and ice makers.
A Floodsafe line will also shut off the water if someone removes the flow restrictor in a fixture and the water volume falls outside of the factory preset amount. In this case the Floodsafe needs to be reset to allow water to flow again. This is done by shutting off the water valve and removing the Floodsafe line. Once you remove the line you can screw it right back on and the water will flow again.
Self-rimming or drop-in sinks are not difficult to install for an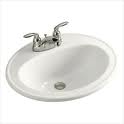 experienced handyman or homeowner. As their name implies, the sink bowl drops into a hole in the countertop and the rim of the sink rests along the perimeter of the bowl. So for the most part, they are not likely to move much unless impacted.
The only thing you need to do is to secure the perimeter of the sink in place. There are a couple of methods here that are both straightforward.
Most drop-in sinks will come with clips that screw into the rim of the sink from underneath the counter. These clips act like a clamp and the more you screw the clip in, the more pressure is exerted on the underside of the countertop. These work very well, unless the countertop is very thick. If you are installing the sink on top of a ceramic tile countertop, it may be too thick to use the mounting clips. This is because you have a wood substrate, followed by cement board, mortar, tile, etc. This counter may be so thick as to prohibit you from using the clips. In that event, you can use adhesive caulking.
Adhesive caulking is applied around the perimeter of the opening so that when you set the sink into the hole, the rim comes to rest in the adhesive caulking. When you set the sink, run a wet finger around the perimeter of the sink for a smooth finish, and then let everything dry.
Have you ever walked through a house and marveled at the intricate ceramic tile medallions or borders and wondered how the installers got it so perfect? The answer is they didn't.
You or your handyman can buy beautiful medallions or intricate border pieces that look as if Michelangelo made them. They come in ceramic, marble, travertine, tumbled marble...whatever surface you are working with you can find these fine finishing touches. What you don't see is the netting that these intricate pieces are glued to before they are installed. Buy purchasing them in this "ready to install" fashion makes them virtually as easy to install as regular square tiles. Here is an article on ceramic floor tile installation.
I've also seen people make their own medallions and borders. You can break or cut several styles and colors of tile into random pieces or cut them into uniform pieces. Then buy the netting and glue them into whatever shape or design you want. The spaces in the netting allow the mortar to pass through to the tile and adhere to them like regular tiles.
The medallion is usually installed first and the surrounding field tiles are installed around it. Once the mortar is dry the entire surface is grouted and buffed clean.
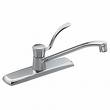 Many kitchen faucets become loose where they connect to the sink after many uses. After years of pulling out the faucet sprayer or pushing the spout from one side of the sink to the other, the faucet develops a little play in it. Eventually it will grow to a wobble and will seem like it is ready to slide off of the sink. It seems that this happens more with sinks that have a little flex in them, such as a thin stainless steel sink. If, for example, the faucet spout is hard to move, the flexibility in the sink seems to encourage the faucet to become loose.
So how do you fix it? It's actually pretty easy. You are going to have to climb under the sink and get access to the faucet. The faucet is held to the sink by any one of several methods, which all clamp the faucet to the sink with threaded nuts. On more expensive single-handle faucets you may have only one large nut located in the center of the faucet.
Whichever style you have, it is a matter of tightening these nuts. In most cases you can do this with just your fingers, but you may need a wrench if the space is small.
If you have a kitchen sink with deep bowls, you may not be able to get your hands into the small space afforded for the faucet. In this case use a basin wrench and tighten the faucet to the sink.
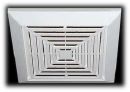 If your bath exhaust fan doesn't work, it's a good idea to run down a list of common-sense items to see if you can avoid calling your handyman.
You first want to check to see that your exhaust fan is getting power. The exhaust fan typically hides behind the decorative grate on your ceiling, so if you pull the cover downward, you should see it, the fan's plug, and an outlet. If the plug isn't plugged into the outlet, plug it in and see if it works. Many homeowners unplug the exhaust fan because it is loud and bothersome.
If the fan still won't run, check to see that the outlet has power when the switch is turned on. If it does have power, then the fan is bad and should be replaced. If the outlet does not have power, try looking for a GFCI outlet that may have tripped off. When you find the suspect outlet, press the "reset" button on it to restore power to it and to all outlets that it feeds downstream of it. This should solve your problem.
If you need to replace your exhaust fan, it is easiest if you buy the same size fan so that it sits in the existing box in the ceiling. Here is an article on a bath fan replacement.
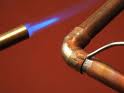 Soldering copper is not rocket science. Sure, it uses some scientific principles, but for the most part it is simply a process. Most of the opportunities that this Las Vegas handyman has for soldering, are for leak repairs. Every once in a while, we will find a valve that needs to be replaced, and there are special precautions to be taken when applying heat to these valves.
You want to protect the valve from damage. Specifically, protect the valve's inner workings from the heat of the torch. Many of the valves mechanics are made of plastic and flexible washers, and heat doesn't mix well with these.
If you will be working on a shower valve with a mixing cartridge inside, you must remove the cartridge before you solder the copper. You can remove the cartridge with a cartridge puller or a pair of pliers. If you leave the cartridge inside the valve while applying the torch, the plastic cartridge and O-rings can melt and virtually glue themselves to the inside of the valve.
For ball valves and gate valves, you want to fully open them up to allow the heat to escape and dissipate. Then you can apply the torch and solder the copper pipe.
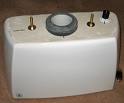 So how many times do you look in your toilet tank? Probably not much. Well I had occasion to once I noticed a puddle of rusty water on the floor. I got on my knees and looked at the rear of the toilet and there was a stream of rusty water from the tank, slowly running down the bowl to the floor. I lifted off the tank lid and saw the culprit: balls of rust the size of a golf ball that had corroded the bolts holding the toilet tank to the bowl.
Usually you can unscrew the bolts from inside the tank, but the rust prohibited that. Sometimes you have to get creative. After shutting the water off to the toilet and flushing it to remove the water in the tank, you can remove the water supply line to the fill valve.
I removed a hacksaw blade from a hacksaw and cut the bolts off in between the tank and the bowl. The bolts are brass and were fairly easy to cut through. The other option is to try to drill out the bolts, but if you have a lot of corrosion built up on the bolts, I would go straight for the hacksaw. Be careful as the toilet is vitreous china and will crack if you try to manhandle it.
With the tank off, you can remove the corroded bolts and replace them with new ones. Use a new spud washer and place it over the flush valve opening (it gets sandwiched between the tank and bowl). Place the washers on the bolts and install them through the tank holes and finally the holes in the bowl. Make sure the holes line up or when you tighten the bolts it may crack the tank. You want an even distribution of pressure from the bolts, so make sure the holes are aligned before tightening.
Once you reconnect the water supply line to the fill valve, turn the water back on and flush the toilet several times. Check for leaks under the toilet, and particularly on the ends of the tank bolts.
 So you bought yourself a beautiful new garden hose and are tired of rolling it up on the ground. You can buy a variety of hose reels and hangars to neatly store it and have it ready to use quickly. You can buy moveable hose reels that you can wheel around from the front of your house to the back, or you can affix a hose reel to the side of your house.
For the portable style, it's a matter of screwing on the garden hose to the hose reel, and then securing the hose reel's leader hose to the hose faucet on your house. Then you are ready to start spraying water. You shouldn't need a handyman for this style of hose reel.
For the style you secure to the side of your house, you will need to drill some holes in the house. If you have wood siding, you might get lucky and hit a stud and for this you can use large wood screws. If you have brick or stucco, you should hold the hose reel (or a template) up to the house and mark the locations for the holes. Use a masonry bit and drill the holes. Use the proper anchors in the wall, hold the hose reel up to the wall, matching the hole pattern you drilled. Then install the fasteners to permanently mount the hose reel to the wall.
It's a good idea to mount the hose reel close to the hose faucet so you can attach the hose to the faucet and have the hose always ready for quick use.