 We were called to diagnose and resolve some plumbing issues at a 10,000 square foot house. The plumbing problems all related to the generic term of low water pressure. One of the key pieces of evidence was that the problem was universal throughout the house and not limited to any one fixture or area. So what should you do?
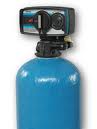
Check the big picture items like the main water meter and any secondary valves (like those found in a garage that shut off water to the entire house). If these valves are fully opened, you might check the PRV (pressure reducing valve). After snooping around, we decided to have a look at a fixture. After turning on the bathtub, there were tiny beads coming out of the tub spout. This was a dead giveaway that the water softener had ruptured.
The softener has resin beads that are inside a membrane. These resin beads play a vital role in exchanging salt for minerals and hardness in the water. However, when the membrane breaks that holds these resin beads in place, they are free to travel wherever the flow of water takes them. In this case, to every faucet, shower, bathtub, and toilet that were used prior to the problem being diagnosed.
If this happens to you, immediately go to the water softener and engage the bypass valve. This is found at the rear of the piping behind the softener and will completely bypass the softener. In effect, it is like no softener is installed. Your only option to once again have soft water is to replace the unit.
To repair the plumbing clogs, you will need to go to every affected plumbing fixture and remove the resin beads.
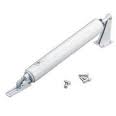 Pneumatic door closers are the weak little sister of hydraulic door closers. Pneumatic door closers are good for closing lightweight screen doors, as they use air in the closing mechanism versus the oil used in the more powerful hydraulic closers.
As a handyman, we are asked which type to use, and the answer is that it depends. It mainly depends on the weight and size of the door. Lightweight doors, such as screen doors or hollow doors, can generally be pulled shut by a pneumatic closer, whereas heavier doors, such as steel exterior doors, need a hydraulic closer.
The closing is done by an internal spring inside the closer. As you open the door, the spring tension begins to close the door. The rate of closing is controlled by a piston and chamber that fills with air when the door is opened. There is an adjustment screw on the end of the closer that controls how quickly or slowly the air empties from the chamber, and consequently how quickly or slowly the door closes. That's why you hear a hissing noise as the air escapes from the chamber...it's more of a controlled slamming of the door.
These pneumatic closers are a game of adjustments. You can adjust how quickly the door closes by adjusting the screw that allows air to escape. However, the door may still give you problems. If the door doesn't close the last few inches, you will need to play with the bracket on the door where the closing arm mounts to it. Many of these brackets have several sets of holes to allow for this. If you move the arm to a hole farther away from the closer, you should get enough force to close and latch the door. If your bracket doesn't have a series of holes for these types of adjustments, you will need to move the bracket slightly farther out away from the closer.
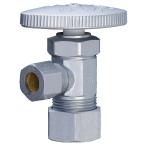 Most people hate plumbing jobs. When I'm asked to replace an angle valve to a toilet or faucet, and the valve uses a compression fitting, I rarely go through the hassle of replacing the compression ferrule and nut. You can't get the nut off without removing the ferrule anyway, but you don't need to, unless you want to change colors, for example from chrome to gold. You might also have to remove them if you want to replace the escutcheon trim ring behind them. The ferrule is a soft anyway, and will mold to the new valve when you tighten down the nut that squeezes it.
If you do need to remove the ferrule and nut, you can try one of several methods. First, I would use a large pair of channel locks, or pliers and firmly grab the ferrule. Then move the pliers up and down to get the ferrule moving. While you are doing this, force the ferrule towards the end of the pipe. The ferrule should come off of the pipe after a minute of moving it.
You can also try to cut the ferrule. Score it with a hacksaw blade to the point where you can break the ferrule. Remember though that the last thing you want to do is damage the bare pipe. So cut to the point where you comfortable and then use a large standard screwdriver and insert it into the groove that you just cut. With a quick twist of your wrist, you should be able to snap the ferrule.
If you have no plans on changing colors or finishes, I would simply re-use the old ferrule and nut.
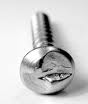 If you've ever wanted to replace a security door or gate, you know that the major roadblock are the one-way screws. They are not meant to be removed and therefore don't have the complete slot in the screw head. The slot in the screw head is cut in such a way as to only allow tightening of the screw, not loosening of it. So if you want to remove this type of screw or bolt, how would a handyman do it?
There are special tools you can buy specifically for this purpose or you can manipulate the screw head to reverse it. The tool you can buy chucks in your drill and you slowly back the screw out.
If you don't want to buy the tool, you can use any one of these methods...try holding 2 hacksaw blades together and cut a new slot in the screw head. This will allow you to get a standard screwdriver in the slot and allow you to unscrew it (a grinder would also work well here). You can also use the grinder to clean up the existing slot so that you cut a shoulder in the head to unscrew it. Or, use the grinder to cut a new slot perpendicular to the existing slot.
Finally, you can use the grinder or a file and cut the sides off of the screw head so that the 2 sides are parallel. This will allow you to use a wrench and unscrew it like the head of a bolt.
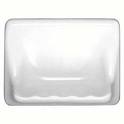 Little kids love using the soap dish as a handle to pull themselves out of the bathtub. It's also the perfect height for a women to rest her foot on as she shaves her legs. So a soap dish takes a lot of abuse, until it finally comes off of the wall. So what do you do then? Well, you can call your favorite Las Vegas handyman, or you can grab a few items and stick it back on the wall yourself.
Some soap dishes are simply glued to the existing ceramic wall tile, and other ones are glued to the cement board or green board and then the ceramic tile is placed around the soap dish. Whichever style you have, you may be able to reuse it or you might have to purchase a new one.
If you are sticking it back on to the ceramic tile surface, use mastic and get it nice and level. Once you have the soap dish in place, use some blue painter's tape to hold it there until the mastic dries, and then remove the tape.
If you are installing the soap dish into the pocket created by the surrounding tile, after you clean out the area, you can use mortar or mastic, again using the tape to hold it in place.
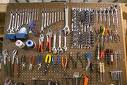 My garage is like many other homeowner's garages. It's messy. Many garage tinkerers leave their tools and projects laying around. As a handyman though, I take my tools with me. But that brings up a good point of what an average homeowner can do to organize his tools. Short of an expensive multi-leveled toolbox, you can always hang your tools on the wall.
This is done with pegboard and can be made on the cheap depending on if you want it to be a few square feet, or if you want it to cover the entire wall. You can make it as large as you want.
The thing to remember is that you will need a small space behind the pegboard so that when you insert the pegs and hangars they have somewhere to go, rather than hitting the wall. To accomplish this you can build a frame around the perimeter of the pegboard using 1"x 2" furring strips. Basically build a frame and secure the pegboard to this frame so that the frame acts as a spacer for the pegboard. If you are planning on a using a large sheet of pegboard, you will need to use the furring strips about every 18" to stabilize the pegboard and make it more rigid, plus they will give you more points to secure it to the wall.
When you've got the pegboard and frame ready, screw it into the wall studs through the pegboard and furring strips and start hanging your tools.
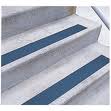 Stairs can be dangerous to climb, especially when they are smooth with little texture for a shoe to push against. In a home, stairs are usually carpeted with makes for easy traction for a foot or shoe. However, in a commercial building or even outside, you see the potential for slips.
An easy carpentry job is to make these types of stairs safer. Most stairs will have an edge where you place your foot called a stair nose. This is at the tread and will sometimes be made of a different material than the stair tread and can have texture on it for traction. For concrete stairs it is a good idea to install some grip tape or non-skid strip. This is available at most home centers and is typically a peel-and-stick product.
The non-skid strip looks and feels like a large grit sandpaper. Clean the surface of the stair nose and peel the backing off of the strip. Placement is important here. You want to install the strip along the top front edge of the stair tread, as this is where people place their foot when climbing stairs. Placing the strip at the rear of the step next to the riser will not do much good since the foot will not be as likely to contact it.
Smooth exterior stairs and stairwells would benefit most from this treatment.
 As a trustworthy handyman service, we are asked to work unsupervised in many vacant houses. This is convenient for everyone, as the customer doesn't have to waste their time babysitting us, and we can work in a more relaxed environment.
Recently, a new buyer had us do some work in a home she just purchased that had been bank owned. She was working full time and gave us a key to the property. We were done in few days and (since she carried a duplicate key) placed the key inside the house and left the house completely locked up. She couldn't understand how we were able to leave the house locked without using the key. It's actually very easy...if there is a garage door opener.
When you are ready to exit the house, simply lock all of the doors/windows from the inside as you would if you were going to bed. Press the garage door opener button to raise the door. Now here's where it gets fun...press the garage door opener button again to start closing the door and race out of the garage. The only thing is that you will have to step over the invisible sensor beam that reverses the door. It looks very strange: press the wall button, sprint to the door, and step over the invisible beam so as not to cause the door to reverse...all while you are bending down because the door is closing.
I told the customer how this is done and it was like a revelation. She had tried this before and the door always opened back up.
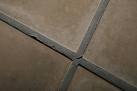 If you've ever grouted a floor or wall, you know that grouting is not a difficult job. However, the perimeter of the area can be troublesome if you are not careful.For example, on a ceramic tile floor that meets the baseboard, you can really create a mess if you try to push too much grout into the gap between the edge of the tile and the baseboard, and the grout gets on the baseboard and looks sloppy.
Some people will try to cut the tile right up to the baseboard, but you still are forced to deal with a small gap. The way around that, of course, is to remove all the baseboard, install the tile, and then reinstall the baseboard over the tile. This creates additional work and also raises the baseboard which may cause problems if the room is adjoining and the other room's baseboard isn't being raised up as well.
My handyman tip is to use painter's tape. You can use a roll of the painters tape and lay it flat on the ceramic tile after the mortar has cured. By laying the roll flat, you are aligning it flush with the surface of the tile, so that the finished product will be seamless.
So before you start grouting, lay out a strip of the tape (1" or 1 ½" wide works well) around the perimeter of the room. I start a strip on the baseboard and then, laying the roll on the floor, pull the roll out and stick the section to the baseboard. I do about a foot or so at a time until all of the baseboard has tape on it. You don't need to completely cover the baseboard, just at the bottom where the grout could touch it.
Once you grout the gap between the tile and baseboard, you can pull the tape slowly off the baseboard. This will essentially cut the grout perfectly level with the surface of the tile. The trick is to pull it fairly soon after you've grouted the area. If you wait too long and the grout has dried, the tape will rip and not be able to pull through the grout. A few minutes is all you will need after you have grouted the perimeter. When you pull the tape, the grout will crumble off of the tape and you will have a perfect finish right up to the baseboard.
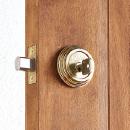
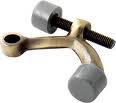 As a handyman I get asked a lot of questions. This time I had a customer who was asking about doorstops. She had very nice base molding that is stained and finished, and I didn't blame her for not wanting to screw a doorstop through it, even though you can get some pretty fancy doorstops. Failing to install doorstops will likely lead to a drywall repair when someone swings the door open a little too aggressively, and the door knob pokes a hole through the drywall. So what is the answer?
You can install a hinge pin door stop. These mount in the hinges of the door and have little padded arms that push against the door itself and the door's frame (or trim). You can adjust these by turning a set screw to open or close the distance of where the resistance begins.
These types of doorstops are best for hollow core interior doors as they are lightweight, however they are so lightweight that this type of doorstop can punch a hole in them if too much force is used. For heavier doors you may need to install a door stop on each hinge pin and adjust them so that they give uniform resistance.
Installing them is easy. Just tap out the hinge pin and insert it through the doorstop. Then tap the hinge pin back into the hinge and adjust it.