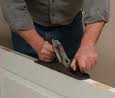
 A door can give you problems if it not closing or opening easily. If you have tried adjusting it and still have not met with success, you might have to resort to planing the door.
Generally, I use planing as a last resort, but a hand plane does come in handy in certain situations. For example, if you have already adjusted a door and have a sliver of wood to remove to get the door to open and close, a plane is the ticket.
Use a well-tuned plane and plane from the edge inward. If, for example, the top edge of your door is hitting the jamb when you try to close it, plane from the edge toward the middle of the door. You will likely have to remove the door for good control of the plane. Adjust the plane so that it takes slivers of wood with each pass. Place the plane squarely on the edge of the door and push it gently and evenly along the edge of the door. It's a good idea to use a piece of scrap wood to guage the thickness of the shavings to make sure you have the thickness right.
When the thickness is thin enough, then you can apply uniform pressure with both hands in removing the small amount of wood. You can actually get a shaving of wood thin enough where you can hold it up to a newspaper and read the printing through it.
After you have removed the shavings, you can paint the exposed surface to blend in with the rest of the door.
 A home inspector completed an inspection of a resale home on behalf of the new buyers and found a problem with a double door lock. He suggested the buyers contact a handyman to repair it. On a set of exterior double doors, you will have a stationary door that secures to the top jamb and the threshold with a set of sliding bolts or pins that sink into the opening preventing the door from operating. The swinging door latches into the stationary door and locks into it. If the stationary door has problems with the bolts that secure it to the frame, then the swinging door has little chance of locking and securing the opening.
Many of these problems deal with the fact that the sliding bolts may not be fully engaged into the holes that receive them. This may be for many reasons but repairing them shouldn't be very difficult. Sometimes the hardware will be loose and it is a matter of tightening up the sliding bolts and making it so that the bolts actually go into the holes again. In other cases the easiest thing to do is to ream out the holes slightly larger so that the bolts can engage the holes and securely lock the door. You can also clean the hardware and lubricate it so that it slides easily.
 Some people really like to the look of laminate...countertops, desks, filing cabinets, and dressers. Laminate is very durable, cleans easily, and is pretty easy to install. They even make good surfaces for a workbench for your handyman.
If you have a surface, like particle board or medium-density fiberboard, you can spruce it up with laminate. You want to trim it with a minimum of overhang so you won't have much to trim after it is glued to the surface. Use contact cement and a thin-napped roller and roll on a coat of the contact cement on each surface...cover both the particle board and the laminate surface you are gluing. Let that coat dry and roll another coat on each surface again and let that coat dry. I suppose you could use contact cement in a spray can, but I like the heavy coat of rolling it on.
The dried surfaces will be slightly tacky but don't touch them together until you are sure they are properly lined up. Once these surfaces touch, they won't easily let go. It is a good idea to use something to keep the surfaces apart until you are sure they are lined up and ready to touch. I like dowels for this. You can lay a couple of wood dowels across the particle board and then lay the glued laminate on top of the dowels. Once they are lined up, just remove one dowel at a time and push the surfaces together. You can use a rolling pin to roll the surfaces together.
Once the surfaces are glued together, you can use a router with a laminate cutting straight bit in it and go around the perimeter of the surface. When two laminated surfaces meet, you can use a laminate cutting angled bit to give a decorative finish.
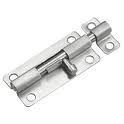 Installing a barrel bolt lock is quick and easy for any handyman. This type of lock is simply a metal shaft that is secured to the door. It slides in-and-out of a guide and, depending on how the door frame sits, can either be slid into a stationery receiving piece, or directly into the door jamb or frame itself.
These types of locks don't provide a lot of protection from an intruder, but they will make it so the door won't open. By the way, they are great for kids that are adept at opening a doorknob from going outside.
You can mount these anywhere you feel comfortable, but just make sure it is level. I like mounting the movable bolt on the door first. They usually take four screws, so use the appropriate screws for the type of door you are mounting it to. Also make sure that the bolt extends far enough into the catch or the door jamb so that it will reach and lock properly.
Once the bolt is installed you can mount the catch in the corresponding point. If you are mounting the catch to the frame or jamb, extend the bolt fully and mark the holes, where the catch will sit. Pre-drill the holes and screw it down. If the bolt will extend into the frame or jamb, put some lipstick or crayon on the end of the bolt and push it out until it hits the bolt. This will leave a mark on the jamb so that you will know where to drill the hole to receive the bolt which will lock the door.
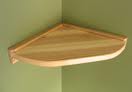 If that corner in your room is beckoning you to do something with it, you might try installing a corner shelf there to put pictures, books, or maybe even a TV. So here is how a Las Vegas handyman goes about it?
You can buy a corner shelf at a home center, but these tend to be a little small for storing or displaying anything of substance. You can certainly make one out of solid wood, MDF (medium density fiberboard), or even melamine, but you will have to install a decorative edge on the melamine or you want to curve the shelf. You need to figure out the size and whether you want the shelf curved or straight across. After that it is a matter of determining how you want the shelf to appear...paint, stained and varnished...you decide.
So all that is left is to install the shelf in the corner. I like to use 2 ledger boards for this. You can use 1"x2"s and, after making sure they are level, screw them at your designated height into the wall studs. The shelf will sit on top of these boards and get secured to them with countersunk screws.
If you need a little extra support for a heavier object (like a TV), you can install some cross braces using the same 1"x2"(or larger) wood supports that span from one ledger board to the other. These cross supports will minimize deflection and give the shelf more stability.
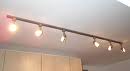 Homeowners ask their handyman to install a variety of light fixtures. Flush mounted, hanging, recessed, and track lighting fixtures. They all install very similarly, with each type of fixture fitting a different need. The benefit of track lighting is that you can have a multitude of lights on a single fixture and can direct the lighting to wherever you want.
Since track lighting fixtures mount on the surface, it makes for a very easy installation. In many ways, installing a track lighting fixture is like any flush mounted fixture installation, except that you have a larger fixture and more lights.
Generally, you start by installing the fixture to the junction box and making the wiring connections. Here is an article on installing a light fixture and a discussion on wiring. Once the connections are made, the track is run and mounted into the ceiling. It's always best to install the track into the ceiling joists if possible, but if not, the fixture will come with drywall anchors to support it.
Some track lights use standard light bulbs and others use small halogen bulbs with a transformer. The individual fixtures are placed in the track and typically make electrical contact by turning the fixtures until they are seated in the track. Once that is done, adjust the lights to wherever you want to direct the light.
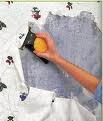 Removing wallpaper is a nasty job. There are so much uncertainty that is makes any Las Vegas handyman want to refuse the job. This is how I get good results.
Wallpaper usually comes off in 2 layers, the actual attractive surface, and the adhesive backed paper. Sometimes it comes off in one sheet, but don't count on it.
You can buy a wallpaper scoring tool which fits in the palm of your hand. Swirl this around on the paper to cut tiny perforations in the paper. The more perforations the better, so don't be bashful. Once you have scored the paper you can apply the enzyme solution. This is mixed with hot water and applied to the wall, which dissolves the adhesive. Follow the directions on the package, but generally you use a sponge and wipe it on the wall, wait for a period of time (15 minutes is common), then apply it again. After waiting some more you should be able to peel away at least the top layer.
If all you get off of the wall is the top layer, then apply some more of the solution and begin the process again. Sometimes if you use a plastic putty knife, you can get a corner lifted and begin goosing the paper off of the wall.
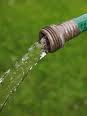 When your old garden hose springs a leak, you can fix it or buy a new one. If you buy a new hose, you can spend between $10.00 for a cheap hose to upwards of $100.00 for a large diameter rubber hose. Take it from a handyman, It is cheaper to fix the damaged hose with a repair kit. The repair kit will correspond to the size of your hose, but some universal repair kits can fix hoses from 5/8" to ¾". The kits also work for any hose material.
You will need to cut out the damaged area with a nice square cut. Use a sharp utility knife for this and the hose will cut cleanly and easily. The cut ends of the hose will push onto a coupling that has barbs on each end. You might put some liquid soap on each end of the coupling to act as a lubricant and allow the hose to easily push onto the fitting.
Once you have the hose pushed onto the fitting, there are clamps that will secure the hose to each side of the coupling. Sandwich the hose in between the two halves of the clamp and tighten the screws down. Do this for each side of the coupling and you are ready to start washing the car.
 I generally like the universal door sweeps that just slide along the door bottom and get screwed to the back. It is adjustable and works on all doors. However, if a customer has a specific door sweep, I would rather use it than a generic one.
A customer has a front door that has a rubber door sweep inserted at the very bottom of the door. She purchased a new door sweep and wants it installed. The sweep she bought is specific to this door. It has two arms that are barbed that install into some grooves into the bottom of the door. This door will need to be taken off of the hinges for the new sweep to be installed.
Removing the old sweep is a matter of goosing it out of the grooves. After you remove the door from the hinges, use a standard screwdriver and, starting at one end, gently pry the old door sweep from the grooves. It will likely come out pretty easily.
Installing the new door sweep isn't much more difficult. There will be some resistance from the barbs on the arms that go into the grooves, but this is good since that is what will hold the sweep in place. Line up the sweep with the edge of the door and start pushing it into the grooves. You will likely need to hold a thin piece of wood under the sweep and hammer against this wood to fully insert the sweep into the grooves. A few paint stir sticks held together works well for this. Once the sweep bottoms out against the door, trim the edge of the sweep so that it is flush.
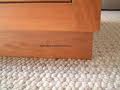 Some carpentry jobs are easier for a handyman than others. For example, replacing toe kick on your cabinets. Toe kick is the piece of decorative trim at the base of your cabinets. At the base of your sink cabinet is an indentation which makes it more comfortable to stand and, for example, wash dishes. Without this indentation you would be forced to stand further away from the sink and stretch your arms out or stoop to reach the sink. Covering this indentation is the toe kick. It's called toe kick because you can kick this board with your toes as you approach it.
Toe kick on modern production cabinets is a thin decorative piece of wood that spans the base cabinets for a finished look. Behind the toe kick is either a support piece or just the edges of each individual cabinet. Without the support, this thin wood will easily break if impacted by a foot. Water damage is also a popular cause of replacement.
You can pry off the old toe kick with a pry bar or get it started with a standard screwdriver. The trick is to find the same, or close material to replace it with. Since it is recessed in the indentation, you are not likely to pick up as many differences in the appearance as it will be partially shaded by the overhang anyway.
You can buy several styles and colors at a home center or you may have to go to a cabinet manufacturer or specialty lumberyard. You may even have to stain and finish it to approximately match the surrounding cabinets. Most home center product is already finished, so that's a good place to start.
Once you cut the toe kick to length, you can glue or use finish nails to keep it in place. You can cover the corners with decorative trim pieces, which makes mitering unnecessary.