 There are many different methods to cut PVC when doing a plumbing repair, and much of it will depend on where the PVC is located. Is it accessible in the garage or is it below ground at the sprinkler valves?
If the pipes are accessible and you have the room, you can use a traditional hacksaw. This will make quick work of cutting the pipe, but the edge will be rough and will leave burrs around the cut which you will have to remove before you glue the pipe. If access is limited, you can use a one-handed hacksaw, which is basically a small handle with a hacksaw blade sticking out of it. This will also leave a rough cut.
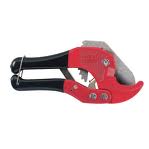
You may also choose a pipe cutting tool that revolves around the pipe as you apply more pressure through the cutting wheel. This tends to leave a small flare at the end of the pipe, but it is a clean cut.
For areas where space is restricted, you can use a wire saw. This works well when the pipe is below ground. You simply thread the wire under the pipe and alternate the pull stroke with either arm. This will cut the pipe and leave a fairly clean cut.
The PVC cutting tool I like best looks like a large pair of scissors. You open the jaws, place the blades where you want the cut and start squeezing. This tool has a ratcheting mechanism that allows for a slow, clean cut. The only warning here though, is to make sure the blades are sharp. If not, at the end of the cut, the pipe will tend to break off rather than cut cleanly.
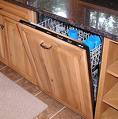 If your dishwasher doesn't look quite right sitting in it's alcove, there may be an easy fix for it. I've seen dishwashers sticking so far out that it looks like the installer didn't push it in all the way. I've also seen them where they are pushed too far into the opening so that you really have to reach back in there to grab the handle.
So the first thing I would do is to adjust it for height. The feet are hexagonal shaped and you can twist them to either raise or lower the height of the dishwasher as it sits in the hole. It's as easy as screwing in a bolt.
The other adjustment will align the dishwasher with the front of the cabinets so that they are all in the same plane. If you open the door of the dishwasher, you will see 2 small metal tabs sticking out of the top of the dishwasher. These metal tabs will have a hole in the middle. Once you have the dishwasher where it is centered and is equidistant from the cabinets on either side of it, install a screw into each tab. This screw will go through each tab and into the wood base of the kitchen countertop (just make sure the screw isn‘t so long that it penetrates the top of the counter). This will hold the dishwasher in place and in line with the cabinets.
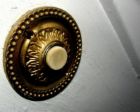 In today's world of foreclosures, repossessions and short sales, I'm no longer surprised at what people take from a house...but really, a doorbell button? So the new owners called this Las Vegas handyman and asked if we could install a new doorbell button.
If you are missing your doorbell button, the first thing to do is to touch the wires together. If you get the "ding-dong" sound, then the only thing you need is a button. If you don't get the "ding-dong" sound, then you will have to troubleshoot the problem. Read how to troubleshoot your doorbell repair.
All that is left to do is to buy a replacement button. You can install whatever style and size that you like. They are universal and install in about 1 minute.
On the back of the doorbell button is a means of connecting the 2 wires coming from your wall. These are low voltage wires, and although they are low voltage, it is always safer to turn off the power to the unit when servicing it. Anyway, connect one wire to each terminal on the back of the button. The terminals are usually screws, but some doorbell buttons have little clips that hold the wires. It doesn't matter which wire goes to which terminal as the button simple acts as a switch to break or connect the flow of power.
Once the wires are hooked up, test the button for sound and secure it to the wall. Some buttons have screws for mounting, and others have a small friction clip that holds it inside the small hole in your wall. If you use this, I would also use some caulking around the perimeter of the button to secure it.
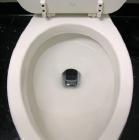 I am a Las Vegas plumber. If you have a poor flushing toilet, you can spend a lot of time and frustration trying to diagnose the problem...and still may not figure it out. A good flush relies on good water volume, good siphoning action (for a traditional gravity-fed toilet), an open drain, and a clear vent to allow air into the system. If you are not getting enough water in the toilet bowl quickly enough, you're probably not going to have a very strong flush.
This can be the result of several things. Most people would be quick to replace the toilet flapper, or at least adjust it so it stays up longer and allows more water into the bowl. However, there is another possibility that people don't consider.
On the underside of the rim of the toilet bowl are holes that allow water from the tank to empty into the bowl. These holes start out large and easily allow the quantity of water to pass through to push the waste down the drain. Over time though, these holes can develop scale and deposits and close substantially. You will need a mirror to see these holes.
A small folding cosmetic mirror works well. You can hold the mirror at an angle slightly below the rim and see the holes. Straighten a metal coat hanger and pick at the holes to clear them. You will see the scale drop from around the openings. You can also buy gels that will dissolve this scale, but this will fix the flush problem quickly and inexpensively.
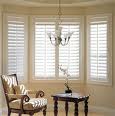 If you have shutters on your windows, consider yourself lucky. They are very nice, but can also be pricey. Occasionally, shutters will need a little TLC with some minor carpentry repairs.
Shutter panels don't get opened and closed much like the louvers do, but when they do, they swing open like a door. They are held closed in the frame by a catch, similar to what you might find on some cabinets. Rarely do you see a magnetic catch on shutters, usually it is a friction type catch.
For the most part, these catches get bent or damaged. If you are lucky, you may be able to straighten out the latch with pliers if it has gone askew. If you can't repair it, just buy a new one and replace it.
It is a matter of mounting the receiving end of the catch on the inside of the shutter frame where you can't see it. Then just line up the mating piece and screw it to the shutter door side so that when the meet, they hold. If it is a large shutter, it may take two catches, one mounted at the top and one on the bottom of the shutter.
 If you've got a loose railing or a wrought iron fence that sits on top of concrete or concrete block, there is an easy way to reattach it. If you are like this Las Vegas handyman, you want to try the easy things first. The railing will be held to the concrete by a fastener, typically a concrete anchor. If you are lucky, you can tighten it up and be done. There is a nut that holds the railing to the concrete, simply tighten this nut and cross your fingers that it works.
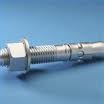
You may have to use a larger anchor. If that is the case, you will have to remove the old anchor and drill the proper sized hole according to the size of the anchor you are using. You can use a standard drill with a masonry bit, which will take longer, or you can use a hammer drill which will quicken the job.
Once the hole is drilled you can use a redhead anchor. This anchor drops in the hole and has bolt threads sticking out of the top. Once the anchor is in the hole, set the railing on top of the bolt and add the washer and nut. Tighten the nut down to firmly hold the railing in place. As you tighten the nut the anchor grabs the walls of the hole you drilled for a solid installation.
 When you install a pre-hung door in an opening, you are going to have some nasty looking gaps and cuts. The gaps will be between the drywall and the perimeter of the door frame. This area is used to shim the door to make sure it is plumb and square. This helps the door to operate correctly.
Over these gaps is placed door trim or casing. It installs easily with a nail gun and a compressor, but you can certainly use the old hammer and 4d finish nails. The key is to have a reveal.
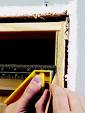
For door casing, a reveal is the small area that stands proud of the casing. It basically is the corner of the door frame as it is revealed from the edge of the casing. As you lay out the casing keep the reveal at a uniform 3/16ths of an inch all around the opening. It will give the installation a more attractive appearance. You can use an adjustable square and set it for this distance and then just mark a pencil line around the perimter of the jamb. This line is where the edge of you casing will stop.
Use a level and secure one side of the vertical jamb with 2 finish nails (the nail gun is perfect for this job-very quick and accurate), after cutting a 45-degree miter at the corner. I like to start on one side, cut the miters, and then continue across the top and down the other side. Once the door casing has been installed, you can install the baseboard square to the casing, or you can miter cut both pieces to make everything flow without any breaking points.
Once everything is installed, you can fill the holes, sand, and paint.
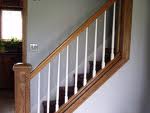 There are times when a wooden stair spindle or a spindle on a railing will break which requires replacing the broken spindle. This small carpentry job is all about finding or making a replica of the broken spindle.
You should remove the broken spindle and take it with you to find the new one. The first places to start would be the larger big box stores, and then after that you can try specialty stair manufacturers. If they don't carry them, they can make one for you or refer you to someone who can. If you have a lathe, you can turn one yourself after getting the right species of wood. Most of us though will have to pay someone to make a replacement.
If your broken spindle is on a stair railing, you will have to ream out the hole in the railing that holds the spindle. Find the appropriate drill bit and clean up the hole. Then measure the length and the angle at the bottom where the spindle will sit. Cut the bottom of the spindle to match this angle.
Once the length and angle are correct, glue the top of the spindle into the hole on the underside of the railing, and swing the bottom into place. Glue and nail the bottom into place.
If your railing is level, in other words doesn't go up or down stairs, you can use the same strategy, just toenail the bottom of the spindle into the base.
 You don't have to be a drywall veteran to get good results matching drywall texture. You can go to any home center and buy texture in an aerosol can that will give you very good results, even if you have never done it before. Drywall texture that resembles the peel of an orange, hence the name, is very popular and so I will focus on that type.
Orange peel texture uses higher pressure and a smaller orifice than other texture types. When you use an aerosol can, you will have to take a few practice shots on a piece of scrap or cardboard. If the texture comes out not quite right, you can adjust the size of the orifice by turning the dial on the can, or by using a smaller straw (if you purchased that type of spray). If the pressure at the nozzle is too high, you can stick the can in cool water to lower it. Conversely, if the pressure is too low, you can stick the can is warm water to raise it. These adjustments will all affect your finished look, so play around with them until you get it right.
When you are ready to spray the texture on the wall, keep the can moving as you depress the button or trigger. You can tape a section of newspaper on the wall with a cutout of where you want the texture to fall. This will help control overspray and make for easy cleanup. Once the texture is dry, you can paint just the patched area if you have a great paint match, or more likely, the entire wall for it to blend in.
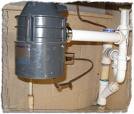 No offense to cavemen, but let's face it, there are times when we just don't have all the available tools to do the job. I get calls like this everyday, where the garbage disposal doesn't work at all or, if it does, it just hums or buzzes. That is a sign that it is jammed. There is reset button on the side of the disposal or underneath it that should restart the motor, but this will likely just get it to make a humming noise.
When a disposal is first purchased, they usually come with a tool to unjamb them...it looks like a hexagonal Allen wrench that has some lazy curves on each end. This is placed in the center hole underneath the disposal and jiggled. This will usually free the disposal up to run smoothly again. However, in a pinch go grab your broomstick and get ready to go caveman on it.
Place the broomstick in the opening of the disposal...you won't need to remove the disposal from the sink. You want to place it behind one of the blades in the disposal's grinding chamber. You will have to feel for them with the broomstick. It doesn't matter which way you push, either clockwise or counter-clockwise. With some quick, short bursts, try to force the blades to move one way or the other. You don't want to push outside the plane that the blades operate in either, as you might dislodge the disposal from the sink. You may have to alternate directions to free it up, but it should work with a little persistence.