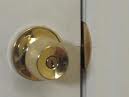
 Replacing a doorknob is really an easy job. You typically only need a screwdriver and a little bit of mechanical aptitude. It doesn't matter if the doorknob is a round knob, a lever, or a thumb latch style...they all go in the same way.
Open the door and stick your toolbox in between the door and the frame (so it doesn't close while you are working). The screws that hold the 2 halves of the doorknob together are located on the interior side of the door. Check the handle and you will see them sitting in there. Unscrew them while holding both sides of the door knob in place. Once the screws are removed the two halves will pull apart. Then remove the 2 screws that hold the latch button in the edge of the door and pull it out.
The new doorknob will have the same parts to reinstall. The latch goes in first with 2 screws. You may need to change the backset distance, but this is simply rotating a piece in the latch mechanism. Once the latch is in the front and back halves of the doorknob go into the hole in the door and through the latch, so that when you rotate the handle, the latch moves and retracts the latch button. As you are holding the halves together, rotate the handle to verify that the latch retracts. After that you can install the screws that hold the two halves of the doorknob together.
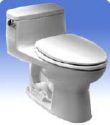 A slow filling toilet tank is frustrating. You flush the toilet and five minutes later the water is still running to fill that tank. Assuming the float in the tank is set correctly, I would focus on either the water supply valve or the toilet fill valve. In my experience, the problem is usually with the fill valve. The fill valve is connected to the water supply line that exits the wall beneath the toilet tank.
The very first thing to do is to make sure that the water supply valve (aka angle stop) at the wall is opened fully. If it is opened only partially, this explains why you would get a low flow of water to the toilet. Turn it counter-clockwise until it stops. If it is already fully opened, you need to test it to make sure it is not clogged. Turn the valve off and disconnect it from the bottom of the tank (this is where it connects to the toilet fill valve). Point the hose into a bucket and open the angle stop you should get good water pressure spraying into the bucket. If not you can replace the angle stop to fix the problem. If you have good water pressure, I would replace the fill valve.
A fill valve can get choked up with scale and slow the flow of water. The next step to fix the problem is to replace the fill valve.
 When you change the flooring in a room, you will have to deal with the transition between that room and, for example, the hallway leading to that room. There are transition pieces for virtually all flooring types. Some look very unattractive though as they are bulky and don't match either of the flooring surfaces.
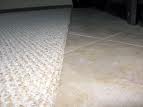
For a transition where carpet meets ceramic tile, this handyman prefers to use a transition piece that is hidden under the carpet. The finished product looks like the carpet just butts up against the tile and has a very clean appearance. This is done with a metal "S" channel and lies under the edge of the carpet. The carpet gets cut and tucked under the lip of the channel.
The channel doesn't look like much. You will need to remove 2-3 inches of carpet padding along the transition area. The open side of the channel is spaced about ½" from the edge of the tile and secured to the concrete pad or wood sub floor. The carpet must be cut about ¾" long and is folded around the channel in the space between the channel and the edge of the tile. Once the carpet edge has been uniformly placed in the groove, the metal channel is hammered downward which pinches the carpet tightly to the edge of the ceramic tile. It has a very clean appearance.
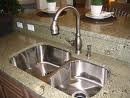 Installing an undermount kitchen sink can be tricky. If you are getting new countertops, such as granite, the installers will often cut the sub-top so that it supports the weight of the sink, and then the granite lays on top of the sink for a nice installation. However, if you are replacing an undermount sink or repairing one that has come loose from the counter, there is a trick that works very well.
An undermount sink is typically held to the underside of the counter with adhesive, and some mounting clips. The adhesive is typically a two-part epoxy to hold the clips and sink in place. Silicone caulking also goes around the perimeter of the sink
The trick is to get the sink to pull tightly to the underside of the new countertop. If your countertop is granite, make sure you clean the underside of the counter as dust will often cause the epoxy to fail. When the installer cuts and polishes the opening for your sink, this creates a slurry of dust that will often find a home under your counter...right where your new sink mounts.
Getting your sink to mate to the underside of the countertop is not difficult, but will take some creativity. Use a 2 x 4 stud and lay it across the counter to span the opening. At this point you have a choice. You can use some adjustable bar clamps and place one end through each drain hole in the sink and the other end over the 2 x 4 and cinch them snuggly so that the sink mates perfectly with the hole in your countertop. If you don't have bar clamps, you can use rope instead. You will make a loop out of the rope and you will need another short piece of a 2 x 4. The shorter 2 x 4 will go through the drain hole in the sink and the rope loop will go over both 2 x 4's so that you are left with the rope going around the 2 x 4's and suspending the sink in the air through the drain(s). Then you can use another piece of scrap lumber and insert it above the 2 x 4 laying across the opening in the countertop but below the rope. Twist this scrap piece of lumber repeatedly and the rope will twist causing the sink to rise up until it meets the underside of the countertop. Then you can clamp the scrap lumber until everything is dry and secure, usually 24 hours.
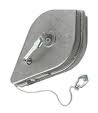 There are times when you need a long straight line and they just don't make a straightedge long enough. This is where a chalk line comes in handy. As a handyman, I use a chalk line when laying out a cut on a large piece of lumber, or laying out straight lines for landscaping projects, etc.
A chalk line is simply a piece of string that is wound up inside a housing. In this housing is also colored powdered chalk. The end of the string has a small hook on it that allows the user to attach it to, for example, the edge of a piece of plywood. Once the string is stretched taut, the user picks up the string and lifts it a few inches above the surface and lets it go. The chalked-up piece of string snaps a straight line on the surface and you now have an accurate line to work from. You can use whatever color chalk suits you, and there is a sliding door to fill the dispenser with the chalk.
Once the user has snapped a chalk line, there is a handle that is used to retrieve the string back into the housing. This also recoats the string with additional chalk.
 At one time or another, we will all want to replace our flooring. If your current flooring is ceramic tile and you want to replace it, you've got a lot of work to do. This is hard, messy work and you're going to be sore for awhile.
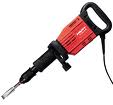
You could take the slow way and use a hammer and chisel, or even a 6-foot breaker bar, but for the money and speed, I would rent an electric hand jackhammer. This is the mini version of a traditional jackhammer. Before you fire it up, you need to prepare for it.
You must wear eye protection, hearing protection, breathing protection, knee pads, and gloves. This little jackhammer will spit shards of tile everywhere. Remove the furniture from the area and drape heavy drop cloths along the base of the walls.
It may make sense to start in the middle of the room and work towards the walls or start at the entryway and work your way in, it's your choice. You will find yourself breaking up tile and then using a wheelbarrow to haul it out of the house. You might also think about protecting the floor where you will be running the wheelbarrow as it will tend to leave a track of dirt from it's tire.
The trick is to try to lift the tile with the blade of the jackhammer. So you will want to keep the jackhammer at a low angle and attack the edge of the tile in hopes that the blade separates it from the sub-floor it is attached to. Otherwise it will shatter the tile and you just have more pieces to sweep up.
Realize that the jackhammer won't remove every piece of mortar from the floor. For this you can use a floor scraper. This is a large steel blade attached to a long wood handle. Once you've got everything cleaned up, you can start thinking of installing your new floor.
 Granite makes a dramatic difference in a kitchen. I had some customers that decided not only to install granite countertops, but also to run the granite up the wall to the underside of the wall cabinets, in place of a traditional backsplash. What an incredible difference that made. Everything in the kitchen seemed to magically come together for a jaw-dropping appearance. The only problem they had though, was that the electrical outlets and switches on the wall suddenly were recessed due to the thickness of the granite on the wall. That's when they called their handyman.
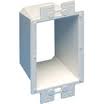
The answer to their problem is a box extender. A box extender is made just for these situations. There is no way you could mount an outlet cover over an outlet that now resides almost an inch in the wall. A box extender solves this by extending the junction box out to be flush with the surface...in this case the surface of the granite. It looks like a sleeve that pushes over the existing box, so there is no need to remove the existing box.
You will need to remove the outlet or switch, gently pull it outward, and slide the extender over it. The outlet or switch gets secured to the front of the box extender which gets secured to the front of the old junction box via longer screws. Then an outlet cover or switch cover will easily cover the extender and look perfectly normal as it will sit flush with the granite surface.
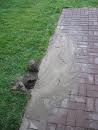 If you've noticed a tall, lush green patch of grass in your yard you may have a plumbing problem. Go over and step in the area and your foot will probably sink to your ankle. This grass is greener and more healthy than the surrounding grass because it is getting more water and/or nutrients. In other words, you probably have a pipe break underground.
The leak may be occurring only when the irrigation system is on, or it may be leaking all the time. You can check your water meter for movement when all other house fixtures are off.
Grab your shovel and start digging in the area of the soft turf. It's probably going to be a lot like a marsh...soft and muddy. You will need to dig to a level where you find the problem. It may be close to the surface, it may not be. It helps to dig a little, turn on the irrigation, and watch for water rising out of the mud. At least then you'll know where to focus your digging efforts.
Once you find the broken pipe, you will need to dig around it so that you can work in the area. Keep the water off so the ground can absorb some of the water, and use a small cup will help you get the water out (tearing a fast food cup in half works well for this).
Inspect the pipe for damage. If you can't see obvious damage, you will have to turn on the irrigation briefly to find it. Let the area dry out and repair the break.
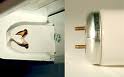 Replacing the tubes on your florescent light fixtures is an easy job...except when you don't have the pins aligned and you crack the florescent light sockets on either end of the fixture.
Replacing broken light sockets is an easy job. Make sure you turn the power off to the fixture before you start tinkering with it. You will need to remove the plastic light lens cover to access the bulbs. After you remove the bulbs you will see a metal cover running down the center of the fixture. Under this cover are the ballasts and wires. The wires from the ballasts to the sockets which provide power to the bulbs. The sockets with either be held my a clip or may need to be unscrewed to remove them.
Now the socket will be dangling in the air. Some sockets will have a quick release harness where you can just unsnap the old socket's wiring and snap in the new one. Other sockets will disconnect from the ballast with a wire nut. The new socket will connect with the wire nut snuggly securing the wires. Just make sure you match up the wires as you install the new socket. In other words, don't remove all the wires and then try to guess where each is supposed to go...do one wire at a time.
Once the wiring is done, re-secure the sockets, re-install the metal cover, and carefully install the bulbs and light lens.
You are ready to tackle some weekend projects including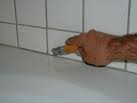 caulking the bathtub or shower, but you first need to remove the old caulking. Sometimes this is easy, and sometimes it seems that you need a jackhammer to break up the old stuff. If luck is on your side, the old caulking will come out in a long strip, but don't bet on it.
Silicone caulking has the reputation of staying flexible and consequently tends to come out easier, but some of the home center brands, water based and latex caulking can get hard and need a little coaxing to come out. For the caulking that is as hard as rock, you can try to heat it up with a heat gun until it is pliable. Keep the gun moving from side-to-side until the area is uniformly warm and then you can cut it out.
Use a razorblade in a holder and push it into the caulking from both sides. In other words, you want to cut it from both surfaces that it is touching. When you encounter and area that you are unable to cut into, break out the heat gun and warm the area back up. Be careful not to scratch the surfaces.
Once you have cut out the bulk of the old caulking, you will likely be left with small remnants of caulking left on the surfaces. You can use denatured alcohol to wipe away soap scum and give the area a general cleaning before you re-caulk the shower or bathtub. Make sure the area is completely dry before you caulk a shower or bathtub.