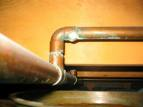
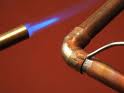
 Invariably there will be plumbing problems. If you find yourself with a copper plumbing fitting that needs to be removed get ready to apply the heat. That is, the heat of a torch. For the most part, the only reason to un-sweat or un-solder a fitting is that you have a leak and it needs to be replaced, or maybe you are re-routing some plumbing lines.
You first will want to have a little wiggle room at the pipe-to-fitting connection. This connection will need enough room to be pulled apart once the joint is loosened, so plan on a few inches anyway. You may have to loosen pipe straps or hangars to get clearance. Also, since you will be working with a torch, have a bucket of water nearby in case you catch nearby lumber on fire. It's a good idea to use a flame cloth and cover any flammable material you will be working near (like wood studs or joists).
Drain the piping so that the pipes can get hot enough to melt the solder. If there is water in the piping, you will turn it into steam and it won't get hot enough to allow you to disassemble the parts. Once you are ready, light the torch and apply the tip of the cone to the fitting just inside of the edge. Keep the flame moving slightly around the perimeter of the fitting to uniformly heat it up. While you are doing this, use large channel locks to slowly pull apart the fitting and the pipe. You will find that heat travels quickly. I recommend using large channel locks or water pump pliers not because you will need a lot of leverage, but because the heat from the pipe well travel quickly and you will feel it in your hand. Once you have the pipe and fitting separated, let everything cool before you start working with them again. Here is some information on how to solder copper pipe.
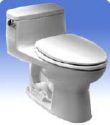 If you suspect a toilet leak but really can't pinpoint it, all you have to do is head towards the kitchen pantry. I know what you're thinking. Why head to the kitchen pantry when the toilet is in the bathroom? Because that is where the food coloring is.
There are kits you can buy to tell if you have a toilet leak from the tank to the bowl, but they are basically a means to color the water in the tank to see if you get some bleed through into the bowl. You can certainly buy one of those kits, but food coloring will accomplish the same thing, and you probably have some in your pantry.
Here's how you do it...after you flush the toilet and the flapper drops back down to start refilling the tank, add some drops of food coloring to the tank (you will have to remove the tank's lid for this). Add enough drops to color the water. Darker colors are easier to see. After you wait 10 minutes, look into the bowl to see if you have any colored water in the bowl. If you do, you have water escaping from the tank into the bowl when it shouldn't be.
To fix the problem, you might want to start with replacing the flapper and fill valve and repeat the test. If you still get colored water in the bowl, try replacing the flush valve.
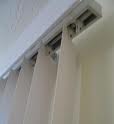 The more your window coverings get operated, the more likely the plastic parts will wear out, and you will need a vertical blind repair. Vertical blinds hang from a head rail and all of the weight is hanging from this rail. However, vertical blinds also have the added bonus of the vanes breaking. The vanes, or slats, are connected to the head rail by a small plastic clip. This clip holds just the very end of the vane and supports the entire weight of the vane. Consequently, it is this tiny piece of the vane that breaks off and requires repair or replacement. You probably don't need a handyman to fix this for you.
You can buy reinforcement clips for the top of the vanes or replace the damaged vanes.
To repair the vanes, you can install the reinforcement clips. You will need to cut out the damaged area on top of the vane so that the finished area is the shape of a rectangle. The repair clip slides over the top of the vane and creates a new pocket so that the vane can be remounted to the head rail.
The other option is to buy a new vane. Stores typically sell replacement vanes in the most popular colors and materials. You can generally find the popular ones at a home center and they would just slide into the head rail clip.
 Drywall anchors can be extremely helpful. They are great for hanging pictures and objects from the wall, where you don't have a wall stud directly behind. The preferred way is to hang the object to a wall stud because the stud is capable of supporting a great deal of weight.
Not all drywall anchors are created equally. The small cone-shaped anchors don't give me much confidence in hanging an object. I have found that the strongest anchors penetrate the drywall and have a mechanism for holding the anchor to the wall. The weak anchors will pull out of the wall, but a well-designed anchor will not. That's not to say that a strong anchor won't pull out of the wall...it just may pull a chunk of drywall out with it.
There are two anchors that I like. There is a plastic anchor that has very large, deep threads. These threads bite into the drywall and bottom out against it. The other type of anchor is metal and has a toggle feature on the end of it. Both types of anchors screw into the wall, but the toggle anchor has a mechanism that pops out inside of the wall (on the other side of the drywall). Once you start to screw the anchor in, the toggle is drawn into the back side of the drywall and clamps against it. Then you can just attach whatever object you are hanging to it.
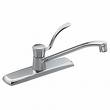 There are many places a kitchen faucet can develop a leak. One of the common ones is at the base of the spout. Particularly on a single handle faucet, the spout assembly slides over the faucet body and down onto the base of the faucet. Inside the faucet body is the cartridge and the means to hold the cartridge in place. This spout assembly slides over the faucet body.
The most common cause of this leak is the o-rings that seal the spout assembly to the faucet body. To access these o-rings, you have to remove the handle at the top. Pop off the decorative cover on top of the handle and remove the screw that holds the handle. You will then have to unscrew the cap retainer. Finally, grab the spout assembly with both hands and gently move it back-and-forth while lifting it up and it should lift off.
You will see the o-rings it their retainer grooves...one at the top and one at the bottom. It's likely that the o-ring on the bottom has failed, but replace them both while you have the spout off. Use liquid soap and slather up the new o-rings and slide them into the grooves without twisting them or you will likely develop a leak. The soap will lubricate the o-rings and make the re-installation of the spout assembly easier and less likely to damage the new o-rings. Re-install the remaining parts in the reverse order and test for leaks.
 Connecting plumbing lines can be a slow process. If you are using copper piping you have to clean, flux, and use a torch to sweat on fittings. For CPVC you have to glue the fittings onto the piping, and for PEX you use crimp fittings that are squeezed around the plastic piping to mate each piece.
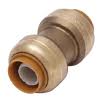
Sharkbite fittings are fast and make solid connections. They don't use glue or heat, but rather use o-rings, grip rings and a series of collars to line everything up. The grip ring is what holds the pipe to the fitting. It looks like a metal ring with angled teeth on it so that when the pipe is pushed into the fitting these teeth are angled in such a way that you can't pull the pipe out (without a special tool). This pins the pipe past the o-ring and into the tube stop for a tight seal. If you need to remove the pipe, you can buy a plastic release tool that pushes a sleeve into the grip ring which releases the teeth.
I generally use the shark bite fittings in certain situations. If I am concerned that a torch is too close to flammable material, or if space doesn't allow traditional joining methods, I'll reach for a sharbite. At nearly 3 times the cost of a copper fitting, they are expensive but worth it when the situation calls for them.
You can join a variety of piping using a sharkbite fitting including copper, CPVC, CTS, and PEX. Just pick the right diameter, cut the pipe squarely, push the pipe into the fitting with a slight twist, and it's done. A depth gauge, which is sold separately, tells you that the pipe has been pushed into the fitting correctly.
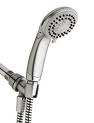 Hand held shower heads are very convenient. Not only can you move them wherever you want them, but they generally have features like a massage spray, pulsating spray, stream, etc. Installing a hand held shower head is exactly like a standard shower head, except that you have a few extra steps.
You will first need to remove the old shower head. Hold the shower arm securely and use an open-end wrench to twist off the old showerhead. Make sure you don't allow the shower arm to move or you might develop a leak in the wall where the arm connects to the shower riser. Clean off the threads of the shower arm and wrap them with 3 wraps of Teflon tape.
Next, install the shower arm coupling. This part screws onto the end of the shower arm and has a threaded fitting for the hose, and a clip to hold the shower head. Screw this coupling on snuggly so that it is oriented vertically when you are done. The fitting for the hose should be pointing down and the clip should be on top.
Wrap the threads of the fitting 3 times with Teflon tape and screw the hose onto this end snuggly. Wrap the threads of the shower head with Teflon tape and screw it into the other end of the hose. Then just turn the water on and check for leaks.
 If you have people in your house with long hair, chances are your drains may get clogged a little more often than other peoples drains. Plumbing is funny that way. If I walked into a master bathroom with 2 sinks, I could probably tell which of the sinks the female used (assuming her hair is longer than the male's) and which one the male used...simply by the smell. As hair goes down the drain, and gets caught in the trap, or the sink stopper linkage, it starts to degrade and you typically get an ammonia smell.
The trick is to stop the hair from going down the drain. You can buy small screens that do a nice job is stopping the majority of hair from going down the drain. One brand is a "Hair Snare", but there are several that will work.
To install one in your shower, you can remove the drain cover and set the screen in place and then re-secure the drain cover. Other styles just drop over the drain. Note that sometimes these will cause the cover to rise up slightly and you will get a small amount of water that puddles around the drain cover. When you see water backing up, you know its time to remove the screen and get rid of all the hair that has collected in it.
 In my job as a handyman, I often have to move items to get access to a repair. These items can be small or large. Commonly, moving furniture away from the walls toward the center of the room is necessary for painting the room...and moving the furniture was a 2 man job. Not anymore. If the room is carpeted it is now a 1 man job.
There are products out there that slide under the feet of the furniture to make this a very quick job. They go by the names "furniture feet", EZ movers, etc. You can buy some brands at home centers, and other brands you have to order online. But basically, they slide under the feet of your furniture and make it easy to slide the pieces across the carpeting easily.
The discs are made of hard plastic with a soft foam to hold the furniture foot. The hard plastic is curved slightly to that it will glide over the carpeting.
The riskiest part is tipping the piece of furniture up (or back) high enough so that you can slide one of these discs underneath each foot. When each foot has a disc under it, you can push the piece of furniture to wherever you want it...by yourself.
 If you've ever been a little nervous to fire up a torch and heat up copper piping hot enough to melt solder...join the crowd. It is a test of fortitude to stand with a torch hissing fire to repair a plumbing leak or extend a copper line. Copper adhesive might be your answer. It is sold under various brand names but they all do the same thing: make copper pipes and fittings stick together and not leak.
I have used Copper Bond before and I like it. It comes in a syringe-style package with a plunger and when you depress the plunger, it pushes out 2 compounds side-by-side. These compounds are then thoroughly mixed and applied to the mating surfaces of the copper being connected.
Before you apply the adhesive, clean the surfaces as if you were soldering copper pipes. Use sanding cloth and a wire brush to get the surfaces to shine. Then apply a thin film of the adhesive to both the exterior of the pipe and the interior of the fitting. Push them together and give it a slight twist. After the appropriate drying time (usually 30 minutes) you can turn the water back on and check for leaks. If you have a leak, you can use a torch and heat up the joint. This will allow you to pull the copper apart and re-glue the joint.