 Removing the toilet to install new ceramic tile is always a good idea. It creates more work now, but will save you plenty of aggravation down the road.
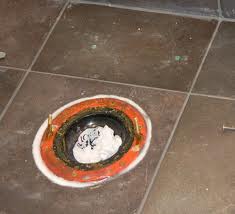
True, you will need to remove the toilet and then buy a new wax ring and bolts. However, when you are done with the floor, it won’t look amateur. Plus, you won’t have to make a bunch of round cuts on the ceramic tile to fit around the base of the toilet. By removing the toilet, you can tile right up to the flange and the cuts won’t need to be perfect as this area will be hidden by the toilet anyway.
How will it save you time in the future? At some point you will want to replace the toilet with a new one. Maybe it’s outdated. Maybe it uses way too much water, or maybe you just want a different design. When you replace it, the big concern will be finding a new toilet with the same footprint as your old toilet. That may be tough. Tiling up to the base of the original toilet is not very attractive anyway, as there is a gap between the tile and the toilet. Can you imagine how ugly the new smaller toilet will look with an even larger gap? Do yourself a favor now and remove the toilet before you tile the floor.
 As a Las Vegas Handyman service, we find broken window locks in many houses. It may be that a homeowner was cleaning the windows and broke the lock mechanism, or that over time toggling the lock damaged it. There are a couple of options for getting your window to lock again.
You can replace the original lock with a duplicate, if you can find it. This usually involves removing the two screws that hold it to the frame and taking it with you. You will likely not find anything at a home center, and so I wouldn’t even try the big box stores. Instead, take the part to a window or glass company. Bring the part with you so they can match it up.
If you are looking for a quick fix and forego the trouble of finding an exact replacement, you can buy thumb locks at a home center. These will come in either black, white, or silver and they just screw onto the window track right behind the sliding window. So if you were trying to move the window, it would hit the thumb lock, preventing it from moving.
The thumb lock has a sharp point at the tip which will dig into the metal window frame, preventing it from moving.
 Can I replace my garbage disposal but not the old collar that holds it to the sink? It is a pretty common question. The answer is that it depends.
Garbage disposal manufacturers don't do a whole lot in the way of design. After all, the disposal just sits in a cabinet out of sight and it can afford to be ugly...as long as it grinds up food.
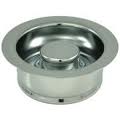
For the most part, yes you can leave the old collar in place and just install the new disposal onto it, as long as it is from the same manufacturer as the old unit. For example, if I had a new Insinkerator disposal to replace my old Insinkerator disposal, and the old collar was tight and not leaking, I would feel comfortable doing that. However, if my new disposal was not an Insinkerator, I would replace the collar.
The biggest gripe about replacing the collar is the snap ring. Although it seems like you need 15 hands to get it into the groove, if you start at one end and gradually pull it down, it will eventually snap into place.
Replacing the collar will only add about 10 minutes onto the job and you know that the new disposal will propertly mate up with the new collar.
 Repairing a lever-style bathtub drain stopper can be a challenge. Rather than doing that, you can replace the pop-up assembly with a retrofit assembly. I use a Flip-It drain stopper for this situation.
Lever style assemblies involve removing the linkages and cleaning out the insert that rides up-and-down in the overflow. This is a dirty pain. There is no easy way, and you have to phenagle the linkages out very carefully. Once you repair the problem, you have to get it back into the hole and adjust it until it holds water.
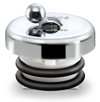
With the Flip-it, you just add the correct size o-rings and push it into the drain. You get a variety of o-rings to fit different sized drain openings. there are two o-rings that go an the base of the Flip-it. These hold the unit in place and stop water from leaking around the perimeter of the unit. Pick the right size o-rings and just push it into the drain.
On top of the unit is a small lever that you toggle to either stop the bathtub water from draining, or to allow the water to drain. They come in a variety of finishes to match most bathtub flanges, and the job should take under 5 mintes.
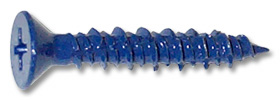 A handyman is always asked to hang, mount, install, and secure different items to different materials. Installing brackets to masonry looks daunting to the beginner, but it is very easy with the right tools. I love using tapcon screws. They are specifically made for concrete and masonry surfaces and go in quickly. The only thing to be aware of is that you need to use a tapcon bit to bore a pilot hole for the screw.
These screws can withstand large amounts of pressure for both pull-out and shear. Did I mention that they are fast?
They come in different sizes and diameters, as well as phillips head, standard head and hex head variations. You will need to chuck the appropriate sized bit into a drill and bore out a hole. The nice thing is that the bits and screws are small diameter and so you won’t have to remove a lot of material to use the screw. Mark out where you want a hole, and drill it out. Place the bracket (or whatever you want to mount to the surface) against the surface over the hole and insert the tapcon screw. The screws will take some elbow grease to fully seat them. The threads are cut in such a way as to scratch a groove on the interior of the hole you drilled. So although they won’t go in like butter, the entire job from drilling to screwing will take about 5 minutes.
 Many modern houses have stucco exteriors, and that makes hanging a flag a little challenging for a Las Vegas handyman. Stucco is hard and there is some guesswork as to where the wall studs will be located. This can make it hard for someone just trying to be patriotic.
The flag will hang at an angle from the house and so it must be securely installed through the stucco into the wall studs. The flag is not heavy, but a good wind will yank it from the wall. The flag will come with a wall bracket and screws. A word of advice: don’t use the screws that come in the package. They are too short and won’t reach the studs. Instead buy some longer deck screws that will extend through the stucco, sheeting (and sometimes foam board) and into the wall studs.
Figure out how high you want to mount the bracket and then estimate where the studs will be. The best location for minimal guesswork will be near a corner of a wall or column. You know there will be studs at the corner, but there will also be a thickness of material you won’t want to screw into as mentioned earlier. Two inches from the corner is a good starting point. Secure the bracket into the wall studs and then you can hang your flag.
 I see it all the time as a handyman. How many times have you run over the sprinkler heads with the lawnmower? Probably a few. There is an easy way to lower the height of the sprinkler heads. Look to the risers.
The riser will screw into an elbow underground. The sprinkler head screws onto the top of the riser. The riser is made up of sections that you can cut to fit your needs. Some installers get lazy and just screw the entire riser into the elbow and consequently, the sprinkler head sticks up in the air.
You want to get to the riser to cut it to the proper length. Unscrew the sprinkler head. If the riser comes out with it, great…the job just became a little shorter. If the riser is still stuck in the ground, grab it and unscrew it. You may need to get an extractor for this, but it should come out with just your fingers.
With the riser out of the ground, use a hacksaw and cut it to the proper length. This may take some trial and error, so only cut one section off at a time. Screw the sprinkler head back on and then screw the riser into the elbow. Ideally, the sprinkler head should be about level with the surface of the ground.
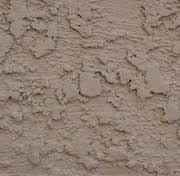 Painting stucco really isn’t much different from painting other surfaces, other than the texture of stucco is very different. Stucco can be applied so it has a sand finish, which is fairly smooth, or heavily textured, which would turn your hand to hamburger if you ran it across the surface.
When you finish a stucco patch, let it dry out. There are those people who swear by adding paint to the wet stucco mix, but I prefer to let the patch dry before painting. For heavily textured surfaces, you will need either an airless sprayer, or a thick nap roller. The airless sprayer is great, but you will usually end up painting the entire wall. You may paint the entire wall with a roller as well, but if you have a great paint match, you can get away with just touching up the patch.
Look for a thick stucco roller with will usually be ¾” thick. It will soak up a lot of paint, but it has to in order to paint the jagged surfaces of the stucco finish. Pour the paint in a tray and let the roller soak it up. You might gently press down on the roller like a sponge wicking up water. The paint will soak up into the roller.
Start out gently rolling the paint on the stucco. If you find that the paint is not getting down into the crevices of the stucco, press down on it and the paint should soak into the voids. Just don’t stop moving the roller. It’s best to roll and gently press down to control the amount of paint on the stucco.
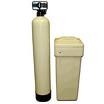 If you are removing a water softener permanently, you must reconnect the plumbing loop. The “loop” is the plumbing supply lines that go into the softener and exit the softener to the rest of the house. By removing the softener, there will be a gap in the piping left that must be closed for the water to flow to the house. Otherwise, when the water is turned back on, the water will flood the area of the pipe gap.
Reconnecting the plumbing is not difficult. You will need to determine the diameter of the pipe and then decide what to use to close the gap. Many loops are copper, and so you can sweat on some male adapters and then screw on a new flex line. You could also sweat on some fittings and some piping. You could also use compression fittings and close the gap.
The loop may be made of CPVC. For this you will need glue specifically for CPVC. Glue on some fittings and then close the gap with a new piece of piping.
There are many different methods to repair this, and some you don’t even need a torch for. My preference is to use copper (although it is expensive) and sweat the connections together.
 We all buy inexpensive furniture that sometimes needs a handyman to revive it. Furniture made from particle board is awfully weak. It is held together with fasteners and dowels. Moving this type of furniture often leads to damage and the particle board pieces breaking around the fasteners.
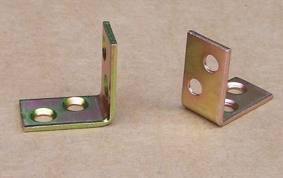
A handyman tip is to repair the damage with brackets. There are many different types of brackets made for this application. If you have a desk, for example, and the side separates from the top, you can use a couple of “L” brackets. I would use a flat bracket for the rear of the desk. One leg of the bracket will get secured to the top back edge of the desk, and the other leg will get secured to the vertical rear side of the leg. The will give the desk more support against collapsing.
You can also use another bracket and fasten one leg to the underside of the desk, and fasten the other leg to the vertical side of the leg. These brackets will be hidden under the desk. They get attached with two screws per leg for a total of four screws. You can also try to glue back any parts that may have chipped out before installing the brackets.