 Here is an electrical problem that frustrates people. Recessed light fixtures will randomly turn off. It may be that you have a group of can lights on a switch and one or more will blink off. Why is this happening?
People will usually replace the bulb first, but it may not be the bulb. It may be that the fixture is getting too hot and shutting off. There is a high limit switch in the light fixture, that when it senses the temperature is too high, will cut the power to the fixture. You can try a few simple fixes. The bulbs are likely producing too much heat. The heat gets trapped inside the fixture which trips the high limit switch off. How about trying a lower wattage bulb? You could even go with LED bulbs that produce very little heat, but that might require you to replace the bulbs in all fixtures as they don’t look exactly the same when illuminated, and they are cheap. Try going from a 60 watt down to a 40 watt bulb…it may work or it may not.
You can also keep the current bulb in place but simply lower its position in the can. To do this, remove the bulb and loosen the wing nut at the side of the can. The socket will travel up and down after you loosen it. Lower the socket closer to the floor a few inches, replace the bulb and see if it stays illuminated. If it does, lower the bulbs in all the cans so that they look uniform.
 If you have a running toilet, the first things people do is to replace the toilet flapper and the fill valve. I would try the flapper first, but you might as well replace the fill valve as it is likely to go bad soon too, if it hasn’t already.
The toilet flapper seals water from leaking out of the toilet tank and into the bowl. When enough water has leaked out of the tank, the fill valve will turn the water on to refill the tank. So the flapper is the first choice.
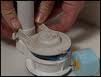
If you have replaced the flapper and the water still leaks out of the tank (assuming there is not crack in the tank), you may have a bad flush valve. The flush valve is what the flapper sits on. The flush valve assembly sits in the hole in the bottom of the tank. Before you replace this part, however, you might inspect the seat that the flapper is sitting on.
These parts spend their entire lives in water. Over time, scale and deposits can form on various parts. This might play a role in your tank losing water. Lift up the flapper and check the rim of the seat where the flapper sits. You are looking for tiny bumps in this area. These bumps will allow a small amount of water to pass and eventually when enough water passes, the fill valve turns on and refills your toilet’s tank. Try using your fingernail and scrape off the bumps. You can also try a flusher fixer which has a gel ring that sits on top of any bumps or deformities at the seat.
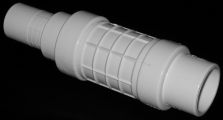 If you have a PVC plumbing pipe break there are several options to fix it. One of the coolest is the telescoping fitting. A telescoping fitting does just what its name implies...it telescopes out to repair the pipe.
When you have a crack in a PVC pipe, such as a sprinkler pipe, you can cut the damaged section out of the pipe. You will need to cut out an area large enough to get the fitting in. The fitting is somewhat large. It will be larger in diameter than the pipe and it will be fairly long, which allows it to telescope. Most of these fittings will telescope out 3-4 inches, so you have a good amount of play with errors. The fitting itself will be 4 inches or so depending on the repair.
With the section of the pipe cut out squarly, remove the burrs from the ends of each pipe. Collapse the fitting and glue it to one side of the pipe. Loosen the nut in the middle of the fitting and pull the other side of the fitting out to mate with the other end of the broken pipe. Use primer and PVC glue for each side. Tightening the nut in the middle of the fitting will compress a rubber O-ring and seal out any leaks.
 Sliding closet doors move sid-to-side via a track. They either hang from a track mounted to the header or the roll on a track mounted to the floor.
I recently came across a large opening with three sliding closet doors to enclose the opening. These doors rolled along a bottom track and they were a bit cockeyed. When you closed the doors so that they contacted the side jamb, the top of the door would touch the wall, but at the bottom of the door there was a large gap.
It's a simple fix really, with just a few turns of a screw that adjusts the height of the rollers. By adjusting the rollers, you can raise or lower each side of the door as there are two rollers per door, one on each side.
The fix for this door is to raise the roller on the side closest to the wall or lower the roller on the side furthest away from the wall.
This is all done with a phillips head scerwdriver. At the roller assembly is a screw that sits on top. Turning the screw clockwise raises the wheels and vice-versa. Adjust the wheels in small increments and check the fit to the door. You want the door to contact the wall uniformly down the edge.
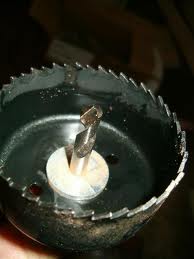
 For most carpentry jobs using a hole saw, it is usually a straightforward process. The hole saw has a drill bit in the center to guide the hole saw to it’s intended location. But what if you have already cut a hole and the hole is too small? The drill bit can’t act as a guide because there has already been a hole cut out, although it is too small.
If you place the larger hole saw over the smaller hole, the saw will tend to wander around until it cuts a groove. This wandering will cause the hole to be cut in a little off center and also scar up the work surface.
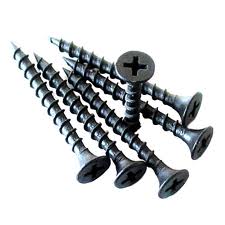
To eliminate this, use a couple of drywall screws. Place the hole saw over the exact location where you want to cut the hole. If you can draw a circle around it--great. You want to locate four drywall screws around the larger hole saw, in effect trapping it in place. It won’t be able to wander because the drywall screws will be holding it in place and not allowing it to move.
Start the cut slowly and when the teeth bite into the wood enough, you can stop and remove the screws from the work surface. Then continue with the cut until finished.
 A swamp cooler holds water for the entire time it is in use. If you have a leak, it is time to inspect it. You need to determine where the leak is coming from. A common source of a leak is the drain and overflow kit.
The bottom reservoir in the swamp cooler holds several inches of water. The drain and overflow kit is a small assembly that allows you to drain the water from the bottom of the cooler. It also will drain water if the water level becomes too high. If the leak is coming from this area, pull the tube from the assembly to drain the water and then try to reseat the tube. If that doesn’t stop the leak, it might be time to replace the assembly.
Unscrew the bottom nut from the assembly and the top will lift out. Clean up the area where the drain sits so that good contact is made when you reinstall the new one. Place the rubber washer over the threads and secure it with the nut on the bottom. The drain tube pushes down into the assembly. Refill the reservoir and check it for any leaks.
When you refill the cooler, adjust the float valve so that there is between two and three inches of water in the bottom of it.
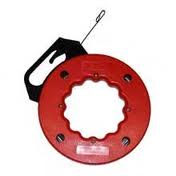 Electrical jobs require some unique tools. Fish tape is one of those types of tools. Fish tape is a stiff wire that allow you to pull cable through openings that you might not be able to access. It’s also good for pulling wire through conduit. For example, if you wanted to pull a piece of romex cable through a wall, fish tape would help you to do that without cutting tons of holes in the wall.
Fish tape comes loosely coiled in a plastic circular holder. It is loosely coiled, but it is very stiff. You can use it to push through wall insulation, or pull cable.
To use fish tape, you can either push it from the existing opening to the new opening or vise-versa. The trickiest part is actually finding the opening you are looking for. Two people helps this go faster. You can slightly manipulate the direction of the tape with the holder, but this takes a certain amount of luck.
When you have the end of the fish tape at the opening, you can connect the cable or wire to it. Most tapes have a hook on the end, or you can straighten or hook the end if it doesn’t. If you create a hook in the fish tape, you can wrap the cable around the hook and then use electrical tape to wrap the connection together. The last thing you want to do is to have the connection come apart inside the wall. They also make a lubricant you can apply to help things pull along easier. Once the new cable is at the correct location, you can cut or disassemble the connection and make your electrical connections to whatever it is you are installing.
Here is a simple carpentry job that is actually easier than the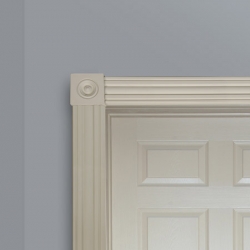 alternative. If you are replacing trim molding around a door, you typically would cut the ends of the two mating pieces at a 45-degree angle to turn the corner. These angles when put together make a 90-degree corner. Most door trim is done this way as it is fast and miter saws all cut a 45-degree angle.
Rosettes are an alternative to mitered corners. Rosettes are basically square blocks with a decorative finish. Most rosettes are used with fluted trim, but you can use whatever style trim fits your taste.
In place of a mitered corner, you install these rosettes. You can take a level line along the top of the door and install the them on this line. In that way, you can run the vertical trim up to the bottom of the rosette and then install a horizontal piece in between the two corner rosettes at the top of the door.
A nail gun works best, and even putting one nail at the center of each rosette works well while you line up the molding pieces. When you are done you can fill in any holes and then touch up the paint or stain it.
 When you are painting, particularly when using an airless sprayer, preparation often takes more time than actually painting. When you are painting walls, you have outlet covers and switch covers to content with. When you are painting doors, you have door knobs, strike plates, and hinges. Should you cover them with tape and paper or just remove them from the door?
The answer lies with your ability. I personally remove the hardware. With a drill driver, I can remove the screws and set everything in a neat pile, cover it with a drop cloth and keep it from the spray. Many people, however, would say I am wasting my time. They cover everything up with tape and paper. I don’t agree with them however, because I have tried their methods and end up missing a small area, or paint runs under the tape’s edge, etc. I usually spend far more time, in my opinion, cleaning up the paint off of door handles, etc. I also spend too much time focusing on taping everything just perfectly so that I won’t end up cleaning paint from these items.
So in my opinion, I can remove hardware and reinstall hardware in less time that it takes me to cover everything up and then clean any paint errors off of the hardware. You might be much more skilled at that than I am however.
 Here is a simple carpentry job that is actually pretty common. Cutting a hole in a desk to run computer cable. This is done using a hole saw.
A hole saw looks like a drill bit shank on one end, and on the other end is a round opening with teeth surrounding it. In the middle of the opening is a traditional looking drill bit. This tool gets chucked in a drill driver and is spun into the desktop to cut the hole. The drill bit is longer than the hole saw’s teeth and so it contacts the wood surface first. This keeps the hole centered.
As the drill bit penetrates the surface, the teeth of the hole saw follow. A steady cut is important here. The tool will tell you how it is operating by how it sounds and how it feels. You want to hear a consistent hum as it cuts and you want the drill to stay stationary. If the drill is moving or shaking, you don’t have the bit perpendicular to the surface. You will feel the bit cut on one side and not on the other, which causes it to shake back-and-forth.
When the drill bit penetrates the back of the work surface remove it from the piece. Now place the drill bit into the hole on the other side of the piece and start cutting from that side. In this manner you won’t have tear-out of the wood. Instead you will have 2 nice looking cuts with no grain tear-out.