 A loose toilet paper holder can be frustrating. If one of the arms becomes loose, the roller won’t stay in place and the paper roll will fall. You can tell when this happens because often someone will just jam the paper roll onto the end of one of the arms.
If you look at the very bottom of each of the arms, you will see a small hole. Inside this hole is a setscrew. The setscrews have a point on the end of them that pushes behind a mounting bracket. As the screw tip works behind the bracket, the force pulls the arm toward the wall and holds it. So by tightening this screw, it will hold the arm tighter to the bracket.
However, if the bracket is loose, you will never get the arm tight. For this you can back the setscrew out to access the bracket. You can try to tighten the bracket, but you may need to add larger screw or wall anchor.
Once you have the bracket tight, you can place the arm over the bracket and re-tighten it. Then just put the paper roll back on.
 If you need to replace a door in your house and you buy a replacement at a home center, you will have to mortise the hinges. The mortise will allow the hinge to lay flush with the edge of the door.
You may also need to rip about ¼” from the width of the door before you cut the mortise. So measure carefully.
After you mark out the locations of the hinges, you have a choice between routing out the mortises or cutting them by hand. You can buy a jig that will easily cut the mortises after you set it up, but if you don’t plan on doing many, it’s just as easy to cut them by hand. All you need is a hammer and a chisel.
Cut the perimeter with light taps to the chisel with the bevel facing toward the waste area. Then you can lay the chisel down and tap out the interior of the mortise. Hold the chisel with the bevel facing toward the door and the flat surface facing upward. Hold it between 30-45 degrees and use light taps with the hammer. The more vertical the chisel, the more aggressive the cut, meaning the more material you will remove.
Periodically place the hinge into the mortise to make sure you don’t remove too much or too little material. When the hinge lays flat and the surface is flush, you are done.
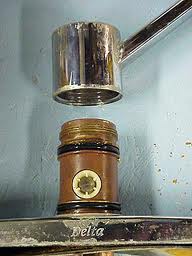 If your kitchen faucet leaks at the base of the spout when the water is turned on, you likely have some faulty o-rings. On a single-handle faucet, the handle will come off first. There is a screw under the cap which holds the handle to the faucet. Depending on the model, you will likely have to remove a cap nut before you can remove the spout.
Hold the spout with one hand and grab the body with the other. Simultaneously pull up and rotate the spout’s body to lift it up and off of the faucet. You will see two o-rings, one smaller o-ring at the top of the body and another larger o-ring near the bottom.
Remove these o-rings from the grooves they sit it. They may be crusty and difficult to remove. You can try a sharp object like a knife to try to pry it out of the groove, but be careful and don’t scratch the faucet or it may leak permanently.
With the o-rings removed, install new ones in their places. Be careful not to twist them when installing them. You can use plumbing heat grease for this, but I like liquid dishwasher soap. The soap makes the o-rings slide right on. Reassemble the faucet and turn the water back on to test.
 If you want to improve your shower quickly and inexpensively, replace your shower head. This will take just a few minutes and you can get a ton of slick features.
Shower heads all go on the same way, so pick the one with the features you like and live it up. You can choose a massaging head, pulsing, or install a rain head. The choice is yours.
When you remove the old shower head, grab the arm it is attached to and hold it so that it doesn’t twist out also. The last thing you want is a leak behind the wall, where the arm attaches to the piping. With the arm firmly held in place, use a wrench and unscrew the shower head.
Clean up the threads, wrap them several times with Teflon tape and get ready to screw on the new one. If you are installing a hand held shower head, you will be screwing on a fitting to the end of the arm. This fitting connects a hose and finally the hand held shower head. The fitting also provides a mount for the hand-held shower head. This allows you to use the shower as if shower head were directly attached to the arm.
 A consistent handyman repair is a closet rod that has pulled out of the wall. The majority of the rods are wood, and the main reason is that they are overloaded with clothing. Tons of weight onto the wood rod and it will come down.
Many of these rods are held in place with plastic cups which are then screwed into the wall. Plastic doesn’t hold a lot of weight, and the screws may or may not be long enough to hit a wall stud. Is it any wonder the closet rods come down?
If you are lucky enough to find a wall stud, use some longer screws and secure the holders into the studs. Better yet, I like to use a short length of 2 x 4 lumber. Use a piece that is long enough to span across 2 wall studs (it will be in a closet so nobody will see it anyway). Cut a “V” shape in the center of it so that the closet rod will rest in this “V”. Cut one for both ends of the rod and screw them into the studs. You can also buy center supports if needed. These hang from the shelf above, and some also mount to the wall.
 Many carpentry jobs require mitering corners for a clean tight fit. Mitering is simply the act of cutting mating pieces of wood to follow the angle of whatever it is you are working on. Most commonly, if you are installing baseboard, you will miter inside and outside corners so that the angle adds up to 90 (assuming the corners are actually 90-degrees.
Power miter saws are the way to go here. They are fast, precise, and safe. Use proper eye and ear protection, as well as breathing protection. Always clamp the piece to the table or fence of the saw. You certainly don’t want to get your fingers too close to the spinning blade. You can set the blade to cut the angle you need to mate the pieces for a perfect fit. Compound miter saws cut multiple angles simultaneously. These get tricky because you will need some math skills to figure out the angles.
If you don’t have a power miter saw or don’t want to rent one, you can buy a backsaw (a handsaw) and a miter box. I don’t care for these much because they take too much effort and the cut ends up sloppy. The result is that you get a mitered cut that isn’t perfectly straight.
 It’s 3 am and your smoke detector battery is chirping. You sure don’t want to go through another night of poor sleep. It’s time to replace the smoke detector batteries.
Generally, it is recommended that you replace the batteries twice per year, each time you change the clocks for daylight savings time and back again.
Replacing the batteries is probably as simple as you imagine, but the only challenge is reaching them. Use a safe ladder and be careful (don’t stand on the top step).
To access the battery, the smoke detector will either have a small door that slides out, or the entire top of the detector will rotate off of it’s base. Whichever type you have, just make sure you reinstall the new battery with the positive side of the battery lining up with the positive terminal of the detector. With the detector whose top rotates off this won’t be difficult as the wiring won’t allow you to install the battery incorrectly. However, the detector with the sliding door just has some bare contacts and you can install the battery either way. There will be decals on the terminal that shows you the proper orientation. Just line up the terminals to the battery posts and reassemble the smoke detector.
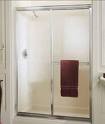 For those of you with a towel bar attached to your sliding shower door, you know that they can become loose and virtually fall off. The repair is easy however.
Towel bars mount to the exterior side of the shower door (to keep the towels dry of course). They are held in place from screws on the inside of the shower. Each side of the towel bar usually has two screws per side. The screws go into the door from the interior of the shower, pass through the shower door, and into the threads of the towel bar on the outside of the door.
The frames of shower doors are somewhat flimsy and weak, and so stuffing a town in between the frame and the towel bar won’t help it to stay together. They become loose over time, and will pull out if not repaired.
The easy fix is to simply tighten the screws until snug. You may have to use a larger screw to get some bite from the handle. Don’t use a longer screw as this may push through the back of the towel bar. Rather, use a screw with slightly larger threads. This will allow it to bite into the material somewhat without damaging its ability to hold.
 For those of us using a pull-chain to turn the ceiling fan on and off, those pull chain switches can break. They are made of plastic and at some point will need to be replaced. They are inexpensive and shouldn’t take more than an hour of your time.
You will need to get access to the switch. Turn off the power to the fan, remove the bottom cover of the fan (or remove the light kit, if it has one) and follow the chain up to the switch. The pull chain switch will be secured with two screws to the fan. The switch will have two wires connecting it to the fan’s wiring.
If you fan’s light kit has a harness that connects all the wires, you will likely have to intercept the switch wires. Cut the appropriate wires (follow them from the switch) and use wire nuts to connect the new pull chain switch. Other fans will already use wire nuts.
Once you have the wires connected to the ceiling fan switch, secure the switch to the fan with the screws you removed earlier. The switch will be held to the housing with a decorative nut, once you thread the pull chain through the housing.
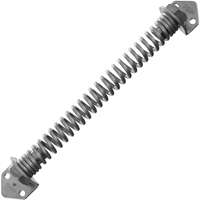 Here is a handyman fix when you want to make a gate self closing. If you line everything up, the gate should also be self latching. You will need a few dollars in parts and under an hour to perform the job.
This works best for small side yard gates, such as those you would walk through to get to the back yard from the front yard…typically about 3 feet wide. This will not work for the larger gates that open to allow an RV or a boat to pull through.
You can buy a self closing spring that attaches to the gate on one side and the wall on the other. The instructions that come with the springs are good and you shouldn’t need to do a whole lot of thinking about it.
Typically, the most challenging part of the job is mounting the ends of the spring. If you have a wood gate, you can obviously use wood screws. For wrought iron gates, use self-tapping screws. For the wall, you will most likely need some type of a masonry fastener. I like tapcon screws for this. Follow the instructions on the package and secure each side of the spring to the appropriate surface.
The last step is to place the spring under tension so that it forces the gate to close once it is opened. You will insert a pin into one of the holes at the top of the spring after you tension it. Use a wrench and turn the spring in the direction that makes the gate close. When you run out of space, insert the pin to hold the tension. Again turn the top of the spring with a wrench (after removing the pin), add tension, and replace the pin. You will follow this pattern until you have the desired amount of tension.