 Cabinet drawers can take a beating. They are typically built with inexpensive materials and stapled together. You can make them strong with some basic parts.
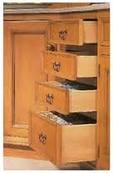
Cabinet drawers can get overloaded with silverware, cookbooks, or virtually anything you need to store. Slam these drawers a few times and this jostles the weighty contents around and weakens the fasteners…leading you to repair them.
Common drawer repairs range from the drawer sides coming apart from the back or front, and the drawer bottom sagging from the groove it sits in.
You can buy some small angle brackets and install them at the corners. You can mount these on the inside of the drawer box or the outside (if they don’t get in the way of the sliding drawer’s operation). Use small screws so that they don’t penetrate through the other side of the wood. Tighten the screws until snug only.
To secure the drawer front to the box, you can add a washer. In many cases the front will become loose after multiple slammings and this will pull the screw head partially into the wood, which gives the drawer front some play. You can place a washer under the screw head which will stop the screw from pulling into the wood.
 Replacing a bathroom light fixture is pretty easy. The first thing you need to do however, is remove the old fixture. A Hollywood style fixture doesn’t have any obvious method of holding the fixture to the wall.
Hollywood light fixtures are very common, because they are inexpensive and install quickly. Most builders don’t even install a junction box. Instead, they just punch a hole in the wall with a hammer and run the cable right into the fixture. You will need to install a junction box for you new fixture. So be forewarned, you may even have some drywall work to do if the new fixture doesn’t cover up the damaged area.
Of course, removing the old fixture is first. To remove a Hollywood light fixture, first remove the bulbs. Around the bulbs are decorative “cups” that slide over the sockets where the bulbs screw in. Pull the decorative cups off of the sockets, but use your other hand to hold the fixture against the wall. Once the last cup is removed, the decorative light cover will come off. There will be nothing holding it to the wall after the last cup is removed.
At this point the bracket will be exposed. With the power shut off, disconnect the wiring at the fixture. Then just unscrew the screws that hold the bracket to the wall.
 A friend called me last night saying he had turned off a gate valve and when he turned it back on it didn’t work. This was the gate valve to the water heater and now the handle just spun around and he didn’t have hot water anywhere. Hint: it’s probably not a good idea to start a plumbing job 8pm if you can get away with it.
So he is panicky and doesn’t have any hot water. This is a classic reason to use a ball valve rather than a gate valve. These valves don’t get touched for years and when you finally need to work on a plumbing issue, you touch it and the gate shears off of the handle’s shaft. The gate won’t lift out and the water is blocked from flowing.
There is a way to get the water flowing again without replacing the valve. With the water off to the entire house, remove the top of the gate valve. This is often easier said than done, as the valve can get awfully crusty. Use a couple of large wrenches and while holding the bottom of the valve still, remove the top half of the valve. Once you have the top removed, reach in and remove the broken gate. Then reassemble the valve and turn the water back on.
The good news is that your water will start flowing again. The bad news is that if you need to do plumbing work at this location again, you will need to turn the water off to the entire house rather than at the isolation valve.
 A misting system is a great idea for cooling down the air outside. These systems can cool the air by 20 degrees, but they do need occasional maintenance.
Most of the systems we see are purchased at the big box stores. These systems are all-in-one systems and you can add to them if you need to. They would be considered the lower end of the quality scale, as they don’t have many bells and whistles as custom systems do.
It is common to see the system dripping, particularly from the area of the nozzles. This doesn’t necessarily mean that there is a leak though. The pressurized water sprays out of the misting nozzles and as water sprays out, it collects on the nozzle itself. When enough water mist collects, it forms a droplet and falls to the ground. So you will see some small drops of water under each nozzle. I wouldn’t worry about it too much.
If the nozzle isn’t spraying at all, then you can worry. It is clogged up with mineral deposits and is blocking the nozzle from operating. You might be able to pick at it and get it spraying again, but most likely you will need to remove it and clean it out.
You can use a toothbrush and a mild vinegar/water mixture. Let the nozzle sit there for awhile and then brush the deposits away with the toothbrush.
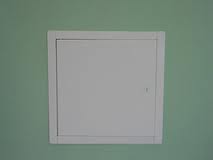 If you have ever had a plumbing issue where you have had to open the wall to gain access to the problem, you know that the size and scope of the job can grow. If you are lucky enough to open the wall in an area that is not noticeable, you might consider installing a plumbing access panel.
The benefit of an access panel is two-fold. First, you don’t have to worry about replacing the drywall perfectly…getting a perfect match on the texture and the paint. Not to mention that if the paint doesn’t exactly match, you may end up painting the entire wall from side-to-side and top-to-bottom. Secondly, because of the access panel, you will always have quick access to the problem area without the need to re-open the wall.
Access panels are good for things like a shower valve buried inside a wall, and the back of the wall is, for example, in a closet. The access hole you would have to make would likely be covered by clothes anyway, and so an access panel would make sense here.
If you have to cut a hole in a very conspicuous area though, I would forego that panel and do a good drywall patch. Even if that means painting the entire wall.
 Door stoppers occasionally get damaged. I had a customer ask if they can be repaired. You can attempt to repair them, but they are inexpensive and it might just be easier to replace them.
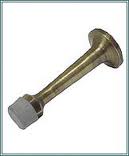
There are several different styles of door stoppers. The solid stoppers just screw into either the baseboard or the door itself. There really isn’t any repairing these. They are very tough, and if something gets damaged, it will be either the baseboard or the door itself. In fact, most repairs come from someone stepping on top of these door stoppers and it pulls downward and out of the baseboard. So at that point you can either patch the baseboard and remount the door stopper to the door instead, or just move it over somewhat.
The spring style door stoppers are flexible and don’t pull out of the baseboard. They slide into a base that is screwed into the baseboard. Sometimes, the spring shape gets damaged and when you thread it back into the base it doesn’t contact the door anymore. You can try to recoil the door stopper with needle nose pliers or just cut off the damaged part and rethread it into the base. Otherwise, spend a dollar and buy a new one.
 Take it from a Las Vegas handyman. If you need to cut through a stucco wall, there is a right way and a wrong way to do it. Tools make all the difference.
Reasons you may need to cut through a stucco wall might be for the installation of a dog door, or installing a swamp cooler, or maybe even for various plumbing repairs.
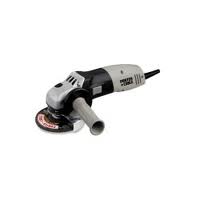
You might be inclined to grab the nearest reciprocating saw and go at it. This will certainly cut through the stucco, but it will also leave a very ragged cut. The cleaner the cut, the more attractive the installation of the dog door or swamp cooler will be. It also leaves less work to do for trimming out the opening.
Rather than using a reciprocating saw, use an angle grinder with a masonry wheel in it. This is a small cutting wheel that will cut very precisely through the stucco surface. Not only will it cut through the stucco, but it will also cut through any wire netting behind it.
Start the wheel spinning and let it work up to full speed. Then gently sink it into the surface of the stucco. Go slowly and evenly. The sound of the blade spinning will tell you if you are going too fast, as you will hear it bog down and the blade may throw some debris around. Incidentally, you should definitely wear eye, ear, and breathing protection for this.
 Landscape lights seem to always be in need of repair. They look very nice, but occasionally you will have to change bulbs and troubleshoot them.
A customer called and said she had several lights in sequence that were out. The first thing to do is to check the bulbs. You can buy a new bulb or simply use a bulb from a working light, that way you know that the bulb is good. Place the bulb in the fixture and see if it lights up. If it doesn't, the fixture is not getting power to the bulbs socket. You can confirm this by using a multi-meter and touching a probe to the contacts.
Next, dig down to where the fixture connects to the cable in the ground. You can remove the contacts in the cable and use the multi-meter to see if there is power in this area. You can also try to attach the contacts in a different area of the cable. It may be that the old holes were corroded to point where the contacts were bad. Incidentally, if you do get a power reading on the multi-meter, it's probably time to replace the fixture.
Now since there are a sequential line of lights that are all out, I would guess that there is damage to the cable which is stopping power from continuing down the line. Start digging just past the last working light to the first non-working light and find the damage. At this point you can install a repair coupling and re-bury the cable. The coupling simply snaps over the cable which allows the electricity to continue to flow down the cable.
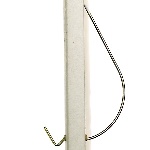 There are lots of slick gadgets out there to hang pictures. One I really like is a wire hook that resembles a giant fish hook. Plus it can hold 150 pounds. No wall studs are necessary here. In fact, you won’t be able to use a wire hanger if a stud is in the way. In that case you can use traditional hanging methods.
For heavy pictures, these wire hooks frequently come with the picture. Otherwise you can pick them up at a home center. The wire is stiff and has a sharpened point on the shank end.
Once you have determined where you will insert the hook, hold the chiseled point to the drywall and gently push while you twist. The point will dig through the drywall. You will feel no resistance when the point breaks through the back of the drywall and enters the wall cavity. Push the hook into the wall cavity so that the point rises up and contacts the drywall on the interior of the wall cavity. Once the point arcs around and touches the back of the drywall directly above the hook, you are done. Then you can simply hang the picture on the hook. These are fast indeed. If you need to remove it, you only have a small hole to fill, rather than a screw hole.
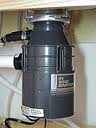 The first sign that your garbage disposal hose is kinked, or restricted, is probably that you have water on top of your counter. A restriction, like a kinked hose, will reduce the flow of water and cause it to back up and out of the air gap on top of your sink.
This path starts at the dishwasher drain line. The drain line goes from the dishwasher up to the air gap device on top of your counter. The air gap then connects to the garbage disposal via this hose, that happens to be kinked. So how do you fix this?
You can either replace the hose, or trim it. If you choose to trim the hose, loosen the clamp on the disposal side of the hose (it is easier to get to). Use a utility knife and make a nice square cut and then reconnect the hose. You might find that you have to trim the hose further or even rotate it to flatten out the kink.
If you choose to replace the hose, you will disconnect the clamps on both sides of the hose and then slide the new hose on the fittings. Place the clamps over the hose and the fitting and then tighten until snug. You will have to play with the length of the hose to make sure it doesn’t kink as well.