 When replacing a door, sometimes you can get away with just a slab door, and sometimes you have to replace the door and frame (pre-hung door). Installing a pre-hung is great, but you first have to cut out the old frame of the old door.
Removing an old door frame takes a little patience. Before you can bulldoze through the frame, take care with the molding. You will need to remove the interior and exterior molding that covers a portion of the frame. Cut through any caulking where the trim meets the reveal of the door jamb and where the trim meets the wall. Once you have cut through this, gently pry up a portion of the trim. If you are replacing the trim you don’t have to be as gentle, but if you are reusing it, start lifting up a portion and gently move down the trim until it is lifted from the surface. A standard screwdriver is good to begin the prying process. Do the same for the exterior of the door frame. You want to avoid splitting or breaking the trim. If you break a section of it, you will have to find the same profile or replace all of the trim with something of your choosing.
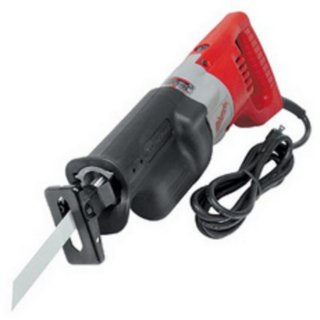
When you have all of the trim removed, use a reciprocating saw and run a demolition blade just behind the door jamb. The blade will easily cut through the nails, etc. With the old frame removed you can begin installing the door pre-hung door.
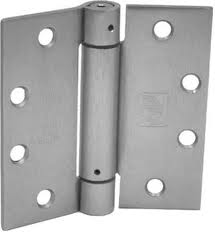 A garage entry fire door needs to have self closing hinges. It is likely that there are already self closing hinges on the door, but it may be that the spring has sprung (meaning it doesn’t self close anymore). Fortunately, these are not difficult to replace.
When you buy new self closing hinges, you will need to buy the right size to fit into the existing mortise at the edge of the door. They are usually 3 ½” or 4” tall, but they get larger for bigger doors. Buy the right size and you won’t have much work to do. You may need to chisel out the corners if you buy hinges that have 90-degree corners and are replacing hinges that have rounded corners. You usually only need to install a self closing hinge at the top and bottom hinge positions.
Once the hinges are installed, you need to set the torque to close them. There are two different styles for this. Once style uses a ratcheting method. Stick an allen wrench into the top of the hinge and simply turn it. You will hear the “click click click” of the ratcheting mechanism applying torque to the hinge. You want enough torque to close and latch the door, but not so much that it slams and knocks the pictures off of the wall. To release the torque push the allen wrench down into the hinge.
The other style uses a pin to hold the torque. Again, stick an allen wrench into the top of the hinge and turn it. Place the pin into the holes and it holds the torque. Repeat this until you have the right amount of torque.
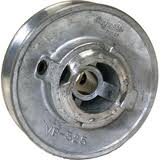 A swamp cooler is basically a box with some simple mechanical parts inside. When a part breaks, it is pretty easy to replace it. That’s what makes a swamp cooler so easy on the budget. You don’t have to buy a $1200 compressor…you can buy a $5 pulley instead.
Replacing a pulley is a matter of removing the belt, working the pulley free of the shaft and replacing it.
Unplug the swamp cooler and manually rotate the pulley. As you do, goose the belt off of it. Once you get the belt started, it should easily come off of the pulley as you rotate it around.
The pulley will be held to the shaft by a bolt or setscrew. Loosen this and the pulley should pull off of the shaft. This often isn’t as easy as it sounds. Inside the swamp cooler is a science experiment in corrosion. You will see deposits and probably rust in a variety of places. You may need to tap the pulley a few times to move it to off of the shaft.
Take the pulley with you and get a replacement. You will notice that on the shaft is a flat side. This is where the bolt or setscrew tightens to it. So make sure that when you replace the pulley that the setscrew aligns with the flat side of the shaft and tighten it. Place the pulley on the shaft and make sure it is in the same plane as the mating pulley. One pulley will be on the motor and the other to the squirrel cage (blower). Make sure they are aligned with each other or the belt will have the tendency to jump off of the pulley.
Place the belt on the pulley and rotate the pulley while pushing the belt onto it. You should tension the belt and then turn on the motor and check to make sure the belt doesn’t have any play in it.
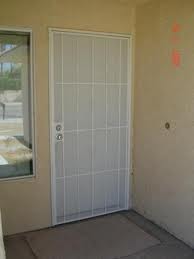 There are certainly times when you would want to remove a security door. Maybe it makes the house look like a jail, or that you just want to replace it. Either way, you will need to remove the one-way screws that hold it in place.
The door is held in place with one-way screws. These are unique in that you can tighten them, but can’t loosen them. Once you remove the screws, the door will come off.
To remove the screws takes a little patience. The fastest way is with power tools. If there is a gap between the house and the frame of the door, you can stick a reciprocating saw blade in there and cut through the bolt.
You can also cut a groove on the top of the screw head. This is best done with a small hand grinder. Grind a slot in the top of the bolt’s head and then you can use a large screwdriver and back it out.
You might also consider cutting off the sides of the round bolt head so that you can use a wrench to unscrew it. Cut parallel on each side and unscrew it.
If you don’t have a grinder, you can use a hack saw to cut the sides off of the bolt head. To cut a slot in the top of the bolt head, hold two hacksaw blades together and cut it.
 Cutting perfect circles in drywall isn’t as hard as you might think. As usual, there are tools for everything.
Depending on the size of the hole you are looking to cut, you can use power tools or cut the circles by hand. For smaller holes you can use a hole saw. This works like a drill bit but it has an inverted “cup” attached to it. Around the perimeter of the cup are teeth that cut through the drywall. This can also cut through different surfaces as long as it was designed to do so.
For larger holes you can use a circle cutter. These come in many different flavors, but basically it works like a large compass. One pointed leg is placed in the middle of the circle you will cut, and the other leg is placed at the radius. It is sharp and as you move the leg around it gradually cuts through the drywall, until the circle is cut.
There are other types of circle cutters that have a midpoint that gets secured to the drywall, and has two cutting legs on opposite ends of each other. These do the same thing as the single leg version, but it cuts faster.
Lastly, you can cut the circle by hand. Trace the circle on the drywall (for example turn the round junction box over and trace around it). Then use a drywall saw and cut the circle by hand. This is easy and if you don’t want to spend the money on a circle cutter, it is definitely the way to go. The saw cuts slowly and gives you complete control over the cut. Plus, you probably already have it in your toolbox.
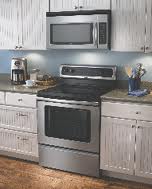 If you are installing a microwave hood over the range, you have to install a bracket that comes with the microwave. What we are seeing a lot of, is that residents of homes being foreclosed upon will take the microwave hood thinking they will either sell it or install it at a new property. The problem is that without the bracket, they won’t be able to mount it to the wall.
The brackets are specific to the microwave hood. In other words, I can’t install a Hotpoint microwave oven on a Magic Chef bracket. The brackets are not interchangeable. So if you are buying a new house and you see the microwave missing from the wall, but the bracket is still there, unless you buy the same unit, you will probably have to remove the old bracket and install the correct one that came with the new microwave.
Fortunately this isn’t hard to do. The new microwave will come with a paper template to hold against the wall. This will allow you to install the fasteners in the correct locations so as not to interfere with the microwave, but also to make sure it stays secure to the wall. There are diagrams on the template with various hole locations that allow you to insure at least one of the fasteners is secured into a wall stud, and others can use wall anchors.
 When your landscape irrigation comes on, do you see small geysers shooting into the air? If you do, you probably need to do some quick repairs. Drip lines connect to the main black poly tubing (either ½” or ¾” tubing) and then branch off to each individual plant.
Leaks develop due to a variety of causes. Pets chewing on the tubing, high pressure (no pressure reducer), even the sun’s UV rays can weaken the tubing (although the tubing may be UV resistant).
Much of the damage is easily repaired. If an animal has bitten through the tubing, cut each end square and install a barbed fitting. These fittings are simply a straight piece of plastic with a barbed end. Just push the drip tube onto the end of the fitting and it stays.
If you have noticed that drip emitters and fittings are being blown from the tubing, that is a good sign that the pressure is too high. Go to the irrigation valve and look for a pressure reducer just after the valve and filter. If there is none present, you might consider installing one to prevent this in the future.
Also, although manufacturers say it is acceptable to leave the drip lines exposed, I prefer to bury them. This also makes animals work a little harder to chew on them.
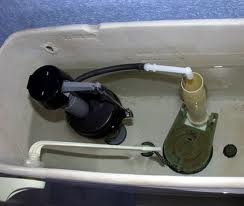 You flush the toilet and it runs and runs until it finally shuts off. Assuming the flapper doesn’t get caught on something, I would check a few simple things first.
Refilling the toilet tank is about volume of water getting into the tank. Again, we are assuming the flapper is seated and not allowing any water to flow out of the tank as the tank refills. I would first check the angle stop. Follow the hose or tube that comes out of the bottom of the tank and goes to the wall. You want to make sure it is fully opened. Turn the handle counter-clockwise. If it doesn’t move, the valve is likely fully opened. If it does move, your problem is likely solved. By opening the valve, you will allow more water into the tank and it will fill faster and shut off earlier. Not that you are wasting water, but rather the water is simply filling the tank faster than before.
If the valve was already fully opened, turn the water off and remove the supply line from the bottom of the toilet tank. Point it in a bucket and turn the water back on. Do you have strong pressure? If you do, replace the toilet fill valve. If the pressure is weak, replace the angle stop as the valve may be defective.
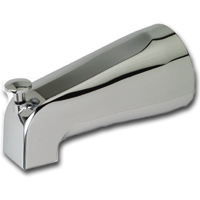 Replacing a bath tub spout is a two step process, removing the spout and replacing it. Removing the spout can often be the most challenging.
The challenging thing about removing a bath tub spout is that you don't know exactly how it removes.
The bath tub spout may simply unscrew from a threaded nipple sticking out from the wall, or it may be held in place with a set screw from underneath the spout.
You can certainly try to goose the spout free by gently turning it counter-clockwise. If it doesn't want to budge, don't force it...yet. If the bath tub spout doesn't have a set screw, then you can apply some muscle to it.
Look under the spout for a small hole. Inside the hole may be a setscrew that holds the spout to a bare copper pipe. You can use a flashlight and a mirror to see inside the small hole, or you can attempt to stand on your head.
If you can see a small hex head screw, use an allen wrench unscrew it. Sometimes it is a little tough to find the screw head with the allen wrench, but keep at it. Once the screw is loosened, you should be able to pull the bath tub spout free of the pipe.
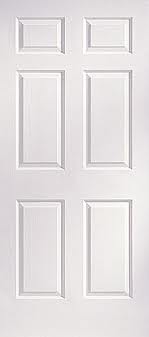 Replacing an interior door often requires cutting it to fit, particularly if you byuy it from a "big-box" store. Typically, you will need to cut about 1/4" from teh hinge side of the door. Making the cut is not difficult.
Remember that a hollow core door is called hollow core for a reason...it is hollow. Only the perimeter and the handle area have wood around them. The center of the door has a cardboard-like material zig-zagging in there. That is what makes the door lightweight, easily damaged, and inexpensive.
A table saw is the perfect tool to rip a small strip from a door. If you don't have a table saw, use a circular saw with a blade that has a high number of teeth for a smooth finished cut.
A circular saw will cut through the top surface of the door as it is laying down. Place a strip of blue painter's tape along the path of the cut to avoid blade pull-out. This is when the blade rises up and out of the surface and will pull small slivers or material with it, which leaved a ragged cut.
When the door has been trimmed, you can cut the hinge mortises and hang the door.