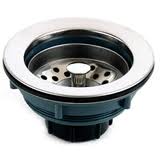
 Maybe your kitchen sink is leaking or maybe you just want to replace the strainer. Removing it can be a real chore. Disconnecting the piping isn’t a horrible job, but then you are left looking at the belly of the beast. You will need to use a large wrench or even water pump pliers and try to loosen the nut that holds everything to the sink. Easier said than done.
The nut under the sink is fairly large, the problem is that when you go to loosen it, the entire assembly will twist with it. What do you do?
There are a couple things you could do, but I think the easiest is to hold the strainer still while you unscrew the nut. You could also cut through the nut or strainer, but that is much more work.
So how do you hold the strainer still? Grab a pair of pliers and turn them upside down. Stick the legs of the pliers into the holes of the strainer at the top of the sink. So what you have is a pair of pliers sticking out of the strainer. Now grab a screwdriver (or a short piece of pipe) and place it in the jaws of the pliers. You have effectively created a handle to hold the strainer still while you remove the nut from below.
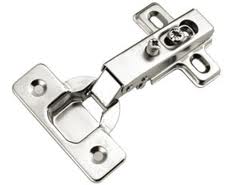 Cabinet doors have a way of getting off-kilter. Little kids open the doors and sit on them, use them to climb onto the counter, and just plain open them too far. Fortunately, European hinges can be adjusted in virtually any direction.
European hinges are hidden, that is, you can’t see them while looking at the cabinets. It would appear that the doors are sitting flush with the cabinets themselves.
You can move European hinges up and down by loosening the screws that hold the hinges to the cabinet sides. You can lift the door up or down to match the other doors.
You can also adjust the hinges to move the door left or right. There is a stubby little screw (it takes a phillips head screwdriver) in the center of the hinge. You can simply turn this screw and watch the door move slightly to the right or left. You want this adjustment to leave you with a uniform gap if the cabinet has two doors that meet in the middle. You will want to test this adjustment by opening and closing each of the doors to make sure they don’t rub on each other.
Finally, you can move the door closer to the cabinet or farther away from the cabinet. Towards the rear of the hinge is a screw that is tucked away into a slight recess. It holds the two halves of the hinge together. Loosen this screw, pull the door in or out, and re-tighten the screw. You will probably have to adjust both hinges of the door for a good fit. You would probably only elect to make an adjustment here is the hinge side of the door rubs on the cabinet when it is open.
 Fixing a loose toilet paper holder is pretty easy. They have small arms that stick out of the wall which require small tools.
The toilet paper holders arms are held to the wall with small brackets. In order for the toilet paper holders to be tight, these brackets must be tight. But before you go after the brackets, use a small screwdriver and try to tighten the arm against the bracket. Look under the arm and you will see a tiny hole. Use a small standard screwdriver and turn the screw clockwise. If you are lucky, the screw will push against the bracket and the arm will tighten up. Problem solved…unless it is still loose.
If the arm is still loose, loosen the screw and remove the arm. Now you can see the bracket. You can try tightening the screw that holds this bracket (doubtful this will work), add an additional screw in the bracket, or use a molly bolt or an EZ anchor to hold it in place. Once you have the bracket secured, you can slip the arm over the bracket and tighten the screw until snug. Slide the TP onto the spool and place the spool into the recesses in each arm.
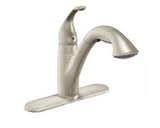 Kitchen faucet problems are inevitable. Sometimes the faucet body leaks, and sometimes the leak comes from the sprayer. For faucets with a pull-out spout, the fix might be very easy.
Faucets with pull-out spouts are generally higher quality and higher priced, but that doesn’t make them immune from leaks. The first thing to check is the connection where the spray head connects to the hose. This often becomes loose from people pulling on it and then twisting it to go from one sink basin to the other. You will see that there is a nut right below the spray head. Tighten this nut by hand…this may be all you need to do. Realize that you will probably have to do this every few months just because the act of pulling and twisting will gradually loosen this connection. There is a washer here that gets compressed to stop any leaks.
If the leak is not coming from this connection, carefully check the hose and the spray head. In a lot of cases, someone will pull out the spray head and let it go expecting it to self retract back into the faucet. Instead it falls and bangs into the sink. The spray heads can crack and leak, especially the less expensive models. You may need to order a replacement for this as most home centers don’t have a broad supply of them.
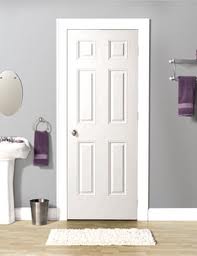 Most of the doors that you buy at a home center need to be cut for width. They are often ¼” too wide and yes, they can be cut. The only thing is that you can’t cut too much from the doors.
In a hollow core door, only the perimeter of the door and around the handle/latch is wood. The interior is made of a corrugated cardboard material. This makes the door light and inexpensive.
You can also cut the door for height. Either way, you can use a circular saw with a fine toothed blade for a smooth cut. A straightedge helps to keep the cut in line, and a piece of blue painters tape can help minimize any tear out as the blade pulls through the surface. If you are cutting for width, cut on the hinge side of the door rather than the latch side.
If you need to cut a significant amount from the door, you may look at a special order door, or you might cut into the hollow of the door. If you cut into the hollow, use the off-cut and peel away the skin of the door to get at the wood core. You can take this core, and push it back into the hollow after applying wood glue onto both it and the door. Then clamp the piece in place until it dries.
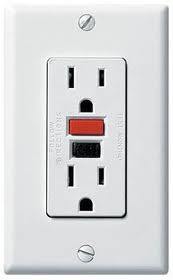 I get calls all the time for getting the power turned back on in the bathroom. The first thing to check is the GFCI outlet, to see if it has tripped off. I tell people to first check in that particular bathroom for the GFCI outlet. This is the outlet with the test and reset buttons. You want to press the “reset” button and hopefully power will be restored.
The next comment is that they can’t find the outlet with the buttons on it. So, start looking around. Check all of the bathrooms, the kitchen, the garage, laundry room. Wherever there is water, there should be GFCI protection. Even though you don’t see a GFCI outlet, you may still have protection there if those outlets are wired “downstream” of a GFCI outlet. Typically, the installer will place a small sticker on the outlet that says “GFCI protected”, but that certainly isn’t always the case. I generally tell people to start in one room of the house and walk the entire house. I’ve seen GFCI outlets behind closet doors. Start looking.
Finally, check the main electrical panel. It may be that you have a GFCI breaker installed in the panel, and it has tripped. Reset the GFCI breaker and it should restore power to your bathroom.
 A handyman sees this all the time: towel bars seem to become loose and finally work themselves free of the drywall. There are plenty of ways to secure a towel bar to a wall. The preferred and most lasting way is to mount it directly into a wall stud. This is great if the supports actually line up with the wall studs, but that doesn’t normally happen. You can mount one side to a wall stud and use a wall anchor (or a toggle bolt) for the other side.
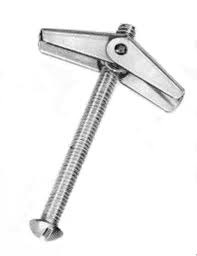
People usually ask about toggle bolts when one side has ripped out of the wall. I also like EZ anchors so long as the damage is small enough. The toggle bolt (aka butterfly bolt) works great but you will have to make some modifications to the bracket. Usually, the hole in the bracket is too small to insert a toggle bolt. So you will have to drill a larger hole into the bracket to accommodate the bolt.
Place the bolt through the hole in the bracket and then screw on the toggle just so that the bolt holds it. You don’t want to screw the toggle so far onto the bolt that there isn’t enough clearance for the toggle to open up. By screwing it onto just the end, the toggle will clear the back of the drywall and open up. Then you can pull the bolt head towards you (away from the wall) and tighten. Pulling the bolt outward engages the toggle into the back of the drywall and allows you to tighten the bracket to the wall.
 If you are replacing a water heater in Las Vegas, you need earthquake straps. There are lots of safety requirements for water heaters and their placement.
The requirement says that for seismic zones 3 and 4 (parts of Nevada are 3 and the rest is a 4), “water heaters shall be anchored or strapped to resist horizontal displacement due to earthquake motion”. The water heater must be strapped in two locations. One strap should be in the upper one-third of the tank, and the other strap should be in the lower one-third of the tank with a minimum of four inches of distance above the controls.
It also says that water heaters placed in an area where they may be subjected to mechanical damage (like a garage) must be suitably protected from such damage (like a car hitting it) by being installed behind adequate barriers. This is why you see a bollard often installed in front of the water heater, so your car will hit the steel pole rather than the water heater.
Water heater straps can be purchased at most home centers and install easily. They must go into wall framing to provide the strength to hold the water heater in place during any seismic event.
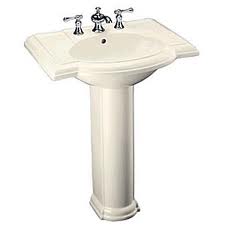 A homeowner called and asked if you could just glue a pedestal sink to the wall. My answer is: it depends on the type of sink.
Pedestal sinks sit on a pedestal for support. So the pedestal bears the weight of the sink. If you are talking about a wall mounted sink, they will come with a bracket that first gets screwed into the wall studs. Then the sink is mounted to the bracket with supports the weight. Trying to glue a wall mounted sink to the wall will not work. However, if you want to use an adhesive caulking around the back perimeter of a pedestal sink, that would be fine. I’ve seen builders install pedestal sinks with just regular caulking and they last, because the pedestal bears the weight of the sink.
Generally, it is best to mount the back of the sink to lumber in the wall. You will see a hole on either side of the sink bowl in the back. You can sink a screw with a washer on it through the hole and into the lumber. If your sink is not lining up with wall studs (this happens most of the time), it is advised that you open the wall and put blocking there. A 2”x6” at the front of the wall will allow your screws to catch and hold. Then you can cover up the lumber with drywall, tape, texture and paint…then finally install the sink. You can see why adhesive caulking on a pedestal sink is an attractive option.
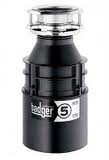 A garbage disposal can easily get jammed if a coin drops into it. Most of the time we see this with children throwing coins into the sink. I don’t know what the fascination is with kids and garbage disposals…maybe it is that they are loud and make things disappear (yes, both kids and disposals).
Removing a coin usually means removing the disposal from the sink. Plenty of people though, will choose to just stick their hand down there and feel for it. Please, if you feel the need to do this, unplug the disposal and make sure it can’t start.
Removing the disposal means removing the discharge pipe on the side and probably removing the air gap hose just above the discharge pipe. Loosen the collar that holds the disposal to the underside of the sink and the disposal should drop right into your hands. Pull off the rubber splash guard and look into the disposal. A flashlight helps to find the coin but it usually gets wedged in between the wall and the bottom plate of the disposal. You may be able to reach in and grab it, or you can use an allen wrench in the bottom of the disposal and try to work it loose. Jiggle the allen wrench back and forth while you have the disposal turned upside down. When you hear the coin fall, you are done.
You can also try a large standard screwdriver. Turn the disposal on its side and wedge the screwdriver at the side wall to give enough clearance for the coin to drop out.