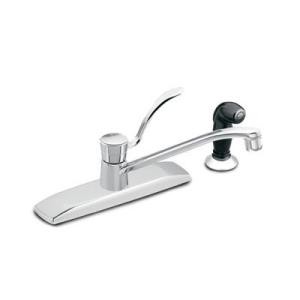
 Have you ever used a kitchen faucet and when you turn the hot water on, cold water comes out instead? You usually find this after someone has just installed it or repaired the faucet. There a couple of situations that could have caused this.
The first situation is where the installer actually crossed the water supply lines. You will see the hot water supply line connected to the cold side of the faucet and vice-versa. I can’t say this is very common because the hot water supply valve is under the hot side of the faucet. In other words, the left side of the faucet is the hot side, and the left angle valve is the hot valve.
What is more common is that the faucet is a single handle faucet and the cartridge’s stem just needs to be rotated 180-degrees. To access the stem, pop the cover off of the handle and remove the screw. This will allow you to remove the handle. The stem is what the screw was removed from. It is usually silver and sticks up noticeably. Hold the stem with two fingers and rotate it 180-degrees, then reinstall the faucet’s handle. That should solve your problem and make the right side cold and the left side hot.
 As a handyman, I see missing smoke detectors all the time. It is usually the case that the detector was chirping and the homeowner removed it because it was bothersome, and probably keeping him awake at night. All that is left is the pigtail plug sticking out of the ceiling. It may be that they just didn’t get around to replacing the battery.
You will need a new smoke detector if you can’t find the old one. If you are lucky, the new smoke detector will mate with the existing plug and will plug right in. If not, you will need to remove the old plug and wire in the new one that came with the new smoke detector. This isn’t difficult at all.
This is a direct wire-for-wire replacement. You can turn off the power at the breaker. You will notice that the plug has a black wire, a white wire, and either a yellow or red wire (which you may not even use). The house wiring in the ceiling has the same colors. Remove the wire nuts from the old plug and replace the new plug wires into the positions of the old plug wires. Tighten the wire nuts and then you can plug it into the new smoke detector. If you old plug didn’t connect the yellow or red wire, then don’t connect it either. This wire is an interconnect wire that makes all of the detectors go off simultaneously, rather than just the detector that has sensed smoke.
By the way, you might replace the cheap battery in the detector with a new one while you have it in your hand. The batteries that come with the new detectors are not a high quality battery, and you don’t know how long it has been sitting on the shelf.
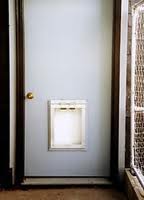 If you have the need to install a dog door you don’t always have to cut a hole through your wall. You may be able to cut a hole through a side door. Some homeowners will install the door in a garage door and then out the side door. Just be aware that cutting a hole in your garage door compromises the fire rating of it. Some people don’t care, but when you go to sell the house, it will likely be caught by an inspection and you will have some choices to make.
If you plan on installing a dog door through the door anyway, it should take you about 30 minutes. The pet doors come with a template and you can trace the pattern on the door. I would drill a hole in each corner of the pattern so that the saw blade has some relief in the cut. Use a jigsaw with the correct blade. It’s a good idea to cover the shoe of the jigsaw with something that will prevent the shoe from scratching the door as you make the cut. Blue painter’s tape seems to work pretty well.
Start in one corner and just connect the holes that you have drilled. When the hole is made, you can install the door halves and just screw it together.
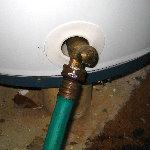 Is your water heater making a rumbling noise? Maybe you hear a popping noise or other noise that water heaters should not be making. The reason your water heater is making noise is that it has sediment in the bottom of the tank.
The noise issue typically happens only with gas water heaters because it has the burner under the tank. So when the sediment builds up, it comes to rest on the bottom of the tank. The bottom of the tank is dome-shaped and so it rests around the perimeter first, and then builds up along the bottom of the tank. The noise occurs because water gets trapped in the sediment and gets very hot. It can turn to steam and cause the rumbling sound along with vibrations. Sediment also makes your water heater operate inefficiently. In order for your water heater to produce hot water, it has to heat the water in the tank. The sediment is a layer of sludge that has to be heated first, and then transfers the heat to the water in the tank. If the sludge wasn’t there, the water would get the benefit of direct heat from the burner, instead the heat has to travel through the sediment first. The answer is routine flushing of your water heater to prevent the sediment from building up in the first place.
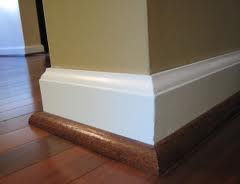 This is a fairly simply carpentry question really. Have you ever noticed that when a wood floor or laminate floor is installed, there is often times quarter-round molding installed around the perimeter of it? It is a very common site. The quarter-round molding serves a very important purpose. It covers the gap between the baseboard on the wall, and the new flooring. You find this if the installer chose to keep the baseboard in place, rather than remove it and reinstall it.
There are two ways to go when installing a wood or laminate floor. If you remove the baseboard, you can run the flooring right up to the wall. Once the floor is installed, you can reinstall the baseboard over the top of the floor for a seamless finish. This is beautiful and you don’t need to install quarter round because the gap is hidden underneath the baseboard.
It’s only when you leave the baseboard in place and install the flooring up to it that you need to use the quarter-round, as a gap is present between the baseboard and the edge of the flooring. Flooring manufacturers make quarter-round molding for this purpose. It will match your floor and will give you a finished presentation. It will however, make your baseboard look shorter because it effectively hides the bottom of it.
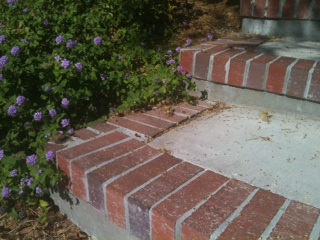 A straightforward handyman project is replacing a broken brick veneer on a concrete step. You see these at the edge of the step. The veneer pieces are typically 3/8"-1/2" and are shaped like an "L" with part of the veneer on top of the edge and part extending down the front.
These pieces get cracked when someone moves a heavy object over the front of the stair and either lets the object slam down on the next step or the step just cracks due to the stress.
You can chisel out the old veneer brick piece with little difficulty. What you will be left with is the mortar from the old veneer piece. A great tool for this is an angle grinder with a masonry wheel in it. Wear eye, ear and breathing protection (along with gloves) and grind out the old mortar. You can remove more than you think necessary because you will fill the void with new mortar and push the new veneer piece into it so that it is level with the surrounding pieces.
The biggest challenge will likely be finding a good match, but once you have it, the job will take less than an hour. By the way, it is probably a good idea to cover the new veneer piece and neighboring pieces with blue painters tape to keep the mortar from filling the pores. True, you can wipe it off, but you will be left with gray colored pockmarks in the brick surface which will draw attention to the repair. If you use the tape, you can peel it off and not have to worry about removing the mortar from the surrounding pieces.
 To remove a soldered plumbing fitting, you need heat. That isn't to say you can't cut the fitting out with a pipe cutting tool...that will work, but you won't be able to just replace the fitting. Rather, you will have to re-work the area to compensate for the parts you removed.
When you unsweat a fitting, you should be able to replace that fitting with an identical one.
You will need to drain the copper piping so that the pipes and fittings can get hot enough so that the solder turns molten and the piping can be pulled apart.
Fire up the torch and apply the tip of the blue cone to the fitting. Move the tip back and forth to distribute the heat. You will probably have to do this to each side of the fitting, heating it up and then pulling one side out at a time.
Be very careful as the fitting and piping will be extremely hot. Use large channel locks or water pump pliers and touch the fitting/piping quickly. Heat travels up metal tools quickly and you will learn fast if you leave the tool on the hot fitting for too long. So grab, pull, and let go quickly. If the fitting won't come apart, keep the heat on until the solder turns to liquid. The other possibility is that there is still some water left in the pipe. You may see steam coming from the pipe if this is the case.
 A loose toilet can be fixed by either tightening or replacing the wax ring and bolts underneath the toilet. If the flange that the bolts secure into is broken or cracked, the toilet will still be loose because the broken flange will not be able to hold it in place.
You can replace the flange but that can lead to additional problems. Instead, you can try a reinforcement repair ring. This is a metal ring that lays over the damaged flange. It has multiple holes so that you can align it in multiple ways with the old flange. Basically, you will be placing the new repair ring over the old damaged flange so that the toilet bolts have something to grab onto to hold the toilet to the floor and to the drain.
If the toilet is on the slab, you can use concrete screws to hold the reinforcement repair ring to the old flange and finally the slab. I like tapcon bolts for this, which is probably overkill, but they are very strong. You will need to pre-drill the appropriate sized hole prior to installing the bolt. The repair ring will have many holes for you to choose from so that the bolts won't get in the way of the repair or installation of the toilet. Once you align the ring over the flange you can pre-drill the holes and then install the tapcon screws.
Once the repair ring is installed, you can re-install the toilet using a new wax ring and bolts.
 Ceramic tile work is like putting together a jigsaw puzzle one piece at a time...and it is straightforward until you get to an obstruction. This happens a lot when tiling a shower wall. You will tiling away and then run into a shower valve handle sticking out of the wall. So, you have to go around this by notching the tile. That is fancy talk for cutting a section out of the tile. This will be hidden by the escutcheon plate for the handle.
The key is to make the notch big enough that it fits around the penetration, but not so big that it can't covered by the escutcheon.
The best tool for this is a wet saw. Before you cut, you can lay out the markings on the tile. You can hold the tile up to the penetration and make some boundary lines on the face of the tile. You can use a pencil or a wax pencil for this.
Lay the tile on the bed of the wet saw. I make the stop cuts first and then nibble away the interior of the notch. The wet saw makes quick work of this. You can cut the far left cut first, and then the far right or vice-versa. Then slowly nibble away from left to right, or whichever direction you feel comfortable with. The last sliver will likely break off, but you can clean up the bottom of the notch by running it against the blade along the series of cuts. When you have the notch finished, you can dry off the tile and mortar it to the wall.
 If you have a light switch making a noise, that is not normal. A buzzing or popping noise suggests a problem, most likely with a connection either from a wire to the switch, or in the switch itself. Remember, most switches are plastic, with a small amount of metal at the connections.
If you have a loose or broken connection, you are probably generating heat at that location. The noise is likely from this loose connection and the danger is heat buildup and possibly fire. Try touching the switch or even the switch plate. Does in feel warm or hot? Even if it isn't warm to the touch, you need to investigate the problem.
Turn off the power and pull the switch away from the junction box. Check where the wires connect to the switch, as they might be loose. You find this a lot if the wire is pushed into the switch rather than wrapped around the terminal. I prefer to wrap the wire clockwise around the terminal and tighten snugly with a screwdriver. The other option is to simply push the wire into the terminal hole at the rear of the switch. This style is not as secure as wrapping the wire around the terminal screw.
If everything looks good, so far, I would recommend replacing the switch. I've seen 5 year olds slam their hand against a wall switch and crack it. Spend the $2.00 and buy a new switch.