 Shower door handles can corrode, become loose, and generally need repair or replacement. Shower door handles are connected by screws and they are easy to fix.
Usually, the problem is that the handle is loose enough to the point where it either falls off or breaks off.
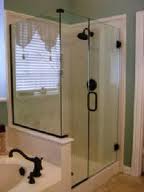
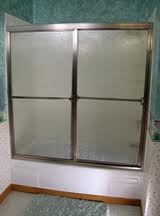
Shower doors either swing like a traditional door, or slide along a track. Swinging doors have a small vertical handle that attaches with two screws. Sliding doors typically have a long handle that spans the width of the door. It will usually be held to the door frame by two screws on each side of the door. The most obvious fix is to tighten the screws to see if that fixes the problem. If the handles tighten back up, you are done.
If you need to replace the handles, you are likely not going to find them in a home center. You should try a glass shop. There are lots of different finishes on door frames. You can try your luck on the web, but by taking the part to an experienced glass shop, they will be able to get the exact part you need. In many cases you will have to order the parts, but getting the correct part will save you a lot of trouble.
 Have you ever lifted up the bathroom sink stopper and it just doesn’t move? There could be a couple of reasons for this.
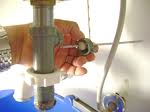
In most cases, when you want to stop the flow of water, you lift up on the handle. There is a pivot rod in the drain assembly that acts like a see-saw. When you lift the handle, it pulls one end of the pivot rod up and forces the other end (the one connected to the sink stopper) to go down. In most cases, if the sink stopper isn’t moving, the end of the pivot rod has corroded and needs to be replaced. There are a few other reasons like either the pivot rod has become separated from the lift handle, or even that the stopper is broken where the pivot rod connects to it.
Check the connections first, and then remove the cap nut that holds the pivot rod in place. Pull out the pivot rod and check the end. It is usually about 1 inch long, but it will likely be corroded and the end will have broken off. There are 2 sizes and so bring the old one with you to find a replacement. If things at the drain don’t look so good, you might even consider replacing the entire drain assembly, which costs about $15.00, and it will have all of the parts you need.
 You will need to cut a hole in your drywall if you are planning to add an outlet or switch. The key here is to accurately cut the drywall so that the opening isn’t too big. If the opening is too small, that’s okay as you can always cut it larger. But if the hole is too large, you sure don’t want to end up doing a drywall repair when you could have been more careful cutting it in the first place. Use a stud finder to locate the studs.
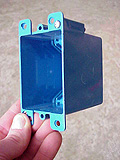
After I’ve picked out the location for the junction box, I will hold physically hold the box up to the wall and trace around it lightly with pencil. Be aware that the remodeling box is somewhat tapered. It is larger at the front than the back. So if you trace around the front of the box, you will need to cut inside the line by anywhere from ¼” –around ½”. Look behind the perimeter of the box and you will see indentations around it. You will also see the ears that pop out and hold the box to the drywall. Also make sure the box is level and the placement is consistent with other boxes.
Use a drywall knife and cut out the drywall. Use a shallow stroke to cut just in case there is a cable, or pipe in the wall. You may have to fine tune your hole, but when done you can push the box into the wall and tighten the screws. The ears will pop out and clamp to the back of the drywall.
 Many people like having access to their attic via an attic ladder. You don’t need an attic ladder unit to gain access though. In fact plenty of people will cut an access hole through the ceiling and just use a regular ladder to get up there. If you decide to go that route, know a couple of things. Cutting a hole in your ceiling will breach the fire rating of your ceiling. Many people still choose to do this for the added storage space.
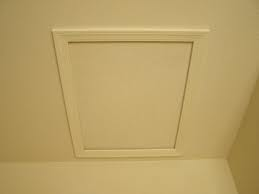
If you choose to cut an opening, you will install trim molding around the perimeter of the opening. The purpose of the trim is two-fold. First, the trim provides an attractive finish to the cut. Second, the trim acts as a ledge for the drywall ceiling piece to rest upon when you don’t need access into the attic.
Use trim molding that is wide enough not only to cover the rough cut, but also to extend far enough into the opening to that the drywall has plenty of room to sit and not fall out.
People typically cut along the width of the ceiling joists and then form a box by installing two 2”x4”s to make the box. In this way, you have something to nail into to hold the trim in place. Make sure that when you install the trim, you hit the ceiling joists with the nails, otherwise the weight of the drywall will push the trim out and the trim and drywall cut-out will fall to the floor.
 Cabinet shelves for the most part require very little maintenance. You stick them in the cabinet and the pretty much stay there unless you somehow damage them. Occasionally, a shelf might fall out of place.
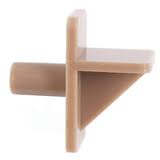
Cabinet shelves use gravity to hold them in place. There are pegs that stick in pre-made holes in the side walls of the cabinets. The pegs slide into the holes and act as arms for the shelves to rest upon. So why would the shelves slip out of place?
Barring an impact to the shelf, it may be that the pegs are not level with one another. You find this when three pegs are on the same level, and one peg is too low. When you set something on the shelf, if it is placed just right it will cause the shelf to tip back or forward. Just make sure that all of the pegs are aligned on the same level set of holes.
Another possibility is that either the pegs are too short or that the shelf was cut too short. In either of these situations, there is the possibility that if the shelf moves too far to one side, it will fall off of the peg on the opposite side. You can cut a new shelf that is wider than the old one, or simply buy longer pegs so that when the shelf is pushed all the way to one side, the peg is long enough to support it.
 Have you ever pressed the garage door opener button and the motor runs but the door doesn’t move? It could be a couple of different problems, but start with the easiest first.
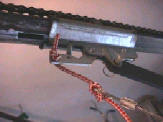
Cross your fingers that the emergency release has been pulled. This is the handle attached to a short section of rope. It is attached to the carriage and moves along with the door as the carriage moves. If for some reason the opener isn’t working, you can pull the handle and it will disengage from the chain, screw, or belt drive that it is attached to. This will allow you to manually lift the garage door by hand to get your car in or out of the garage. Check to see if this is the case with your garage door opener. If the handle has been pulled you can simply re-engage it by pulling it toward the motor.
If the handle is engaged, you likely have a broken or worn gear inside the motor. You can take off the motor’s cover and look inside. The gears are plastic and the teeth wear down on them. Look for a powdery looking substance on the bottom of the motor’s housing. The broken or worn gear will need to be replaced.
 If you have to replace a shower cartridge, the job should take less than 30 minutes. The most challenging part of the job however, is removing the old cartridge.
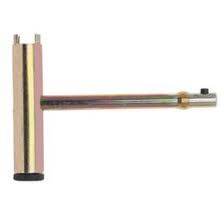
You will first need to remove the handle to gain access to the cartridge. For a Moen cartridge there is a clip that you have to pull out, which frees up the cartridge to make it’s exit. But it’s not that simple. Theoretically, you should be able to grab the stem with some pliers and pull it out. In reality though, it is more difficult than that. You can buy a cartridge removing tool to help out.
The tool screws into the screw hole that the handle was screwed into. Turn the handle on the tool until it starts to tighten. You will see that handle and the cartridge pull together. The ears of the cartridge will mesh with the tool. As the tool is tightened, the cartridge will start to lift out of the opening. There will be a time when you will be able to pull the cartridge out of the opening.
If the shower valve was installed with the cartridge inside of it, it may be very difficult to remove the cartridge. In this case, the stem may pull out, but leave the cartridge still in the opening. You can try to use a torch and slightly heat up the valve to loosen it. The tool will also have a skinny shaft (usually the handle) with a retractable ball bearing in it. You can stick this into the hole and twist it until it engages with the cartridge. Then pull and twist it out.
 If you plan on replacing shower doors from your bathtub, you will first need to remove them of course. You may just want to remove them and install a curved rod and shower curtain, but I personally prefer the permanent look of sliding doors.
Sliding shower doors are very easy to remove, but they can be awkward because of the typically flimsy glass doors.
Start by lifting the outermost door and swinging the bottom out. Once you lift the door’s rollers from the track you can remove each door. With the weight of the doors no longer hanging from the top track, you should be able to lift the track up and off of the side rails.
The side rails are held in place with screws and caulking. Look at the inside of the tracks and you will likely see screw heads. You may also find them in the rubber bumpers that prevent the doors from hitting the sides too hard. Remove the screws, and cut through the caulking.
All that is left is the bottom track. It is held in place with caulking. You can cut through the caulking with a utility knife, but be careful not the scratch the bathtub. Once you remove all of the pieces, you will have to clean up the old caulking.
 As far as plumbing valves go, I really dislike gate valves. They are very common however, because they are a few dollars less than a superior ball valve. Gate valves have a round handle that, as you turn it, lifts or lowers a gate that either stops the flow of water, or allows it to flow, depending upon which way you turn the handle.
The problem is that the handle will shear away from the gate which makes the valve useless. The gate may stay in the up position (allowing water to flow), or it may drop down and stop the flow of water (big problem if you need water). The answer is to replace the gate valve with a ball valve. However, you can restore the flow of water without replacing the valve.
Use opposing wrenches and remove the top of the valve. You should hold the bottom half of the valve still with one wrench, while applying the other wrench to the top half of the valve. Unscrew the top of the valve and remove it. Reach down inside the valve body and remove the broken gate (it will look like a piece of rounded metal sitting in a groove). You can screw the top back on to the valve and turn the water back on. This will allow you to have running water, but you won’t be able to shut it off from this valve. The best choice is to replace the gate valve with a ball valve.
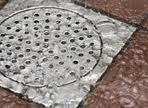 If you have experienced a slow shower drain, you know it can be frustrating. The good news is that in many cases, the cause of the blockage is located just below the drain around the trap. You usually don’t need a snake to reach the blockage if it is in this location.
You will need to remove the drain cover from the shower drain. If you have a plastic cover, the strainer should just pop off. If you have a metal cover, it usually is held in place with two screws. The clog will be a mass of hair mixed with soap. Over time you will notice a foul smell as the hair degrades.
You can buy a “zip-it” tool to reach this area. This is nothing more than a long, thin piece of plastic with barbs on it. You stick the tool down the drain. On its way down, it pushes past the hair ball. It’s when you pull it out that the magic happens. The plastic barbs grab the hair ball and pull it out. It is easy but can be messy if you pull it out too fast. In a pinch, I suppose you could bend a metal coat hanger and put a little hook on the end of it to fish out the clump. I wouldn’t stick it past the trap though as you might not be able to get it out.