 My Dishwasher Installation Sticks Out Too Far
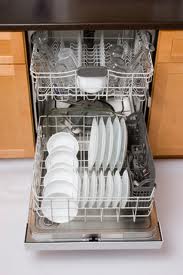
When doing a drywall installation, you have to pay attention to the little details. In addition to connecting the dishwasher’s drain line and water supply line, the unit has to fit neatly inside the opening in the cabinets.
Some people have issues with the dishwasher sticking out too far or not being flush with the surrounding cabinets. You want the dishwasher to be aligned with the surrounding cabinets and have equal spacing along the perimeter. The dishwasher is held in place with two screws at the top of the unit. Open the door and look at the top…you will see the screws.
If the unit is sticking out too far and won’t go any further, pull it out of the opening and look inside the opening for obstructions. It may be that the drain line is coiled up behind it and is preventing it from moving back any farther. If the dishwasher is in a kitchen island, look at the back of the cabinet opening. It may be that there is a strip of wood along the bottom of the floor which is used as a nailer for the cabinet back. If necessary, you can chisel out small areas where the feet of the dishwasher will go. There will be plenty of room to install the dishwasher. You just have to figure out what is preventing it from moving all the way back. When you are happy with the position, reinstall the screws at the top.
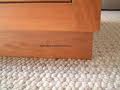 Cabinet toe kick is certainly cheap enough to replace. However, that does take some effort to remove the old toe kick and install the new. If the damage is slight, why not try to repair it?
A lot of damage to cabinet toe kick is from water. Maybe the dishwasher leaked, or maybe you repeatedly got crazy with a wet mop. If the damage is not bulging out, but rather discolored, grab some stain and give it a shot.
Toe kick is typically a thin piece of veneered wood. That means that the attractive finish is extremely thin and doesn’t go through the entire strip of wood. Think of a thick strip of wallpaper glued to a thin piece of plywood. You can lightly sand the veneer, but if you get too aggressive, you will burn through it and not be able to repair the damage. So the key here is to be gentle about it.
Water damage will appear as white stains. Use fine/medium sandpaper and remove the staining. Then get some stain and stain the piece of toe kick. It might be tricky to match the color, but stains are made in a multitude of colors.
Once you stain the toe kick, you can try to match the finish. When the stain goes onto the wood, it will look somewhat dull and a little lighter than the surrounding finished wood. When you finish the piece, the color will come out and it will be a closer match.
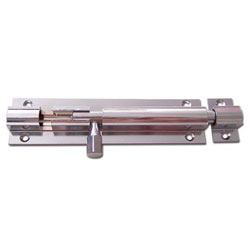 Installing a lock on a door takes a little common sense. For those folks with small kids, you‘ve probably learned that Junior can open the door with little effort. This is where a barrel bolt comes in. A slide bolt simply slides into a door jamb or a receiver to keep the door closed. They are easy to install and you can mount it high enough to prevent Junior from reaching it.
The sliding part mounts on the door and is held in place with four screws. The mating receiver piece mounts on the door jamb. To lock the door, simply slide the bolt into the receiver.
On some doors, the bolt will actually slide into the jamb, and so you will need to drill a hole for this. Choose a drill bit slightly larger in diameter than the bolt. To determine where to drill, you can extend the bolt until it hits the jamb and then draw a circle around the bolt at this location. The other way is to use lipstick and cover the end of the bolt with it. By extending the bolt, the lipstick will make a mark on the jamb when it contacts it. Then just drill a hole in this location and you are all done.
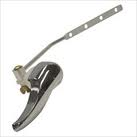 A toilet handle is a simple lever, that when depressed, lifts the flapper and allows water to rush into the toilet bowl. This flushes the waste from the toilet.
The only part that you see outside of the tank is of course the handle. But that is only part of the mechanism that causes the flush. If your toilet handle is falling off, it is likely that the nut or threads inside the tank have corroded and the handle is loose and needs replacing.
If you remove the lid to the toilet tank, you will see the workings of the toilet. Look at the handle where it penetrates the tank. You should see a round nut that screws onto some threads on the handle. This nut pulls the toilet handle tight to the outside of the tank. When the nut cracks or corrodes, it can no longer apply the force to hold the handle to the tank.
Buy a new handle and install it. Remove the flapper chain where it connects to the handle and unscrew the nut that holds the handle to the tank (if necessary). The handle will pull right out. Insert the new handle and thread the nut onto the handle to hold it to the tank.
You will probably have to adjust the flapper chain somewhat and give the toilet a few test flushes.
 A customer called saying his door stop wouldn’t stay in the wall. I assumed he meant the door stop wouldn’t stay in the baseboard, but you have to ask these questions. Yes, he did mean the wall.
Installing a door stop in drywall is generally not a great idea unless the force of the impact is spread out among a larger area. Drywall will puncture easily, so placing a door stop there is asking for a hole, which defeats the idea of a door stop anyway. It is probably a better idea to move the door stop down to the baseboard, which will weather an impact better.
Another option is to place the door stop on the back of the door itself so that when it contacts the wall, it will hit the baseboard. Some people install them at the top of the door, but you have the same problem with the force being focused on a small area (the tip of the stopper) and will puncture the drywall.
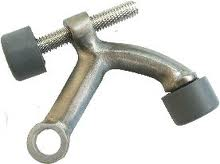
You might also consider installing a hinge-pin door stopper. These sit at the top of the hinge pin and the force is placed at the door and the jamb. You will need to pop out the hinge pin, thread the stopper onto the pin, and tap the hinge pin back into the hinge.
 How many times have you seen caulking in a bathtub or shower start to peel up? Probably many times. With a some simple rules and a little attention to detail, this shouldn't ever happen again.
A big problem is that people don't use the right caulking. So, choose the right product. I like silicone caulking specifically for wet areas. Do you know how to determine if your product is good for wet areas? Read the back of the tube! The back of the tube of caulking has all types of important information regarding the application and use of the product...so read it.
The other issue is that people don't prepare the surfaces. Don't try to apply caulking on a wet surface. When someone calls me and asks us to caulk their bathtub or shower, I tell them that they can't use it 24 hours before we caulk it, or 24 hours after we caulk it. This way I know that that the area is dry when we arrive and will stay dry until the caulking gets firm enough to repel water.
The bigger issue is that if the caulking was peeling, water may have gotten behind the surface of the shower walls. This is something we all want to avoid and really the reason we use caulking. When you use the right product and apply it correctly, the caulking will prevent water from entering areas that it shouldn't be entering.
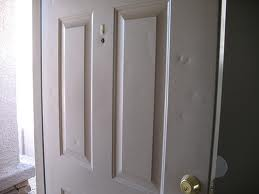 Dents in your metal front door are unsightly. You will see blemishes from small dings to sizable dents. Fortunately, repairing the dents is an easy process.
It’s a good idea to lightly clean the door and then rough up the dents with some sandpaper or steel wool. You can buy bondo at an auto parts store or you can opt for various metal repair products at a home center.
Some products require you to mix them together and others you can use straight from the can. Just read the manufacturer’s instructions to figure it out.
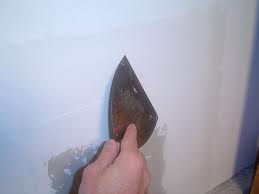
Basically, you are going to use a wide putty knife and push the product into the dented area, and spread it out. If the area is large, you will probably have to use several coats of the product. It is generally better to use several passes than one large swath. Let the preceding coat dry before you add another coat. The idea is to get the area flat and flush with the surrounding area so that when you paint it, it will be unnoticeable.
When the area is flat, sand it smooth. You can use wet/dry sandpaper up to 220 grit. Start with slightly larger grits and work down to 220.
When done sanding you can paint the entire door. Prime the door first and then paint it. Use a paint conditioner like Floetrol for latex paints or Penetrol for oil based. These will slow the drying down and allow any brush or roller marks to disappear.
 When you patch a drywall hole, you have an ugly eyesore staring at you. After you have patched the hole, taped it and floated drywall compound (mud) over it, you have a smooth area in the middle of a textured area (unless your wall wasn’t textured).
The key to making a drywall patch is getting the surface flat so that it doesn’t protrude or indent from the surrounding area. When you reach that point it is a matter of spraying some texture on it and painting.
Once the mud dries, many people use sandpaper. If you use sandpaper, use a fine grit. Beginners tend to use a medium grit and it leaves scratches. Finer is better. Sandpaper will remove dried mud quickly, so use light strokes over the entire area.
You can also use a damp sponge. Ring the water out and lightly use a swirling motion. The sponge will clog with wet mud, so you will need to dunk the sponge and wring it out again.
Once everything is flat, use a damp sponge and get rid of the border of the patch. When you spread the mud on the patch, it will fill all of the textured divots. Try to erase the border of the patch to bring the textured area back. Once you have done this, you can spray some texture on the drywall and paint it to match.
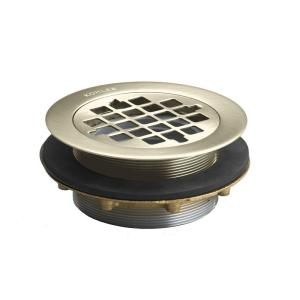 If you are replacing a fiberglass shower pan adding the drain connection is the most important part. If it’s not done correctly, you get a leak and the resulting water damage. The drain connection looks very intimidating, but it is actually very common sense.
First off, spend a few extra dollars and buy a brass drain connection. Plastic is cheaper but don’t use it. Use plumbers putty under the lip of the drain and tighten the nut underneath the shower pan. The putty should ooze out.
What you will be looking at is the drain pipe in the middle of a hole in your floor. The pipe should be at about floor level, but dry fit everything before you make any cuts. The drain assembly will fit over and around the drain pipe.
At the bottom of the assembly is a lip. With the assembly over the lip, place the neoprene washer around the pipe. This will be a snug fit, so you may need a wooden paint stir stick to fully seat the washer against the lip at the bottom of the assembly. A little liquid soap can help as it acts as a lubricant to slide it on down.
Insert the compressing ring and start tightening it. This threads onto the inside of the drain assembly and compresses the washer against both the outside of the drain pipe and the inside of the drain assembly. This is what prevents leaks. The compression ring has notches in the top of it to accept a small metal key. The key drops into the notches and you can start turning it. Once it becomes too difficult with your fingers, you can slide a screwdriver into the slot in the middle of the key and continue turning.
Finally, you can snap the strainer into place.
 Here is a handyman tip that demands safety. Removing a bathroom mirror from a wall certainly doesn't look intimidating. In fact, the mirror can look as if it is held to the wall with a few fasteners. Easy right? Not so much. Most likely the mirror has been glued to the wall, and when I say glued, I mean the wall will come down along with the mirror.
The mirror gets glued to the wall with mirror mastic or other suitable adhesive. Usually, you will find large globs of adhesive behind the mirror. For this reason, you will have drywall repair to do after you remove the mirror, or you might decide to cover the damage with a different mirror.
At the minimum, safety goggles and gloves are mandatory. If you are lucky, the mirror will slowly peel off of the wall without breaking. By the way, the larger the mirror, the more help you need to get it off in one piece.
I use a stiff putty knife 3-4 inches wide. The stiffer the better. I also use a long standard screwdriver. Start by inserting the putty knife behind the mirror and gently lifting. When the mirror starts to lift, insert the screwdriver in and continue to pry the mirror. As you lift the screwdriver, move the putty knife over a few inches and push it behind the mirror and gently lift. Slower is better here. You should hear the drywall paper tearing as you lift. Do this slowly. The goal here is to remove the mirror in one piece so that you are left with repairing the drywall. The last thing you want to do is to lift to aggressively and break the mirror. Not only will you damage the sink, floor, etc., you may also injure yourself. Be careful on this job and go slowly!