 Bi-fold doors need regular adjustment to work properly. The doors are not hard to adjust, but it seems to be a game of constantly fine-tuning the doors.
The key is to get the doors to the point where they have a uniform gap in the middle, and that they fully open and close without getting hung up on anything. To accomplish that you have to make some fine adjustments.
Look and see where the doors are contacting each other. Is it the top or bottom or all along the entire length of the doors? There are adjustments at the top and bottom of each door on the wall side. At the bottom of each door is a pivot that sits in a grooved bracket. This allows you to move the doors closer to each other or farther from each other. You simply lift the door and move it to the next resting point in the bracket. That adjustment will give you some space in between the doors, but you will also have to adjust the top of the door as well to keep a uniform gap between the doors.
For this adjustment, you will need to open the door. The top of the door has a retractable pin that slides into a guide in the track. There will be a screw you can loosen that will allow the guide to slide down the track. You need to make small adjustments until both doors work correctly. You will see a pattern of adjust and test. Once you have the doors to your liking, be gentle with them. You don’t want to have to do this every week.
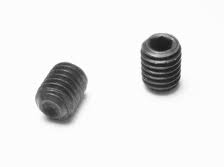 A handyman runs into set screws often, but just what is a set screw? A set screw is a small mechanical part that spends most of its life hidden from view. Pretty much the only time you see it is when you remove it. Think of a regular screw only without the head on it. If you see a small hole in, for example, a faucet handle, there is probably a set screw in there.
As I said, set screws stay out of sight, and they are sometimes hard to find, especially when you need to. You will find set screws that hold on faucet handles, toilet paper holders and towel bars, tub spouts, etc. You probably don’t even notice the holes where the set screws are because they are designed to be inconspicuous. For faucet handles, look at the rear of the handle. For toilet paper holders and towel bars, you will find them on the bottom of the holder, and for tub spouts you will find them underneath the spout. The tub spout is particularly challenging because you practically have to stand on your head to see it (or use a mirror).
Removing them takes either a small Allen wrench or standard screwdriver (like the eyeglass type). If you can see the head of the set screw with a flashlight, great, but otherwise it is a process of “feeling” for the set screw.
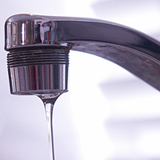 We had a service call from a customer who was upset with another plumber because he charged lots of money and didn’t fix the problem. The original situation was that if someone turned on a faucet when the customer was showering, the water would just trickle out of the shower head. The other plumber replaced lots of valves and parts and charged them plenty of money…and still didn’t fix the problem. He failed to check the most basic of items, as the problem was not one of water pressure, but water volume. We checked the most basic starting point (the main shut-off valve) and found it to be only partially open. After opening it fully, we solved the problem.
You may have a similar issue, but if you are noticing it only in the bathroom, you might check the fixtures and diagnose them one by one.
A faucet with low water flow can usually be attributed to a clogged aerator or a partially closed shut-off valve. Use a pair of pliers and unscrew the aerator (wrap the aerator with a rag so you don’t scratch it). The aerator is simply the screen at the end of the faucet with introduces air into the stream of water. Over time, this screen will get clogged with sediment and reduce the flow of water. You can replace it for under $5.00 or just clean it out.
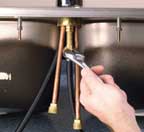
If the problem is not with the aerator, go under the sink and turn the shut-off valves counter-clockwise to make sure they are wide open. If they are and the water flow is still poor, turn off the valves and disconnect the water supply lines from the faucet. Point the lines into a bucket and turn the water back on to see if there is a good flow of water into the bucket.
If the flow of water is poor, replace one or both of the valves. If the water flow is strong, I would replace the cartridge in the faucet or the faucet itself.
For the bathtub/shower, the problem will be with the valve in the wall. I get several calls per week saying that there is no hot water coming out of the shower. Usually, the problem involves a single handle that controls both the hot and cold water. Replacing the cartridge inside this valve will solve the problem. This part will cost under $50 and will take under an hour to replace. If you have separate handles for the hot and cold valves, you can replace one or both of those depending on how poor the flow is in each valve.
If you are seeing poor water flow throughout you house and you have a water softener or a whole-house water filter, you should investigate them. People often neglect replacing the filters in their system and they get clogged up. For the softener, if you remove an aerator and you find a small, bead-like material plugging up your fixtures, it may be that the softener tank ruptured and sent resin beads flowing down to your fixtures. This will require disassembling the affected fixtures and removing the beads.
 A kitchen faucet leak becomes more common as the fixture ages. If you have a faucet with a sprayer, you have more opportunity for leaks. A common source of leaks is at the sprayer attachment.
You may find a leak under your kitchen faucet when you see the small puddle of water laying on the cabinet floor. This is going to take some investigative work, along with a flashlight. You will need to turn the water on to the faucet while looking for the leak. Pay particular attention to the area where the sprayer hose connects to the base of the faucet. If the leak is occurring at another location of the faucet, you may end up replacing the faucet if it is not leaking at a connection.
If the leak is at the connection of the sprayer hose, you can try to tighten it, remove it to find the problem, or replace the entire faucet. Some hoses are held on with a threaded connection, and some are held on with a clip. It may be that you can remove it, replace a washer, re-tape the threads with Teflon tape, and screw it back on. However, if the faucet looks to be in generally bad shape I would replace it.
 A handyman gets asked to do all kinds of things, including installing a safe. Fortunately, the safes we install are relatively lightweight.
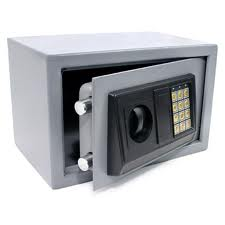
You can buy a small safe at any lock shop, or even at a home center. They are not big, but are they are heavy enough for one person to struggle with. A home safe is great, but since it can be carried away by one person, it makes sense to secure it to the building.
You will have a couple of options. If you have a concrete slab, you can install some anchors and secure the safe. If you have a wood subfloor, you can install it with lag bolts. These are usually included with the safe.
Place the safe where you want it. Open the door of the safe and there will be some small holes at the bottom of the safe’s floor. These are where you will anchor the safe to the floor. Use a pencil and stick it through each hole. This will make a mark on the floor. Move the safe away and drill pilot holes in the floor. If you have wood floors, drill holes slightly smaller than the shank of the lag bolts. You can then move the safe back into position and screw the bolts into the floor from inside the safe. If you are installing the safe onto a concrete slab, you will need to drill holes to fit the concrete anchors, and then place the anchors into the holes. You will have to place the safe over the anchors so that the anchors mate with the holes in the bottom of the safe. Then you can install the nuts over the threads from inside the safe.
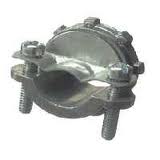 I was in an attic the other day and looked at a metal electrical junction box. The box had romex cable running into it after the knockouts had been removed. There were no cable clamps or grommets at this area to protect the cable.
If you are using metal junction boxes, you need to use cable clamps. A bag of these will cost only a few dollars, but will hold and protect the cable from damage. Without a clamp, if there was movement, the sharp metal box could cut into the wire and possibly cause damage. The cable clamp prevents the cable from moving at the box.
The cable has a collar that spins off. The clamp is then placed inside the box so that the threads protrude out of the exterior of the box. Then you can screw the collar onto the threads. This holds the clamp to the box. To hold the cable in the clamp, there are two small screws. Loosen them to spread the clamp open, run the cable through the clamp enough so that you have enough wire to make your connections. This is done with each cable that enters the junction box. The cables are held to the box and the individual wires are connected using the appropriately sized wire nuts.
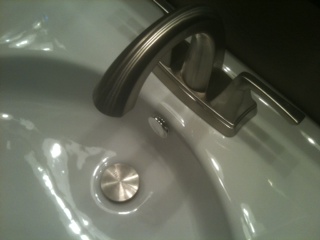 Some faucet manufacturers are no longer making the pull rod type drain stoppers. Instead, they are including a pop-up stopper that you simply push with your finger. Push the stopper once to stop the flow of water and fill the sink, and push it again to open the drain and allow the sink to drain.
Design-wise it is a very clean look. Gone is the little knob behind the faucet to open and close the drain stopper. In my mind, however, it seems to be unsanitary to touch the drain stopper. I know what I put down my drain, and I certainly don’t want to touch it. Plus I don’t want to stick my hand into a sink full of grossness to push the stopper.
Installing this type of stopper assembly is very easy, and you won’t need tools….surprise here: most of the assembly is plastic. Remove the large nut (that holds the assembly to the bottom of the sink) and the conical washer. Drop the assembly through the top of the sink and into the hole for the drain. You won’t need to put any plumbers putty under it unless the manufacturer says to do so. Hold the assembly in place and install the conical washer back onto the tailpiece so that the large end faces down. Then just spin the nut back onto the threads. This nut will push the washer into the hold and seal out any leaks. You may have to give it another quarter turn if it leaks.
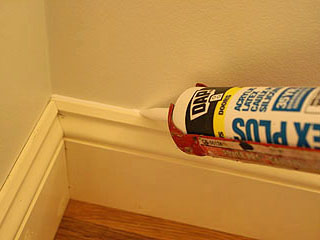 Painting is all about the details. Preparing the surface, caulking, and finally painting gives a needed change. When you are painting a wall one color, and baseboard a different color, caulking is crucial to getting a crisp line the separates the colors.
The mark of great forethought here is the area where the two different paint colors meet. It is here that people’s eyes are drawn to see the contrast. The line separating the two colors should be definite and straight with no overlap. Caulking is used to accomplish that.
The less caulking you use the better. At the top of the baseboard, lay down a thin bead of white paintable caulking. Do this before you begin painting either surface. Use a wet finger and lightly smooth out the caulking along where the top of the baseboard meets the wall. Use one continuous motion along the top without lifting your finger, or you will see this when the paint dries. Let the caulking dry.
I usually paint the baseboard first and let the paint overlap onto the bottom of the wall. You don’t need to be perfect here because the wall paint will cover it up. Once the baseboard paint dries, use blue painter’s tape and make sure the edge of the tape falls on the caulked surface. The tape will stand out horizontally which is why I like to paint the baseboard first.
You want to remove the tape before the paint on the wall dries, but after the paint sets up. In other words, if you pull the tape too soon, you may get wet paint that fouls your line. If you pull the tape too late, you may pull some of the dried paint off with it. Generally wait 15 minutes and test an area. If the tape comes up cleanly without pulling any paint off with it, keep removing it.
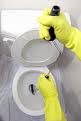 Rising water in the toilet can make a person very nervous. You flush the toilet and you can tell something is wrong because the water doesn’t go down the bowl, instead it slowly start it’s ascent to the rim of the bowl. This is a tell-tale sign that there is an obstruction in the drain.
It is usually a partial obstruction, as some water goes down, but not at the rate it should. So instead of having a trapway (the drain hole at the bottom of the toilet) that is 2 ¼”, it may be reduced to a diameter much smaller than that. That is the reason the water starts to rise in the toilet. Since the water can’t go down the drain, it has nowhere to go but rise in the bowl. If you get too nervous and the water looks like it will run over the top of the bowl and onto the floor, you can always turn off the water to the toilet. Look on the wall under the tank and you will see a valve at the wall. Turn this valve clockwise to stop the water. You may have a manibloc system where all of the fixture valves are located in a small cabinet. If this is the case, you won’t have a valve at the wall, rather you will have to go to the manibloc closet and shut off the water with the key provided.
So here is an article on how to unclog a toilet I would go with the toilet plunger first. I’ve had the most amount of success with the plunger.
 If your swamp cooler pads are not getting wet, you are going to have warm air blowing from your cooler. The problem is obvious: the water is not getting to the pads. So it is time to investigate why not.
Let’s start with the easy things first. Make sure you have water in the bottom of your swamp cooler. This sounds stupid, but you would be surprised. I had a customer call us out for this exact reason…it turns out the landscaper turned off the water at the hose bib, which happened to be the one that supplied water to the swamp cooler. No water, no wet pads.
If you have water in the bottom of the swamp cooler, check to see that the pump is working. You should have a basket to keep out debris which could clog the impeller. You might remove the hose at the pump and turn the pump on to make sure water comes out of the outlet. If no water comes out, it may be time to replace the pump.
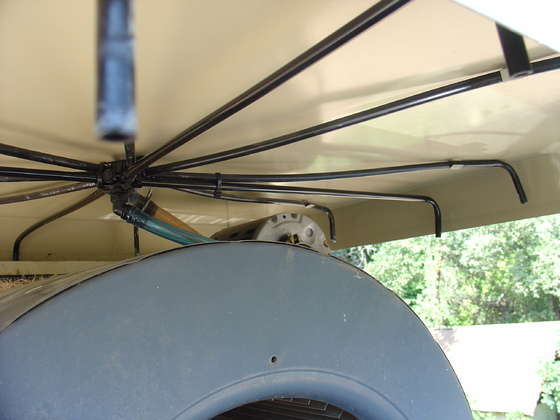
The last thing to check is the distribution to the pads. From the pump will be a larger tube that connects to an adapter at the top of the cooler. This adapter branches out into distribution tubes (called a spider) which go to the pads. If necessary, you can pull the tubes apart and clean them out. You can also use a pipe cleaner you might find at an arts & crafts store. Once you clean these out you should have water flowing to the pads.