 A customer called and said her son locked himself out of his bedroom. The thing that really bothered her was that he left his television on full-blast. That’s when she called. She told me she tried sticking a nail in the small hole in the handle, but it wouldn’t open. Not bad.
This is one of those quick fixes that it is tough to charge anyone for. It’s going to take under 15 seconds to get the door open.
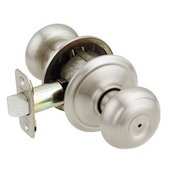
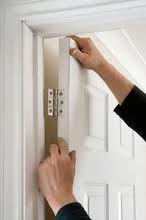
Interior door locks will have either a button to push or a knob to turn to lock the door from inside the room. However, if you accidentally lock the door and you are outside the room, you can start to panic. That is, until you see the small hole at the door knob.
You can unlock the door in one of two ways. Look for a small hole either in the door knob itself, or on the escutcheon around the door knob. You can try to push a nail in the small hole to unlock the door (this style is typically found for the push-button locks). More common though is the slotted mechanism. This style of door lock comes with a little tool exactly for this purpose. If you don’t have the small tool, you can use a small standard screwdriver that fits into the hole. By the way, look on top of the door trim for the tool as many installers will place it here after the door knob has been installed.
Stick the tool or screwdriver into the hole and feel for the slot. When the tool engages the slot, just turn the tool until the door unlocks. It’s that easy.
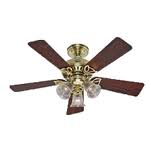 So maybe you are moving, or just want to replace your ceiling fan. You first have to remove it and fortunately this is easy. Probably the most difficult part is getting up on a ladder.
Turn the power off and climb up to the ceiling fan. You will have a choice here in how what steps you take to remove it. Fans can be heavy and those that have a 52" diameter can be a challenge to handle. So , you might choose to remove the blades first before you disconnect the fan. Mark the blades with the corresponding supports where you remove them. This is because the fan can become unbalanced if you move them around, and by marking them you can make sure the same blade goes back onto the same support. Just use masking tape on each piece to mark them.
You will need to get access to the wiring connections. Unscrew the cover at the ceiling. There are two screws that hold this on to the fan. The cover will drop down and you can pull out the wires. You should see the wire nuts inside the hanger. Pull these out and remove the wire nuts and the ceiling fan wires that they connect to. Place a wire nut back onto the ceiling wire and tuck it gently back into the ceiling.
With the wiring disconnected, you can lift the fan out of the support. If you chose to keep the blades on, this can be awkward because the blades will force you to keep your arm extended.
With the fan removed, you can remove the fan support from the ceiling and either install a new fan, or place a cover over the ceiling junction box.
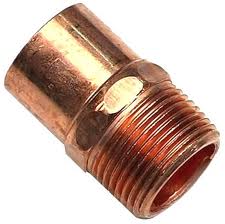 Copper plumbing sometimes needs some work. It is high quality but occasionally it will spring a leak. Removing a copper fitting can be done in several ways.
A torch will make quick work or removing a copper fitting. You will obviously need to turn the water off and drain the water from the piping to allow the pipe to get hot enough to melt the solder. If you don’t drain the system, the water will boil and turn to steam, and will absorb the heat that is necessary to turn the solder to liquid so you can pull it from the pipe.
Make sure you have a bucket of water nearby and a flame cloth to protect the surrounding area. Heat up the fitting by touching the tip of the blue cone (the end of the torch’s flame) to the fitting. Move the torch over the fitting to make sure the entire fitting is hot enough to pull away from the piping that is connected to it. Use long handled pliers or channel locks to quickly grab and release the fitting. Heat will travel quickly down a metal tool, so protect your hands and don’t hold onto the hot surface for too long.
Instead of the torch, you can also use a pipe cutting tool. This is fast, but you will be shortening the pipe rather than just removing the fitting. So, if you are replacing the exact fitting, you will have to make up the distance that you cut out.
Place the jaws of the pipe cutter around the pipe and tighten gradually as you encircle the pipe with the tool. You will notice that it first will score the pipe and then it will stay in the groove. As you gradually tighten it, it will cut a deeper groove until it eventually cuts through the thickness of the pipe’s wall.
 Troubleshooting a plumbing leak requires some patience. The key is to isolate the problem. In the case of a dishwasher leaking under the cabinet, clear out the cabinet and make sure there isn’t an active leak and then start the dishwasher.
There are plenty of possibilities here, from the water supply to the draining of the dishwasher. Grab a flashlight and watch…and wait. If it is leaking under the sink cabinet, it really is isolated to either the water supply to the DW, or the draining action of the DW. If the dishwasher itself were leaking, you would notice water coming from under the unit itself, rather than in the sink cabinet.
Start at the wall valve and look for leaks. Follow the water supply line from the valve to where it exits the cabinet. No leaks? Then wait for the drain cycle. When the dishwasher drains, it sends water up the drain hose to the air gap (on top of your sink) and down to the inlet of the garbage disposal. Watch for leaks. It will likely be coming from either the air gap or the disposal. If you have a damaged hose, replace it and re-secure the hose clamps. You may have water coming from the air gap on top of the sink and some of it finds its way into the cabinet. If that is the case, clean out the hose from the air gap to the disposal so that the blockage doesn’t force water out of the air gap. You might also find that the disposal itself is leaking (it should also leak when you run water down that side of the sink from the faucet). If that happens, you need a new disposal. The leak could be from something not discussed here.
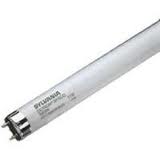 Replacing florescent light bulbs sure seems like a no-brainer. There are a few different styles of bulbs and several different connections that might cause some confusion.
To access the light bulbs, you usually have to remove the plastic lens cover. With that gone you will have the bulbs ready to remove. The bulbs will either have 2 pins on each end or a rounded hub. These make contact with the electricity and illuminate the bulb.
Look at the connections where the ends of the bulbs meet the fixture. If you see a slot at the bottom of the connector, rotate the bulb until you see a pin. Look at each end of the bulb to make sure you see a pin at the bottom of each connector. At this point the pins will be in the 6 o’clock and 12 o’clock positions. Gently pull the bulb out of the fixture.
The other style has a small metal hub on each end. These are held in place by a spring in one of the connectors. Push the bulb to one side to retract the spring, pull the other side of the bulb out, and remove the bulb.
Make sure you buy the correct florescent bulb. There are many diameters and sizes, but it should be pretty obvious.
To reinstall the bulbs just reverse the procedure. With the pin-style, make sure both pins are into the connector before you try to twist it. If not, you can damage the connector and/or the bulb.
Sometimes flushing a toilet can lead to some loud noises. It might be water hammer, but it probably isn’t.
Water hammer happens when the water flow is abruptly stopped. This causes a shock wave to travel the length of the piping. If the piping is not secured properly, you can get some loud banging or vibrations. This happens most often with electric valves which shut the water off very quickly…not so much with a toilet, although it can happen. In a toilet, as the float rises in the tank it gradually slows the water until it stops. For this reason it usually isn’t water hammer.
However, the fill valve can make some loud noises that people often conclude is water hammer. If you get noises when you flush the toilet, I would start by replacing the fill valve. This will probably fix the problem. Fill valves can crack and as water pushes through the valve, they can make some weird noises. You might also be getting a small “thud” when the water does stop making you think of water hammer.
Electric valves from a washing machine or even a dishwasher are more likely the culprits of water hammer. If that is the case you can install a water hammer arrestor.
 Most people think that for a sagging door, they are going to spend either a lot of time or money to repair it. There are several things you can do to fix this without having to call somebody.
Open the door and lift up on it. You might see and feel a lot of play in the door. This is bad. If you can lift up the door, something is not connected well. Look at the hinges, particularly at the top of the door. It may be that the hinges have worked themselves loose either at the door or the jamb. Try tightening them up to pull the door back into the correct position. You may need to use larger screws for this if the holes have been reamed out. For hinge screws, try a larger diameter screw rather than a longer one.
If the hinges look good, you can lift the top of the door with a long deck screw. Remove one of the top screws that hold the top hinge to the jamb (not the door). In place of the short screw you removed, install a long deck screw 3 or 4 inches in length. This screw is going to push through the door jamb and into the rough framing surrounding the door. This will pull the jamb closer to the framing and lift the door bottom up, so that it doesn’t drag on the threshold anymore.
 So the toilet is refilling every 20 minutes but nobody is flushing it. You are right to replace the flapper first. This is quick and easy. However, if that doesn’t work, then you need to troubleshoot it.
Lift the flapper and check the rim of the flush valve where the flapper sits. It should be smooth with no pits or divots in it. If the rim feels rough, this may be allowing water to pass from the tank to the bowl. If this is the problem, you can replace the entire flush valve (which is a bigger job), or buy a flusher-fixer. This is a new flapper assembly with a gel base that sits on the damaged rim. The gel fills any voids and stops water from draining into the bowl.
If everything looks good at this point, check for hairline cracks in the tank around the flush valve. If you have a crack in the tank, you should have water on the floor as well. A small crack around the flush valve may allow water to get by the flush valve and into the bowl.
If you see water on the floor and the toilet refills periodically, look for the source. Generally, you will find the problem at the tank bolts, the fill valve or supply line, or a cracked toilet tank.
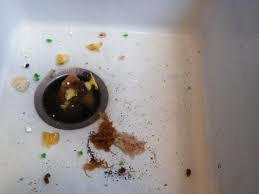 Maybe you’ve been using the garbage disposal and washing dishes in the sink and you go to drain the water and…it doesn’t drain. What do you do?
The distinguishing feature on a sink clog is whether both sides of the sink are backed up or only one side. If it is only one side, than the issue is probably related to the garbage disposal rather than the entire sink’s drain line. Although, if you have been washing dishes on the non-disposal side of the sink, it may be that the sink strainer is clogged with debris.
For the disposal, there is a discharge pipe that comes off of it’s side that leads to the trap. This is where you need to start. You probably have already turned on the disposal and swirled the water, but noticed that nothing happens.
Place a large bucket underneath the discharge pipe because the entire contents of the sink will soon be flowing into it. Unscrew the trap from the discharge pipe (you may have another section of piping here depending on the distance). You will start to get a slow flow of water. The source of the clog should be at the end of the discharge pipe as it exits the side of the disposal. You can stick your finger in there to try to dislodge it. When you do this you will start getting a lot of water flowing out. Let the water flow into the bucket until the sink is drained. Then you can remove the piping and fish out whatever object is causing the blockage. Make sure nothing else is blocking the drain downstream of the pipe and then reassemble it.
 If you see water coming from the base of your toilet, you have a problem. Although many people think that simply caulking around the toilet will fix it, it won’t.
Water (a nice way to say waste) around the base of your toilet where it sits on the floor is an indication that the connection from the toilet to the drain is not secure. In most cases the wax ring has been breached by movement and is no longer molded to the horn of the toilet.
Beginners will just think that they just have to stuff some caulking in between the floor and bottom of the toilet. If it lasts, it’s just going to trap the waste around the perimeter of the toilet’s base. The chances are good though that the waste will continue to seep out.
You will need to replace the wax ring and floor bolts that hold the toilet to the floor. This involves lifting the toilet and scraping up the old ring. Here is an article on replacing a wax ring and toilet bolts.
When you reset the toilet back down, I like to use plaster of paris instead of caulking. Check to make sure that it is allowed, but it has a good open time to work with and when you set the toilet base into it, it fills all of the voids. A wet sponge or rag will wipe away the excess and make for a perfect finish.