 The worst thing about replacing a florescent light socket is standing on a ladder. Otherwise it is an easy wiring job to replace the socket.
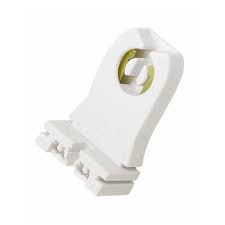
To gain access to the socket, remove the plastic lens cover and then remove the light bulbs (the tubes). The socket is what the ends of the tubes are sitting in. To get access to the wiring, remove the metal cover right below the tubes. This may have screws holding it in place, or it you may be able to squeeze it and pop the tab out of the slot.
With the cover removed you will be able to see the ballast (s) and wiring. Follow the wires from the socket to the ballast. You will need to cut the two wires leading to the broken socket and replace it. The new socket will come with a length of wire attached. Make sure the power is off to the fixture and cut the wires so that you have plenty of wire to work with. The last thing you want to do is to make the cut so short that the socket leads don’t reach.
The old socket will snap out of its holder, and the new socket will snap right in its place. Use wire nuts to hold everything together and gently tuck the wires back in place. You don’t want sharp bends in the wiring, only gentle loops. A sharp bend could damage the wiring and you want to avoid that.
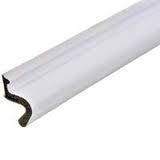 My favorite style of door weather strip is the push-in kerf style. It stays in place and you don’t have to worry about it coming off of the door or jamb when the adhesive wears out.
Not all doors can use the kerf-style weather-stripping though. A kerf must be present in order for this weather strip to work. A kerf is a small groove that sits around the perimeter of the door. Look at the stop (the piece of wood that the exterior side of the door rests against). If you see a groove about 1/8” wide, your door can use this type of weather strip. If your door does have a kerf, you probably already have this weather strip in though. I sure wouldn’t replace it with the peel-and-stick style.
To remove the old kerf-style weather strip, just pull it out of the groove. There is a small barb on it that pushes into the kerf and holds. Measure the distance for the new piece and cut it. Start at one end and push it all the way into the kerf. For the corners, you can either cut the strip straight across (you may have some overlap in the corners), or you can cut the strip at 45-degree angles to make a 90-degree corner (for example, like you would on window trim). You shouldn’t have any problems with it coming out of the groove.
 You see water leaking from the top of your water heater and you start to panic. You have every right to panic, although it may not be as bad as you think.
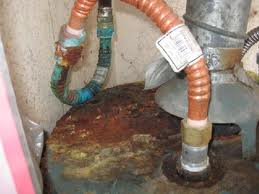
If the water is a yellow-rust color, I would worry. It likely means long term corrosion has damaged your water heater tank or a fitting on the tank. If the water is clear, you still may have damage at your tank or on a fitting, but follow the water.
Although the water may be pooling on the top of the water heater, it may be ending up there from somewhere else…like on your water supply line. See if the lines that connect to the nipples are wet. If they are, the leak is somewhere above the tank, likely at the copper flex line, a fitting, or the incoming supply valve. Touch the pipe with a piece of toilet paper. If it is leaking, the toilet paper will pick up the wetness. If either of the pipes above the water heater are wet, you will need to determine what is leaking and replace it.
If the pipes are dry, the best you can hope for is that one of the nipples are leaking at the top of the heater. The best case scenario is that you end up replacing a nipple or the rubber washer in between the nipple and the water supply line. The worst case scenario is that you are replacing the water heater.
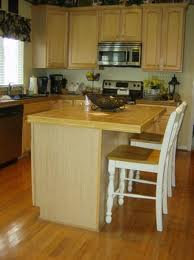 Some large kitchens really need to add a cabinet or more for a kitchen island. You’ve seen the large room with just cabinets and appliances around the perimeter. Well there is a lot of space wasted at the middle of the room. You don’t need to run plumbing, although you could, but that would make the project get expensive.
Try adding some base cabinets not only for additional storage, but you could make a breakfast bar out of it as well. Once you have the dimensions figured out, you can lay down some 2 x 4’s and secure them into the slab or subfloor with the appropriate anchors. The cabinets will fit over the 2 x 4 frame on the floor and get secured to it through the side panels. Once the unit is secured in place, you can use a brad nailer and adhesive, and install the toe kick and side panels to cover the screw heads.
You can choose to put whatever type of counter top on the island. If you have the room, it’s great to add an overhang for a bar style top. This way, you can add a few bar stools and people can have useable counter space in the kitchen.
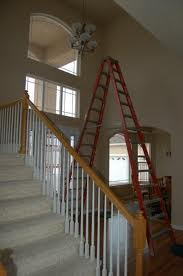 To replace light bulbs in a tall ceiling requires some ingenuity. Most people think they need to get a tall ladder and start the balancing act. In some cases, that may be the only way.
You might first try a telescoping pole. You can buy or rent these and you can attach a variety of tools on the end of them. For flood lights, which have a large semi-flat face on them, a suction cup works well as the attachment. The suction cup screws onto the end of the pole and it has a string attached to release the bulb. Make sure the surface of the suction cup is dust-free. You might spray a little glass cleaner on the end of it to make sure. This will make it so that when the cup contacts the bulb, they actually stick well together. You can untwist the old bulb and place a new one on the cup and screw it back into the socket in the ceiling. Pull the string to release the suction cup from the bulb.
For other bulbs you can buy different attachments. There is an attachment that slips over the bulb to grip it. The opening on this is smaller than the bulb, so you need to push it onto the bulb and then it grips it. From there you can twist the bulb out.
So what if the bulbs are beyond the reach of the telescoping pole? You can use a small ladder along with the pole, but use common sense here…you don’t want to be teetering on top of the ladder with pole in your hand. Depending on the number of bubs, you may be faced with setting up scaffolding or even renting a lift.
 A kitchen faucet can get loose over time and require a quick fix. It seems that faucets with a single handle have more of an issue here than do faucets with separate hot and cold handles. I am guessing that because people push the lever to its extreme travel point and slam it back down causes it to move over time and eventually become loose. This also holds true for bathroom faucets
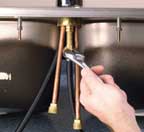
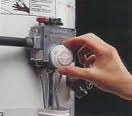
Fixing it isn’t difficult. You will need to climb under the sink to access the fasteners that hold the faucet to the underside of the sink (or counter). If you have a faucet that sits on a metal base, look for 2 nuts that hold the faucet on. The nuts may not look like nuts at all. They may be colored plastic, but they will thread onto a stud of some kind. On some faucets, you can follow the incoming water supply lines and the nuts will be on the same inlet that the lines are attached to. Other faucets will have separate threaded rods that allow nuts to be screwed on to them.
Faucets that have no base plate will have a fastener that looks like an open nut. It looks like the letter “C”. This allows the faucet to be tightened to the sink and still allow the water supply lines and sprayer hose to remain undisturbed.
Use a basin wrench to tighten the nuts that hold the faucet to the sink. This tool gets into tight spaces and allows you to tighten the nuts with little effort.
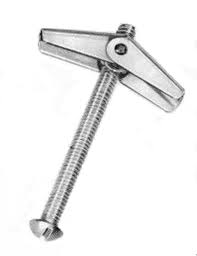 To a handyman, toggle bolts solve many problems. They are fantastic for holding things to drywall where there is no wall stud to mount into. Ideally, you want to install into a wall stud, but if none exists where you need it, a toggle bolt is just the ticket.
Toggle bolts are perfect for jobs like installing toilet paper holders, towel bars, and towel rings to the wall. Really most things that need to stick to the wall, but don’t require a stud to support weight. Things that support some weight are not good candidates for toggle bolts as theoretically, they could pull out of the wall under those conditions.
You will need to select the right size of toggle bolt, and that usually means looking at the holes in the bracket and considering the function.
Remove the toggle from the end of the bolt and push it through the bracket you are installing. Place the toggle back on the end, but thread it just enough that it stays on the end of the bolt and doesn’t fall off. If you screw it too far onto the bolt, the wings of the toggle may not open far enough for the toggle to engage. Drill a hole large enough for the toggle to fit through. If the hole isn’t quite big enough, you push and twist it through.
You should hear the wings of the toggle spring open once they clear the back of the wall. Now you have to tighten the bolt and draw the bracket to the wall. It helps to pull the bracket away from the wall as you tighten the bolt. This will keep the toggle engaged to the back of the wall and make securing it easy.
You can have the best patch in the world but if the paint doesn’t match, it’s going to stand out like a three-legged racehorse. You’ve got a couple of problems with touching up the paint: one is the color and the other is the sheen.
Many people have the original paint that was used on the walls and they expect it to match perfectly. Unfortunately it does not. We run into this quite a bit: we can do a perfect drywall patch, but if the paint doesn’t match, the customer won’t be happy, even if they supplied the paint.
Maybe the number of years that the bucket sat in the garage changed its shade slightly, or maybe the sunlight shining on the wall bleached the old paint. Whatever the reason may be, you have a problem.
The simple solution is to paint the entire wall from corner to corner. Even if your paint is slightly off-color, when it is spread out over the entire wall, you won’t be able to tell. You will be left with two slightly different colors at the corner where the new paint meets the old, but the difference will be imperceptible.
The bigger problem comes when you just want to do a little touching up. This could be a drywall patch or even scuffs on the walls from the kids. Touching up a small area will be noticeable from some vantage point. When the paint dries, you may look at it straight on and it may blend in perfectly, but when you stand to the side you can tell, or it may look flawless in the morning but be noticeable in the afternoon. With touch-up painting, you have to be prepared for not-so-perfect results.
If you don’t have any original paint, you can cut out a sample from an inconspicuous area. You can try a closet, but if the wall being touched-up was beaten up by the sun, it may not match since the closet didn’t have the same exposure. You will need to take a sample to a paint center for a color match. The sample should be at least the size of a quarter, but I would cut one about 2 inches square. Use a utility knife and cut a square from the wall by pressing just hard enough to get through the paper face of the drywall. Pry up one of the corners and peel it off of the wall.
When you get a color match, you can apply a little drywall mud to the back of the sample, stick it back on, and then blend it back in.
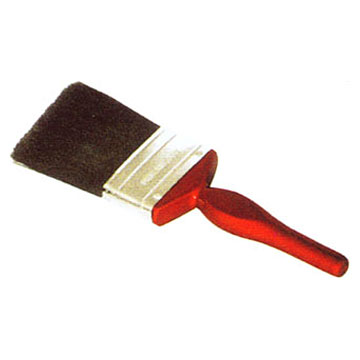
Apply the paint sparingly. Use a paintbrush and dab the paint on instead of brushing it. You want to use the least amount of paint necessary to achieve the least noticeable touch-up. As you approach the edges of the area, almost wipe the brush dry and feather the paint out. Wipe the brush several times along the rim of the paint can and with small strokes in an outward direction only, feather the paint out.
You can also use a mini-roller to feather out the paint. Use the roller dry and roll it outward from the new paint to the old and it will help to blend it in. You will get good results from either method, but if you are picky, then paint the entire wall.
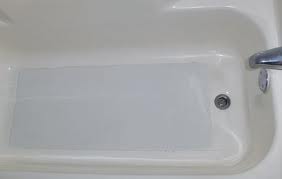 If you are installing an inexpensive bathtub you might notice that most are not as beefy as they once were. The fiberglass tubs are lightweight and inexpensive. You might notice that when you step into it, it flexes upon your weight.
There is plastic webbing underneath the bathtub that helps to prevent this, but the fact is, it’s plastic and will give under the weight of a large adult. There is a way to make the tub rock solid.
Once you dry-fit the bathtub to make sure everything is lined up and level, mix up some thin-set mortar. You are going to lay down some mortar underneath the bathtub to make it rigid. You don’t need to completely cover the floor, but most of the flex will occur at the center of the tub as this is where most people step.
With the tub out of the way, pour some thin-set on the floor. It doesn’t have to be pretty, but spread it around a little bit, but not so much that it squeezes out once you set the tub into it.
Place the bathtub back into position so that it matches up with your previous marks and is sitting in the thin-set. Secure the tub edges on top of the ledger and into the studs. Step into the tub to push the webbing into the thin-set and to distribute it. I would let it set up and then you can finish the surround.
 New tenants moved into a house and were talking about how the water heater didn’t produce enough hot water. They said that the hot water stopped after only 10 minutes or so. There could me many factors here, so it was best to look at the water heater.
The water heater was only a few months old and was professionally installed. The chances that a dip tube was broken or other part was already bad were slim. If the dip tube was broken, then incoming cold water wouldn’t be pushed to the burner to warm it up and you get lukewarm water after it mixes with the hot water already in the tank….but that wasn’t the problem. I looked for a large bathtub that maybe used all the hot water. Nope, they take showers. Then I considered the most obvious…the setting on the thermostat. It was set on its lowest setting. Duh!
I set the thermostat on the next setting up from the lowest and the burner fired up, just like it was supposed to. Once the water heater started heating the water to a higher temperature, the tenant used less of the available hot water and the problem was solved. I try to set the thermostat at the lowest possible setting to get the necessary amount of hot water, but no more. There is no need to waste energy.