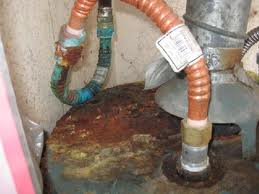
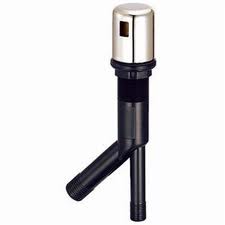
 The only reason you would want to remove water heater nipples is if they are leaking or so badly corroded that they look like they will start to leak. They really aren’t something you would choose to do normal maintenance on. However, be careful how much you chew off here…sometimes it is as if the water heater nipples are welded into the tank.
After you remove the supply lines at the top of the nipples, try some penetrating oil around the threads (where they enter the tank) and wait. The oil may or may not help, but the answer lies in leverage. Use the biggest pipe wrench you can find and place the jaws around the unthreaded surface at the midpoint of the nipple. Then try to unscrew the nipple. Then try some more. With any luck, you will hear a “snap” sound, and the nipple will start to unscrew. You don’t want to hear that sound and have the nipple shear off. It’s a gamble, but there really isn’t a foolproof method to removing these. If the nipple does shear off, your day just got longer. Here is some information on how to remove a sheared off water heater nipple.
Use dielectric nipples to replace the old nipples. They won’t corrode like the old ones did.
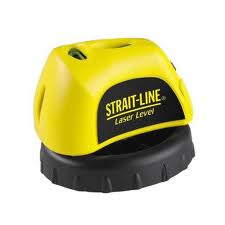 A handyman loves laser levels. I had a customer that was hanging a series of wall sconces in her house and wanted them to all hang at exactly the same height. Underneath the sconces was a chair rail around the perimeter of the room.
Laser levels generally are inexpensive and come in a few different styles. Some laser levels just stick to the wall and cast a line down it, while others sit on a stand and rotate a line around the entire room. The more expensive models are self-leveling and others require the operator to adjust them. The great thing though, is that they are extremely accurate, even for long distances. A good laser level will project a line or dot several hundred feet away and be accurate to within a fraction of an inch.
For this project, I would use a self-leveling rotary laser level. You can set it in the middle of the room, turn it on, and the laser will start spinning 360 degrees around the room. That way, you won’t have to make a mark with a traditional level and move it all about the room. You can certainly use the old-fashioned level, but as you move it around the room, your level line will likely be off with all the moving you have to do. You could certainly measure the distances from the ceiling or the floor, but either of those could be uneven and would leave you with tiny differences. A laser level will establish a level line regardless of floor or ceiling imperfections.
I would start the project by installing the chair rail. Decide at what height you want to install the rail and line up your laser level with this height. You can adjust the rotary level by raising or lowering the stand. Turn the unit on and it will start spinning like a disco ball in a ‘70s dance contest. You can let it run while you nail in the chair rail or make various marks around the room at the height of the laser line.
For the wall-mounted unit, simply move it up or down to align with whatever height you have chosen. This unit will cast a solid line down the length of the wall, and on some units it will display along the adjoining wall as well.
After the chair rail is in, cast another level line wherever you want the base of the sconces to sit. This way, you know that the distance from the bottom of the sconces to the top of the chair rail is exactly the same around the perimeter of the room.
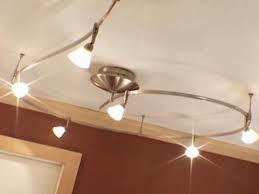 Installing a track light fixture is an easy project; there isn’t much difference between it and a regular light fixture. You do need to consider the styling of the fixture though. Some older fixtures look like they are from the 1970’s rather than modern day. They are basically a track with large cans connected to them. More modern fixtures allow the “arms” of the fixture to curve and bend in different directions. They use smaller halogen bulbs that greatly minimize their appearance. Regardless of the style, they install in the same manner.
Connect the wires from the ceiling to the fixture wires (black to black, white to white and either green or bare copper wires together). The arms of the fixture get secured to the ceiling with screws…the location is up to you and where you want the arms to sit.
Once the arms are secured, you till secure the bulbs into the arms. The bulbs go into the light assembly and then usually twist into the arms. The power source runs along the arms and by twisting the lights into the arms, they make contact and illuminate.
From there you can direct each individual light in a different direction to accent a picture or shine in a particular area.
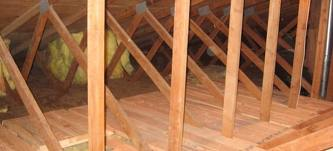
Installing an attic ladder can give you a significant amount of storage space where you didn’t have any before. For it to be useful, many people like to add a surface so that you can walk in the attic (assuming you have the space). This can be a lengthy process as you can’t just throw some plywood on top of the joists. There are a couple of pitfalls here. You will have electrical cables and maybe even some plumbing or gas lines running through the attic across the joists. So if you just lay plywood across them, you may pinch or damage them. You will need to add some furring strips on top of the joists to elevate the plywood. In this way, it will not touch the cables or piping. 2”x 2” strips are good for this. You can cut them to length so that they don’t interfere with the location of the cables or pipes. Once you have the strips secured to the top of the joists, along comes problem number two: you can’t get a full sheet of plywood into the attic. The standard size opening for an attic ladder is 22 ½” x 54”. If you are lucky, you will only have to cut a sheet of plywood one time down the middle of its length. That will leave you with a 24” x 8’ piece of plywood to pull through the opening. It will fit on a diagonal assuming the roof doesn’t get in the way of you pulling it into the attic. Once you have it in the attic, you can secure it into the strips on top of the joists.
 I had a customer call me asking about an air gap that leaks. He was trying to diagnose the problem and was haphazardly checking under the sink every now-and-then. So he called to learn a little about his dilemma.
The air gap sits on top of your countertop. Underneath the counter is where the magic happens. It has two outlets on it…one is smaller than the other. The smaller outlet is connected to the dishwasher drain hose and the larger outlet is connected to the garbage disposal inlet (if you don’t have a disposal, it will be connected to a nipple on the tailpiece. So the answer to the question is that if the air gap will leak, it will leak when the dishwasher goes into its drain cycle. This is the only time there will be water passing through the hose and the air gap.
If you find the air gap leaking under the sink, check the connections where the hoses attach to the air gap and the connection where the air gap drain hose connects to the garbage disposal. These are usually connected by hose clamps, which are very reliable, but they may need to be tightened. Another common culprit is the garbage disposal itself, so be detailed and check that too.
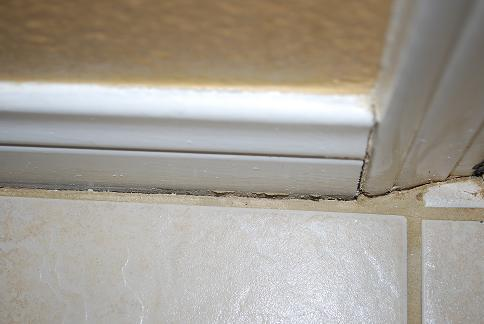 Removing the baseboard before a new floor gets installed is a personal choice, but there are some floors I would remove it prior to installation, and some I would not.
If you are getting new carpet, I would not remove it. The installers will use a knee kicker to stretch and tack the carpet down and the final appearance will look great.
For other flooring surfaces, it is a personal choice. Removing baseboard and reinstalling it almost always looks cleaner for surfaces like ceramic tile, wood, and laminate (vinyl is a little different in that you can cut it right up to the baseboard and add some caulking, all without removing the baseboard).
For wood and laminate flooring, if you choose to leave the baseboard in place, you will have gaps in between the end of the flooring and the baseboard. You cover this gap with quarter round molding. Some people don’t like the look of this extra molding. Personally, I would prefer not to have it, but you are adding a lot of work to remove and reinstall the baseboard.
For ceramic tile, if you chose to leave the baseboard in place, you would have a grout line around the perimeter of the room. This may look fine so long as the width of the grout is consistent with the rest of the tiles.
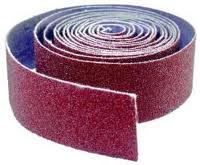 If you are working with copper plumbing lines and will be soldering, there are steps to follow to get a leak free joint. Copper will last a long time, and so if you get a leak, it will usually be at a joint of a fitting.
The first step in soldering a fitting is to clean it. I don’t mean with soap and water, I mean to get the surface down to clean untouched copper. Basically, you will be abrading the surface of the copper with a tool or with emory cloth. Emory cloth is like a thick flexible sandpaper that scratches the end of the copper pipe. In a pinch, you can use steel wool.
Tear off a piece of emory cloth and wrap it around the end of the copper pipe. Hold the strip around the end of the pipe and move it back-and-forth. This will remove any corrosion from the pipe and scratch it up so that the flux can flow into the joint once it is heated. You want the cleaned surface to look like a shiny new penny when done. You can also use copper cleaning tools that have openings with stiff wire bristles around them. They perform the same function.
To clean the interior of fittings, you can use a wire brush specifically for that purpose. They come in diameters that correspond to the fitting’s size. Once everything is shiny and clean, you are ready to flux the joint and apply the torch. By the way, once you have cleaned the copper, don’t touch it with your fingers. The oils from your fingertips could interfere with the flux and solder flowing.
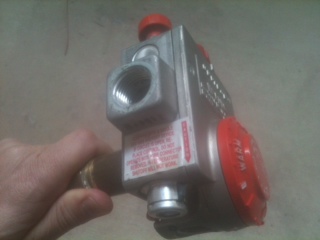 Replacing a water heater gas control valve is a big deal. Once you’ve gotten to this point, you have to ask yourself if you should be considering replacing the entire water heater. The control valve is expensive and if your water heater is getting old anyway, it may be time to bite the bullet.
Turn the gas off so that the handle is perpendicular to the pipe and remove the gas line from the control valve. Also turn the water off to the water heater at the top of the tank and then connect a hose to the hose connection at the bottom of the tank. Open the hose valve and start draining the tank. Be careful as this will be very hot water (assuming the water heater has been on and heating water).
There are three connections remaining at the bottom of the control valve: the main gas line, the pilot tube, and the thermocouple. Remove these connections from the valve. The control valve will be ready to spin out. Use a large pipe wrench and place it over the top of the valve. Unscrew the valve from the tank…this probably won’t be easy. You will have to go to a plumbing supply store, so take the old valve with you to make sure you get the correct part.
Reinstalling the new valve is a matter of reversing the order when removing it. Wrap the threads of the new valve and tighten it up by hand, then give it an extra turn with the wrench. Connect the main gas tube first, then the pilot tube and thermocouple. Reconnect the gas line from the wall, refill the tank and light the pilot. You should have hot water in about an hour. By the way, for a sealed burner unit, in addition to the above, there are wires that go into the burner chamber and you must have an exact replacement.
 I’m not sure you can call this a plumbing job, but for swimming pool owners, draining your pool is a chore that has to be done every couple of years, or when your water gets so nasty that it just won’t balance anymore.
How often you have to replace the water in your pool varies, but generally speaking, probably every 2-3 years or so. Once the water can no longer hold chemicals, or if your total dissolved solids (TDS) readings are too high, it’s time to change them. You can take a sample of your water to a pool store and they will give you some advice on your water as well.
When it’s time to replace the water, you will need a submersible pump and enough hose to reach your cleanout. Place the pump into the deepest part of the pool (near the drain) and run the hose to the cleanout. You will probably need to hunt for your cleanout. It should be in the ground with a plastic or rubber cap covering it. Many times the cleanout line is run in the same trough as the main water line. Look at the meter and follow a line up to your house. It may be covered with dirt, landscape rocks, etc. Anyway, you may have to spend some time looking for it.
If you have a spa, drain run the spa drain only to drain the spa into the pool. This will make it so you only have to drain the pool and not the spa in addition to the pool. Turn the pool equipment off and turn on the submersible. You will want to keep an eye on it to make sure it doesn’t overflow your cleanout, and also that you shut it off when it is done. The pump will get hot if it continues to run while the pool is drained.
By the way, while you are draining the pool, it’s a great time to clean the filters and generally perform any maintenance on the pool or equipment.
 Sure, adding food coloring into your toilet tank will help you determine that you have a leak. But didn’t you already know that anyway? I mean, when the toilet suddenly refills (starts running) you probably figured out that water was leaking out of the tank and into the bowl.
Here’s how it’s done…flush the toilet and as the tank refills, add a few drops of food coloring into the tank. The refilling action will help distribute the color throughout the tank. Now, DON’T FLUSH THE TOILET! If you start seeing the food coloring in the bowl, then water is somehow getting from the tank into the bowl when it shouldn’t be. The only time it should is when you are flushing the toilet, but since you haven’t flushed the toilet, all of the color should remain in the tank. I suspect if you are adding food coloring into the tank, then the toilet is refilling when it shouldn’t be. The ideal time to do this is right before you go to bed. If you don’t have food coloring, you can also turn the water off to the toilet and then check the level in the tank the next morning to see if it has dropped since the previous night.
This all means that water is getting past the flapper or flush valve and leaking into the toilet bowl. It could also mean that you have a crack in the tank, but generally instead of leaking into the bowl, the water will leak onto the floor. The fix here is to replace the flapper, the flush valve, or the tank, in that order.