 Securing an exterior door is a priority for many homeowners. If people knew how poorly some of the locking and latching mechanisms were, they might lose sleep at night. Not that the locks are bad mind you, it’s the strike plate that is the weakest link.
The strike plate is the curved metal piece that sits in the door jamb. The latch hits this and closes. The problem is that the strike is usually installed with ¾” screws into the jamb. When the door gets kicked open, the jamb usually splits from the force of the impact, and the door swings open.
A fast fix is to replace these short screws with longer deck screws so that they sink all the way into the house framing. The door can still be kicked in, mind you, but it will take more than one kick.
You can install an armored strike plate for some added sleep. These are beefy strike plates with a larger surface area to spread out more of the impact. You will need to make the hole for it into the strike jamb and then mortise the area for the surrounding lip to sit into. This will use 4 deck screws with each one long enough to screw into the house framing. The unit comes with a template to make the location easy to mark out and install. Just because you have an armored strike plate installed doesn’t mean the door is kick-proof. It just means that it will be more difficult to enter than a door without it.
 If you have a plumbing clog in a drain, I like to do the easiest fixes first as most people do. For toilets, a plunger or a closet auger works well. For sink drains, cleaning out the trap takes care of many issues. For larger drains like showers, you can clear the trap easily enough, and then try a snake to reach the blockage if it is within the reach of the snake. But what if it’s not?
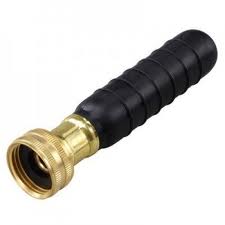
You can try a drain bladder. This is a rubber bag that expands once you pressurize it. There are different sizes made for different pipe diameters, but basically, you attach a hose to the end of the bag and place it at the opening of the pipe. It will also come with fittings to connect it to an indoor faucet.
Turn the water on and as the bag begins to fill with water, it compresses against the interior walls of the pipe. Water then begins to pulse out of a small hole at the other end of the bag.
The idea is that the pressure will push the clog out of the drain and into a larger pipe where it is free to tour the city via the sewer.
 A closet rod falling down is a classic handyman job. The closet rod gets loaded up with far more weight than it is designed for and the homeowner wonders why it fell down. So the question of which is better, metal or wood, doesn’t have as much to do with the material as it does with how it is installed.
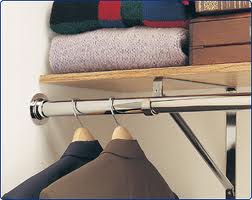
The key here is to distribute as much of the weight as possible over the length of the rod and wall it is attached to. I’m always amazed when I see a clothes rod secured on each end with no support in the middle. Do you think that would stop people from hanging too much weight on them? Nope. Wood rods will bow in the middle to the point of breaking.
At the very minimum, the rod should be braced on each end and in the middle. Depending on the length of the rod, it may be a good idea to add more bracing in between each end and the middle support for a total of five support points. That might sound extreme, but over a long wall it isn’t.
Wood rods use a shelf support and a hook for the rod. Metal rods are integral to the shelf and are supported with various wall anchors. When supporting these, you will get more support and stability when you install into the studs, regardless of whether the rod is made of wood or metal.
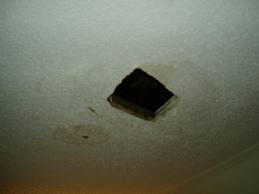 It’s a scary thing to look at your ceiling and know that you have a pluming leak from upstairs. The bathroom is right above the stained ceiling and so it’s a safe bet that the cause is up there somewhere. But how do you find it?
The obvious answer is to cut a hole in the ceiling and look around, but then you just added to the job because now you have to repair the ceiling, texture and paint (you likely have to do this anyway if you see a stain there). But before you start cutting, there are a couple things to look for first. Can you hear water dripping on the ceiling at any particular time? Maybe when you flush the toilet, or run water in the sink or shower? This might help to give you a clue as to the cause.
It’s almost impossible to guess where the leak is coming from, but it’s common that a wax ring from a toilet is to blame. So you might check the toilet and replace the wax ring and bolts, especially if the bowl is loose at the floor.
Chances are, if you can hear the dripping on to the ceiling, it is a drain line and you will have to cut open the ceiling. Don’t think though, that just because the stain is right above your head that the leaking drain pipe is too. It may be several feet away and the water (polite way to say “waste”) is just running down other pipes or lumber and finally dropping off in that location. Be prepared for anything when you cut the ceiling open.
 As a handyman, I’ve not been asked to re-string a window blind. I was a little apprehensive, but it looked pretty straightforward.
The blind was an accordion style blind that as you raised or lowered it, the horizontal pleats would tuck it nicely together and out of the way. The blind was raised and lowered by a loop of cord. For whatever reason, the cord snapped and a replacement was found. Fortunately, for this style and size of blind, there is one common diameter of cord. I ordered it online and prepared to install it.
After removing the blind from the window, I popped off a cap on the string-side of the blind. There is a wheel on the end with teeth that the cord wraps around. I removed the broken cord simply by pulling it, which slightly lowered the blind.
I took the new loop of cord and wrapped it around one of the teeth. While holding one end of the cord still, I rotated the wheel so that the cord was fed onto it. When the tooth made its way back to the starting point, the cord was ready to go. I replaced the end cap and re-hung the blind. It worked like a charm.
 Replacing a hard wired smoke detector in your house is similar to replacing a light fixture. If it is time to replace the detector (the general rule is if it is over 10 years old), it may be as easy as plugging it in, or you may have to do a little wiring.
Generally, if you buy the same brand of smoke detector, you can pull out the plug on the back of the old one and push it into the new one. During that time, if the plug style has changed or if you are buying a different brand, you will need to wire the plug into the house wiring.
Turn off the breaker that feeds the smoke detector, and replace the wires of the old plug with the wires of the new plug. There will be wire nuts that hold the wires together. Unscrew them one-by-one and twist the wire nuts on until snug. You may or may not have the interconnect wire attached. If the old smoke detector plug had the interconnect wire attached, then secure it as well, but if you see the interconnect wire (usually yellow in color) not connected then don’t connect it. The interconnect wire makes it so that if one smoke detector goes off, then they all go off. Some houses have the detectors installed connected and some do not.
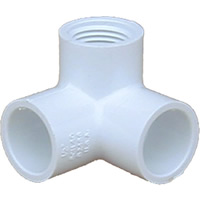 There is a process to gluing PVC piping and plumbing fittings together. PVC piping is very common in landscaping and so you will likely be working with it outdoors. Whether you are adding a valve or additional sprinklers, or maybe you have an underground leak, look for the PVC.
When you are connecting PVC to a fitting, cut the pipe squarely. Cutting the pipe squarely will make it so that the entire circumference of the pipe bottoms out against the fitting’s internal stop.
Prime both the outside of the pipe and the inside of the fitting and let that dry. Purple primer makes it so that you can easily see when it has dried. It dries very quickly and is flammable so be careful with it and the glue. When the primer has dried, apply glue to the exterior of the pipe and the interior of the fitting. Push the two together until they bottom out, and give a slight turn. Make sure that the fitting is oriented where you want it because you will not be able to get the two apart. The glue locks the pieces together, and after a few seconds you won’t be able to pull them apart. Read the label on the glue for the length of time you must wait before you can turn the water back on.
 When you need to replace an interior door and you buy one at a home center, many people are surprised that they don’t fit the opening. The typically need to be trimmed by approximately ¼” along the height of the door. You will also need to mortise the hinges into edge of the door.
When you trim the door, do so along the hinge side of the door and not the handle side. You don’t want to alter the setback of the latch, so that leaves the hinge side to work with. Use a table saw if you have one, or use a circular saw and clamp the door to your work surface. You can use a straightedge as a guide if you like, or you can cut it freehand after marking a cut line on the door.
I like to add a piece of painter’s tape to where the blade will be cutting to eliminate tear-out along the cut. Use a good blade in the saw (the more teeth the saw has, the smoother the cut), and cut the door in one continuous motion. If you stop the saw, you may get a burn mark and the blade may bind. It’s also a little dangerous trying to start the blade in the middle of a cut (you should start the saw and let the blade get to full speed before cutting).
With the door trimmed, you can mortise the hinges and install your door.
 As a handyman, I get asked about everything under the sun. I had a customer that had a new granite countertop installed and it was really beautiful. It had an undermount sink with holes cut in the counter for the faucet. It looked very custom. A few weeks after it was installed, it the customer noticed some staining around the soap dispenser so she called the company that installed the granite. Apparently, the installer and salesman neglected to inform her that the granite would need to be sealed. The stains were a result of water dripping on the counter and permeating the stone. Granite is porous and the water was sitting on it and being absorbed into the stone which gave that area a darker appearance.
Sealing the granite is surprisingly easy. The important thing is to select a good stone cleaner and then a good sealer. You can go to specialty stores, or a home center sells them too.
Cleaning the counter is the first step. Get rid of all crumbs and debris and then apply the cleaner. The products are typically spray-on and wipe off.
Follow the directions from the manufacturer for both cleaning and sealing products. Clean the surface, wait for drying time, and then seal it.
Sealing it is as easy as spraying on the product, waiting, and then wiping it off. The manufacturer generally suggests several applications of the sealer initially, and then every six or twelve months thereafter.
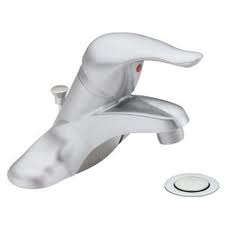 A single handle faucet that leaks around the base may be an easy fix or you may be replacing the faucet. If it was a kitchen faucet, I would replace the o-rings, but the difference is a bathroom faucet is that the spout doesn't swivel, so those o-rings don't exist. There are a few things to look at though.
See if you can tell where the water is coming from. In many cases, the water will be traveling from the aerator, down the underside of the spout and finally puddling around the base. If this is the case, remove the aerator and either clean it up and reinstall it, or just replace it.
Another possibility is that water is coming from around the handle. In this case I would replace the cartridge. You will need to turn off the water, remove the handle, remove the retaining pin and finally pull out the cartridge. Get a replacement and reinstall it.
Lastly, it may be that the faucet is corroded and needs to be replaced. You may not even see the leak from above. The body of the faucet may be corroded and pitted or cracked and you may not see it. If you can't see the leak, you probably are looking at replacing the faucet.