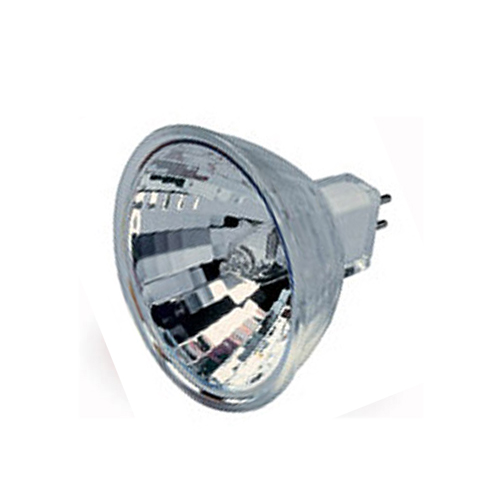
 Replacing a bulb in your landscape lighting is very easy. Most are not the type of bulbs you think of when you think light bulbs. The typically don’t screw in. They have pins at the rear of the bulb or a flat area with contacts that fit into a slot, rather than a threaded socket.
The bulbs are halogen and have the wattages stamped on the underside of the bulb. So look at your old bulb and find the wattage on it, and replace it with the same bulb. You can replace it with a bulb that has a lesser wattage, but if you want to increase the wattage you need to do a little math. You should add up the watts on all of the bulbs. The total cumulative watts should not exceed 90 percent of the transformers output.
To get access to the bulb, you will need to remove the cover from the light fixture. These usually unscrew at the top. Make sure the system has been off for a while because the bulbs will get very hot when they are on (assuming you are replacing a bulb that is working). If the bulb is not lighting then the fixture should be cool. Pull the old bulb straight out to remove it, and push the new bulb into the holes in the socket. The pins will fit perfectly into the holes. Push the bulb into the holes until it stops.
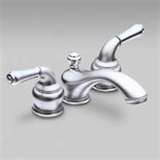 Faucet handles come in all different styles. When a handle becomes a little loose or wobbly, you have to figure out which method is used to secure the handle to the faucet. It’s not difficult at all.
Many plastic handles use a single screw to hold the handle to the faucet (it’s actually screwed into the top of the stem). This style can be found in either the single or double handled faucets. Use a small standard screwdriver and lift off the plastic cap on top of the handle and tighten the screw. Then snap the cap back into place.
Metal handles often use a set screw that is hidden at the bottom of the handle. For aesthetics, it is usually placed at the rear of the handle. Look for a small round opening at the base of the handle in the rear. Use a small allen wrench to tighten the set screw. These openings are very small, and so you will likely have to try a few allen wrenches before you get the one that fits into the top of the set screw. It is a matter of “feel” because you won’t be able to see inside the small opening.
Finally, some handles screw down onto the faucet. The handle will be connected to a round base which screws onto the faucet. Moen Monticello uses this style.
 I have a customer who has a large broken vertical window blind, so she called her handyman. The only problem is that the vanes no longer twist to the open and closed positions. On this particular blind, there were two cords on one side. The short cord is used to rotate the vanes, and the longer cord to retract all of the vanes to one side. The short cord would move, but something in the head rail was broken and the vanes didn’t move.
This head rail was ten feet long and would have to be a special order item. The clips that hold the vanes in place are all universal. But the way the head rail mounts to the wall may vary. If you are lucky, the head rail will attach in the existing supports.
Remove the vanes by spreading the clips enough to lift the vane up and out of the clip and set the vanes aside. When they are all removed, it is time to remove the head rail. There is a spring-type clip that holds the rail in place. Push on the back of the spring clip and slightly rotate the rail forward to free it from the clip. I remove the outermost clips first so that the only one left is in the center. This way it is easy to balance the rail while you remove it.
At this point you may have to replace the wall supports, or you may just be able to rotate the new head rail into the old clips. Once you have the rail up, you can adjust it for the distance from the wall and then re-hang the vanes.
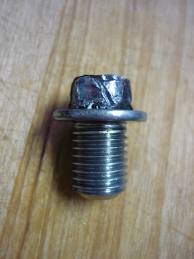 Many handyman tips I have learned out of necessity. You get stuck and you have to figure a way out. A rounded bolt head is no exception. Someone else may have chewed up the flat sides and now it is a big round mess. The first thing I did was grab the biggest water pump pliers I had and squeezed and turned. Leverage is a wonderful thing…sometimes it works and sometimes it will twist the head of the bolt right off.
Assuming the bolt head is still attached, you can make opposing flat sides that will allow you to place a wrench on it. Use a grinder or a file and grind away enough material to make 2 flat opposing sides. Then place a wrench on it and turn out the bolt.
While you have the grinder out, you can try cutting a slot down the middle of the bolt’s head. When you have the slot cut, you can insert a screwdriver into the slot and remove the bolt. Although conceptually this works, you will probably find that you can’t get enough torque from the screwdriver to remove the bolt. So try using a screwdriver with a square shaft and while putting your weight down upon the bolt head, place a wrench on the square shaft of the screwdriver to turn it. In this way, you have a lot of force on the bolt while attempting to unscrew it.
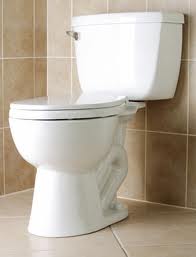 It is strange to look into a toilet bowl and find it totally dry. Where did the water go? A couple of possibilities come to mind. Imagine when you go to bed the toilet bowl looks normal with water in the bottom of it. You wake up to use the bathroom and now it is dry.
One possibility is that you may have a crack in the bottom of the bowl. These are very hard to see. The way the toilet trap is laid out is that it runs under the bowl. So if the bowl is cracked, the water would drip into the trap and you would never have any evidence of a leak on the floor around the toilet. Some people would say that if this was the case, the toilet would be running. That’s not true as there is no water demand from the tank until the toilet is flushed.
Another possibility is that you have a clogged vent. The vent runs to the exterior out of the roof. In order for the drain to work correctly there must be an air supply, and the vent provides this. It is simply a pipe that is connected to the plumbing system that rises up to the roof, or connects laterally to a pipe that runs to the roof. If this is blocked, a flushing action will suck water out of the trap (sink traps too) to satisfy the demand for air.
You can use a flashlight and look down the vent from the roof and look for a bird’s nest, or rodents, etc. If you have another toilet on the opposite side of the wall, have someone flush it while watching the water level of the first toilet. Look for the water to move when the first toilet is flushed. If it does, you probably need to clear the vent.
 Homeowners that entertain frequently often have a separate icemaker machine that needs to be connected to the plumbing. These units resemble a small portable refrigerator or wine cooler. The only requirement is for the unit to have a water supply.
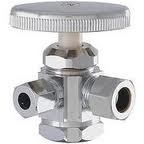
The water connection is a pretty straightforward job. You will likely have to choose between a saddle valve and replacing your single outlet faucet angle valve, with a two-outlet angle valve. I really don’t like saddle valves, so if I had a choice I would replace the angle valve. By the way, replace the cold water valve, not the hot one…you don’t want to feed your new icemaker hot water.
You will need to turn the water off to the house to replace the valve. It is likely a compression fitting, so you can remove the existing water supply line and loosen the nut on the back of the valve. Pull the old valve off and slip the new dual-outlet valve on. Don’t worry about replacing the nut with a new one. I just reuse the nut and tighten it onto the new valve.
Reinstall the faucet’s water supply line and then screw on the icemaker’s water supply line onto the empty outlet. Tighten it snuggly and turn the water back on to test for leaks.
 A customer called his handyman and told him he had an iron gate that has been pulled out of the block wall and a chunk of the block came out with it.
Most gate damage occurs at the latch side. Since many have self-closing hinges, people walking through them swing them open and let them slam closed. Over time, this loosens the latch and it will need to be repaired. Many landscapers and pool service companies have allowed me to stay employed performing just this service. God bless ‘em.
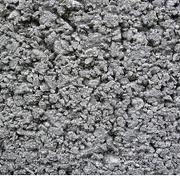
There are several products that will anchor objects into concrete. Quikrete makes an anchoring cement that will reach a pull-out strength of over 12,000 psi after only 24 hours. You can vary the consistency of the mixture by adding or reducing the amount of water in the mix. Since you will be working on a vertical surface, you will want the mixture to be more stiff and putty-like so it doesn’t just run out of the hole.
If the void in the block is small enough, you might try the gambit of anchors to see if you can avoid refilling the void. You might be able to drill a larger hole in the block and use a large anchor.
If you need to fill the void, mark the location where the anchor goes. You can use two pieces of tape and place one vertically above the hole, and the other piece horizontally to the side of the hole. You can follow the lines from the tape to align your anchor.
You may have to enlarge the hole for the cement to properly hold. The depth of the hole should be at least 2 inches, and the diameter of the hole should be at least three times the diameter of the anchor (a minimum of an inch). You can use a cold chisel and a hammer for this-just make sure you wear safety glasses.
When the hole is the right size, vacuum out the hole to remove any debris and loose dirt. Use a spray bottle and lightly mist the hole where the mix will go.
Add the water to the dry mix and stir it up until it is thick and blended. Stuff the mixture into the hole with a trowel. The block you are working on may be hollow or it may have been filled when the wall was built. If the block is hollow, you will have to stuff in a little more of the mixture.
Place the anchor into the mixture and pack everything tight until the mix is flush with the surface of the block. You will want to hold the anchor in place until the mix begins to harden. The time this takes will depend on the amount of water you used to mix the batch-more water means it will take a little longer.
 Here is a simple handyman project that protects the little ones in your house. You must baby-proof your electrical outlets. It just seems that kids that are intrigued by outlets. Maybe it is because they are at the perfect height for a toddler that is crawling. Or maybe it is because toddlers have a never-ending curiosity. Whatever the reason, kids love seeing just how far they can go before they get caught. So preventing kids from sticking something into an electrical outlet is very important.
Fortunately, it is also very easy. Yes, you can buy the latest, greatest gadget to stop something from entering the outlet. They make special covers that you have to twist to be able to use the outlet. There are all kinds of things coming out that do this. But it seems if I have to stand on my head to operate a shock prevention device, I’m likely not going to use the outlet. So I go with simple.
I prefer the basic plastic plugs that you just push into each outlet. They are basic, they are cheap, and they are fast. You can buy them in the color of your outlet which may make junior not as interested in them. It seems that when you change the outlet, kids get curious about it and want to spend time figuring it out. Not so with plastic plugs. They are cheap, easy, and fast.
 A typical handyman job is installing vertical blinds. It’s very easy and fast. I had a customer that asked us to replace a blind because a couple of vanes had broken. The vanes were a PVC material and the hole at the top had torn out making then unable to hang from the head rail. So the homeowner figured the entire blind needed to be replaced. There are other options.
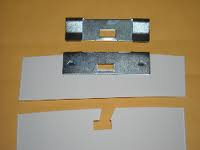
If the vanes are common, you can buy replacement vanes that are sold in small quantities just for this purpose. If they match, it’s a quick and cheap job. If the vanes don’t match the existing ones, you could replace all of the vanes with new ones, so that the head rail is old but the vanes are new.
Easier yet is to buy repair clips that push onto the top of the damaged vanes. They basically recreate the hole. They are metal clips that simply push onto the top of the vane. Friction holds them in place. Simply line up the clip with the hole and push it down until it is seated. It’s that easy. Once you have the clip on the top of the vane, push it back into position onto the hanger coming out of the head rail.
 If you live in a homeowner’s association, there will be a time that you get a letter saying you need to scrape and paint your fascia boards and eves. This is the trim board area just under the roof line. It is usually painted an accent color. The only part you will need to repaint is the area which can be seen from the street, although it makes sense to paint the entire perimeter since you have the tools out.
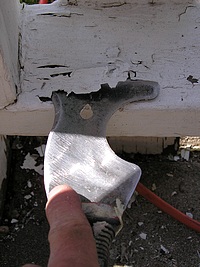
The painting portion of the job is easy. Scraping the old flaky paint off of the board makes quite a mess below. I would recommend you cover the area just below the roofline with a drop cloth so that clean-up will be easy. If you have bushes below, cover them with a drop cloth too.
Set up your ladder and get a paint scraper. The stiffer the blade, the better. Start at one corner and move around the perimeter. Wear eye protection and a hat because the crusty paint chips will be flying around.
I like using a tampon roller because they are small and the painting goes quickly. Plus you can get the paint into tiny areas, so there is less touch-up with a brush. Although some people like to scrape a small area and then paint it while they are there, I prefer to paint the entire perimeter and then paint the entire area. It’s a personal choice.