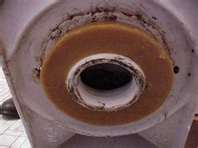
 I got a call the other day from a homeowner asking how to seal a toilet base to the floor. I think people believe that if the perimeter of the toilet isn’t sealed to the floor with something, then it will leak from under the base. That’s not true.
What seals the toilet base is the wax ring. The wax ring is soft enough to compress into any nook and cranny between the bottom of the bowl and the drain flange, yet firm enough to hold once it has been compressed. If the toilet leaks, it is likely that the bowl has moved and broken the bond.
I think a lot of “sealing” the bowl to the floor comes from appearance. People think if there is a gap then waste can leak out…and it can if there is a breach in the wax ring. If there is a breach in the wax ring, either the bolts weren’t tight enough, or one or both of them have corroded and broken, allowing the bowl to move.
If you are planning on filling this gap between the bowl and floor, most people simply caulk the gap. You can also use plaster of paris for this.
 Handyman Trims Wallpaper
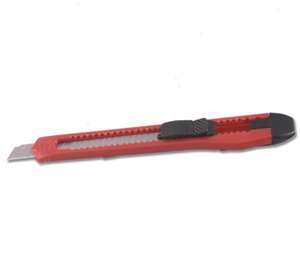
You don’t need to be a handyman to trim wallpaper. You just need a super-sharp razor, a straightedge, and a steady hand. Trimming the paper gives the wall a finished look.
Installing wallpaper is not a pleasant task, but many people like the finished look. After you measure the length of the drop, you will activate the paste (usually get the back of the paper wet), let it book (let the paper sit after folding the adhesive sides together), and then hang it on the wall. Push out the large air bubbles and get the first drop to sit right on your plumb line. Move to the next drop and hang it in the same manner, then go back and trim the first drop.
Use a new blade to cut the paper. A break-away blade is great because you don’t have to continually change blades, you simply snap off the old one and you have a fresh sharp edge to use. Most of your cuts will be at either the ceiling or the baseboard. Use a straightedge or taping knife and hold it where the surfaces meet. For example, push the knife on the wall to where it meets the baseboard and run the razor along the edge. You always want the knife to protect the wall while you cut. Don’t place the taping knife on top of the baseboard and cut as you will cut the paper too short. Plus if you use a dull razor, you could end up tearing the drop and have to start over.
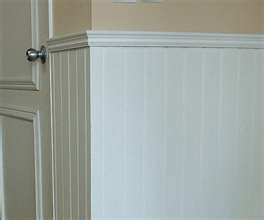 Here is a straightforward carpentry project with a little country flair. You can install it right over the drywall.
Beadboard comes in either planks or sheets but the sheets install much faster than the planks. Many products are tongue-and-groove and fit together seamlessly.
The thicker the board, the deeper the grooves. A lot of the inexpensive products are thin, so the decorative grooves of the beadboard are not very deep. When it’s time to paint them, the paint will settle into the grooves and fill them, which detract from the appearance. So, if it’s in your budget, you might consider the better product.
Start by determining how high you want the beadboard and snap a chalk line on the wall to mark the height. At this line, install a temporary strip of wood to keep the top of the beadboard aligned. While the top is important, the bottom is not, as it will be covered by the baseboard.
Remove the baseboard along the bottom of the wall. Use a putty knife to scrape off any caulking that is sticking to the wall. Regardless of whether you are using the sheets or the planks, make sure the first piece you install is plumb. If your first piece isn’t perfectly vertical, all others will be off as well. You can use a level to check.
Beadboard is usually secured to the wall with adhesive and then nailed at the top and bottom. The bottom nails will be hidden by the baseboard and the nails at the top will be hidden by cove molding that you install afterward.
Before you start hitting nails into the wall, mark out where the studs are located. You can use small finish nails to tack the board to the wall, as the adhesive will do the brunt of the holding. Apply beads of construction adhesive horizontally to the wall about 16 inches apart and push the board into the adhesive. Make sure the top of the board rests against the underside of the temporary guide strip so that everything is aligned at the end. The next piece of beadboard will have a tongue that slips into the groove of the previous piece.
The electrical outlets will be a challenge. You will need to cut a hole in the beadboard to allow the outlet to be accessible.
Grab a tube of lipstick or a crayon and draw a line around the outlet. You can dry-fit the panel over the outlet and push the beadboard to the wall. Pull the beadboard off and on the back of the board will be the outline of the outlet. Use this as a guide to cut the opening large enough to allow access to the box.
Words of caution: Turn the power off to the outlet when you are working on it. You will have to remove the cover plate, install a box extender, and then reinstall the cover plate after the board has been secured to the wall. You must also negotiate the corners. As you approach the corner, just cut it to end flush at the corner. Coming out of the corner, you can butt the end of the board against the other corner piece. You may have to cut the piece coming out of the corner so that the beads maintain the same amount of spacing.
Once the beadboard is installed, reinstall the baseboard and then look to the top of the beadboard. Install a piece of bullnose along the top of the board so that it stands proud like a tiny shelf. Under this shelf, install a piece of cove molding. This will not only hide the finish nails, but will also dress up the installation. Maybe then you can slip on an apron and start cookin’ some country fixins’.
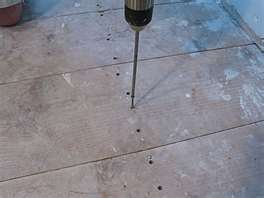 A fairly common handyman job is to repair squeaky floors. This happens when the floor is on joists, and a prime location is at the stair landing. It is the perfect area for kids to jump over the last few steps and land with their full weight on the landing.
The squeak noise comes from movement. So to stop the noise, you have to stop the movement. A stair landing is fairly small, but regardless of where the squeak is, the process is the same. You will need to roll the carpet and pad back once you find the source of the noise. If you were to remove the carpet and pad, you would see a line of nails as they were shot into the joists. Some hit the joist and some do not…carpenters move fast and “bump fire” the nail gun which isn’t always very accurate.
Stand on the floor and move your weight up and down. You will hear and feel the floor moving slightly. Keep moving until you can isolate the noise. Drive a deck screw through the sub floor and into the joist. The threads will pull the floor down on top of the joist and hold it. Move your weight up and down again to verify that the noise is gone. It probably makes sense to walk the entire floor to check for any other noise since you have the carpet pulled back. Once you are done, if you don’t feel comfortable placing the carpet back on the tack strip, you can hire a carpet company to finish up.
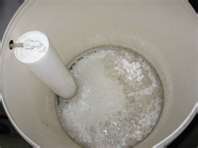
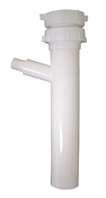
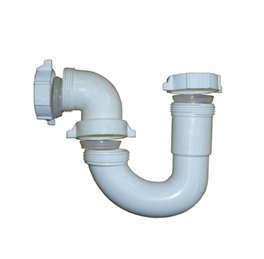 One of the first places I look when you have a plumbing leak under a sink is at the P-trap. This is the “P” or “U” shaped drain pipe under a sink. The trap inlet receives water vertically from the sink drain and moves it horizontally out the wall to the house’s drain system. Modern homes use plastic traps, and they get bumped by people moving things in and out of the cabinet.
It is usually not the case that the trap is cracked, although that can happen, rather that the connection between the trap and the other piping is at fault. Run the water and keep an eye out for the leak.
When you find a leak at the connection, you may be able to simply tighten it, or you may want to disassemble it and investigate the source of the leak. Unscrew the slip nut and check that it isn’t cross-threaded. Also, check the slip washer for a crack. If it is cracked it will allow water to pass and drip out of the top of the slip nut. A crack in the washer is hard to see so run your fingernail across it and listen for a “click” sound.
These parts are cheap to replace and take only a few minutes to assemble. Just make sure you seat the washer correctly and don’t cross-thread the nut.
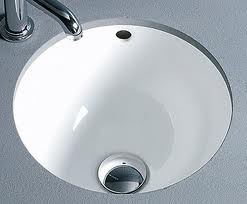 If you look at your bathroom sink near the top you will see a hole. This is the overflow and it prevents the water from rising up and spilling onto the top of your counter. When the water level gets high enough in the sink it goes into overflow hole and down to the drain. Nicer sinks have an integral overflow trough built into them that leads to the drain. These last and generally don’t leak. However, the inexpensive builder-grade sinks are different. Many of these sinks have a plastic trough stuck to the bottom of them that leads to the drain. This style does tend to leak over time.
You generally don’t have an issue with the cheap sinks though, since the overflow is not needed very often. You will only notice a leak when the water enters the overflow. The plastic trough really isn’t made to be repaired, but you can try to make it more water tight. Try caulking the perimeter of the trough, then take your finger and push the caulking into the area where the trough meets the underside of the sink. Then cross your fingers. With any luck this will hold the next time you leave the water running and the sink stopper in. The other remedy is replacing the sink, but for as often as the overflow is used, most people try to just “band-aid” the sink.
 Flushing the toilet shouldn’t cause the tank to move. If it does, you need to check the bolts that hold the tank to the bowl. Tightening tank bolts is an easy job…unless you overtighten them.
It may also be that one of the bolts has corroded and broken off. If that has happened, consider yourself lucky that you don’t have water all over your floor.
You want to tighten the bolts just enough, but not so tight that they crack the tank. If you look into the tank and see globs of rust and corrosion, I would replace them anyway.
Hold a standard screwdriver in the slot and use a small wrench to turn the nut below. The idea of a small wrench is because you will not be able to apply a lot of torque on it and it will cause you to consider whether or not you should continue to turn it. Believe me, the last thing you want is to end up replacing the entire tank because you overtightened the bolts and cracked the tank.
You will be able to snug the tank down enough so that it doesn’t leak and won’t move (unless you really push or pull on it). If it moves easily, tighten it up a little more. If the toilet tank doesn’t move, then its tight enough.
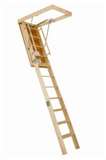 When you install a wood attic ladder in the ceiling, you will have to trim the legs so that when you unfold the ladder, the feet contact the floor at the right angle and make for a stiff set of stairs.
This isn’t hard to do, but it’s one of those things that pays to measure twice and cut once.
The bottom of the ladder will fold forward so that once the legs are cut to the correct length, the legs will be straight and rest on the floor. This will make a rigid ladder and give you confidence that it won’t collapse or move under your weight.
With the legs folded back, and the stairs extended, you want to take two measurements on each leg. You want to measure the distant from the back of the leg to the floor, and the distance from the front of the leg to the floor. You will do this for each leg and you may have four different measurements. It makes sense that both rear measurements and both front measurements should be the same, but this may not be the case if the floor is slightly sloped, etc. When you measure the distances, use something rigid. Don’t use a tape measure because it will flex and droop and will not be exact. Instead, use something like a 1”x2”, line it up along the leg and make a mark. Then transfer this distance onto the leg once you extend the stair back out. Do this for both the front and back of each leg.
What you will have made is a cut line on the leg. Mark a line between the two marks and cut along this line. Do this with each leg and the attic ladder should be cut perfectly.
 Water softeners occasionally need a handyman. If you find yourself without soft water it may be due to a salt bridge.
A salt bridge is a crusty buildup of salt inside the tank. If you were to take a cross-section of the brine tank, it would look like a bridge…hollow underneath and dense salt which forms the “bridge”. High humidity can cause a salt bridge. Salt crystals bond to each other and form a crust. As salt below the crust is used in the regeneration process, the bridge never moves and consequently the water does not get softened. If you look into the tank, the salt appears to look normal, but the salt does not appear to be decreasing over time. You need to break up the salt bridge and dispose of it.
You can use a broom handle or really any tool with a handle. Turn the broom or tool over and try to break through the bridge in the center. Stay away from the walls of the tank and make sure you don’t puncture the bottom of the tank.
Once you break the bridge up into pieces, remove the pieces from the tank. You can go crazy if you like and use a wet/dry vacuum and clean out the tank. Refill the tank with new salt pellets and set the controller to regenerate. Depending on your home’s use of water, you should have soft water again in 1-2 days.
 Installing a dishwasher without a garbage disposal sounds a little daunting, but it isn’t. You will need a few specialized plumbing parts, but otherwise it should be straightforward.
The dishwasher will go into the cabinet the same way the old one came out. Some people don’t like garbage disposals and so they remove them, I personally like them and don’t know why anyone would get rid of one. Anyway, when you remove the disposal, you will need to add a sink strainer and a dishwasher tailpiece. This looks like an ordinary tailpiece except that it has a nipple that sticks out of the side. This tailpiece nipple takes the place of the nipple on the disposal where the dishwasher drain was connected.
The dishwasher drain will run up to the air gap and then down to the tailpiece nipple. Secure the drain to the nipple with a hose clamp. The water supply connection is the same. Screw the water supply line onto the angle valve until snug after you wrap the threads with Teflon tape.
Shimmy the dishwasher into its final position so that it lines up with the cabinet faces and is centered in the opening. Open the door and secure the dishwasher to the underside of the counter with some short screws. The screws go through the brackets and into the underside of the counter.