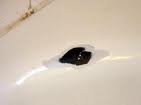
 If you've ever dropped something in your sink and it chipped. Don't worry about replacing the sink, instead you can buy a kit and do your own porcelain sink repair. The repair will be very good, but not flawless.
You can buy a repair kit at a home center. The kit has a filler material to bring the divot up to the level of the surrounding surface, and it has a topcoat glaze to give the repair a shine. Some kits have an all-in-one filler that you buff to a shine when done.
Start by sanding the damaged area with 220-grit sandpaper. Just don't sand beyond the damaged area or you can scratch the surrounding porcelain. Clean the area and let it dry.
The filling compound and glaze come in several colors packaged in bottles that look like nail polish.
Use a putty knife to fill the divot. Use thin layers of the compound and let each layer dry before adding the next.
Once you build up the divot, break out the 220-grit sandpaper again. Sand the area with a light swirling motion being very careful around the edges to avoid scratching the surrounding surface.
You can also use a single-edged razor and slice any high spots off your final layer before it dries too hard. You still will want to sand it after you slice it.
Once the leveling is done, glaze the top of the repair.
The bottle of glaze will have a small brush attached to the cap. The idea is to dab the glaze onto the patch to make it match.
The trickiest part is at the edges. The glaze is about the consistency of nail polish and will have the tendency to stay where you put it. Use as little as is necessary to blend in the patch.
Let it dry and then hit it with the sandpaper.
You can also apply the glaze in small thin coats until you get the desired effect.
If just the top layer of the porcelain has been chipped from the sink, you may be able to go straight to the topcoat glaze.
Like I said, the kitchen sink repair won't be flawless, but you can fool most people with it.
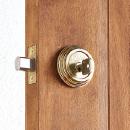
I have a friend whose house was burglarized over the weekend. They pushed through a door that didn't have a deadbolt on it (that's unusual). So he asked for the specifics on installing deadbolt locks.
The worst part of this job is drilling the holes. Don't worry though because deadbolt manufacturers include a template that you tape around the door so that you drill the holes in the right places.
You'll need a couple of specialized tools. For about $20, you can get a deadbolt installation kit with a 1-inch drill bit and a 2 1/8-inch hole saw.
Start by marking the door edge between 3 inches and 6 inches above the doorknob. Tape the template to the door at this mark. The template will wrap around the edge of the door showing you where to start drilling the holes. Mark the door edge for the 1-inch hole (the latch hole), and then mark the door face for the larger cylinder hole. Most deadbolts are adjustable for either a 2 3/8-inch or 2 3/4-inch backset. Choose the distance from the door edge that aligns the deadbolt with the doorknob.
Use a one-eighth-inch bit to drill a pilot hole through the template at both the latch hole and the cylinder hole. The template will have the center locations marked. Next, chuck the hole saw into your drill and start drilling the cylinder hole. Drill about halfway through one side of the door, pull out the drill, and then drill from the other side to complete the cut. This avoids tearing out the other side of the door as the saw goes through it.
With the door closed, stick a 2-inch nail into the cylinder hole and through the pilot hole you drilled for the latch. Press the nail into the doorjamb so that it makes an indentation in the jamb. Open the door and use the 1-inch bit to drill a hole at the indentation to a depth of 1 inch. Finally, drill the 1-inch latch hole through the edge of the door so that it reaches the cylinder hole.
Insert the latch into the latch hole and trace around the face of the latch. Remove the latch and chisel out this area to a depth of about one-eighth of an inch or until the latch is flush with the edge of the door. Screw the latch into place on the door's edge.
Place the exterior side of the cylinder (the side with no visible screws) on the exterior side of the door and align it with the holes in the latch. Push it into the hole so that all of the parts are aligned with the latch.
Slide the interior side of the cylinder (the side with the screw holes and the thumb knob) over the torque blade (the arm that pushes the latch out of the door) so that it also aligns with the hidden screw holes from the exterior side of the cylinder. Insert the machine screws into the cylinder and tighten. Check the fit of the latch bolt into the doorjamb hole to make sure it moves freely.
Hold the strike plate over the strike hole and trace the outline onto the doorjamb. Chisel out this area so that the strike plate sits flush on the doorjamb and secure it with screws.
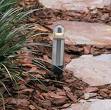 As you pull up to your house at night, you notice that a few of the landscape lights are not working. Fortunately the weekend is coming up and you have nothing better to do that work on some landscape lighting repairs.
The simplest fix is to change the light bulbs, but if that doesn't work, use a low-voltage tester (about $12 from a home center) to test that the light bulb receives power. The tester will have two terminals. Manually turn the lights on and stick a terminal in both sides of the light socket. You may have to place a piece of black duct tape over the light sensor if the transformer doesn't have a manual switch.
I say "light socket," but it doesn't look like one. This socket will have either two holes, or two clips depending on the system. If the tester indicates you have power to the socket, then you have a bad bulb. You can also use the continuity-testing feature on the multi-meter to test the bulb.
If you aren't getting any power to the socket, you will need to dig up the light base assembly. This assembly contains the socket, the wiring that connects the socket to the underground cable, and the stake that holds it all in the ground. The entire assembly will only be about six inches deep, but dig it out carefully as you don't want to sever the cable.
You want to find where the light assembly connects to the cable. In many cases, this area corrodes or gets clogged with dirt preventing electrical contact. Unscrew the connector or pull it apart, then clean it off with a soft brush.
At the ends of the light assembly's wires will be sharp contacts. These contacts are pushed into the cable to provide electricity.
Use the continuity tester by touching a terminal to both contacts. If the light assembly is good, the tester will show continuity. If there is no continuity, replace the light assembly (between $12 and $25).
If the light assembly tests fine, then re-install the connector into the cable. It is possible that the contacts have either pulled away from the cable's wiring or that dirt has prevented the contacts from touching the wires. Clear away any dirt, then re-install the contacts into the cables. The connections are secured by either twisting on a retainer cap, or by pushing the contact wires together until they lock in place.
Had the entire system been dark, you would have first checked that the transformer was getting power from its source (typically a GFCI outlet). If it was not, then you would need to backtrack from the GFCI outlet (try pushing the "reset" button on the outlet).
If the transformer were receiving power but not delivering it to the lights, you may have needed a new transformer. Many transformers have a circuit reset button. Try pushing the button before you buy a new transformer.
If all of the lights work up to a certain point and the rest of the lights are not on, you may have a damaged cable.
In this case, start by digging up the first light assembly that doesn't work and pull the contacts out of the cable. Manually turn the system on and stick the tester in the holes of the cable that the contacts made. If you get power from the cable, the problem is somewhere in the light assembly or bulb.
If there's no power, dig up the cable between the last operating light and the first nonoperating light. Find the damaged area of the cable and splice a new section of cable in its place. New cable and splice connectors are available at most home centers.
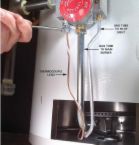 So you're ready for a nice hot shower and...there's no hot water. You take off the cover of the water heater and notice the pilot light is out. What's worse is that it won't stay lit. You may need to replace the water heater thermocouple.
It is a $10 part that is a safety device at the base of your water heater.
The thermocouple acts as a switch. On one end is a part that looks like a thermometer (this part sits in the flame of the pilot). On the other end is a fitting that screws into the gas valve. Connecting the two ends is a wire.
The part works like this: As the one end is heated by the flame, a small electrical charge is generated which tells the gas valve to remain open. When the pilot light goes out, the charge stops and the gas valve closes. This prevents gas from continuing to fill up the base of your water heater.
So this little $10 part does a pretty important job. If the thermocouple is bad, no gas will flow and the pilot will not light.
To change the thermocouple, you will need to disconnect several parts to access it. Before you do anything though, turn off the gas to the unit. Turn the knob on top of the gas valve to the "off" position and turn off the gas supply valve where the gas flex line connects to it. Also, remove the small metal door that stops breezes from entering the burner chamber (In newer units you may need to replace the entire assembly, but they function the same way).
You may get lucky and not have to remove the burner, but chances are you will have to remove it.
There are three lines coming out of the bottom of the water heater's gas valve. The burner's gas line, which is about as thick around as your pinky finger; the pilot light's gas line, which is about one-eighth inch in diameter; and the thermocouple, which looks like a copper wire. It is the skinniest line there.
Gently unscrew the three lines from the gas valve and maneuver the burner assembly and thermocouple out of the chamber. The burner may have a tab at the bottom that slips into a slot at the bottom of the water heater. If so, just lift and push it out of the slot.
Some thermocouples just push into the bracket that holds the pilot in place. Others are secured by a threaded fitting. Unscrew the thermocouple fitting at the bracket (or if you're lucky just pull it out). Your new thermocouple will come with several universal fittings for different sizes and methods of connecting it to the bracket.
With the thermocouple in place, maneuver the burner assembly back into place and connect the gas lines and new thermocouple to the gas valve. Turn the gas back on and follow the directions on the tank to relight the pilot.

Hanging pictures in groups can be a little challenging for people who don't like to read a tape measure.
When you're hanging things from a wall, it is always better to hit a stud. It is usually the case, however, that a stud isn't located where you want to hang the picture.
Fortunately, you can buy picture hooks that don't require nailing into studs. A picture hook sits flush against the wall and has a nail that is hit through it at a downward angle. These hooks come in different sizes and can support substantial weight -- anywhere from five to 50 pounds.
To install the hook, simply hold it against the wall and tap the nail into the drywall.
To hang a picture exactly where you want it isn't difficult, but it takes a lot of measuring. If it has a wire on the back, you should only need one hook.
Start by holding the picture where you want it to hang. Use a pencil and make a light mark on the wall at the top of the picture at the center of the frame. This mark represents the vertical plane where you will mount the hook. Now we need to determine how far down the line to go.
Take the picture down and grab a tape measure. At the front of the tape is a metal lip. Place the lip underneath the picture wire and pull the wire up until it is taut. Now measure the distance from this point to the top of the picture frame.
Take this measurement back to the wall and, from the mark you made on the wall, measure down by this amount and make another small mark. Use a level and hold it vertically on the wall to make sure the second mark is aligned with the first. If it isn't aligned, move it over until it is. This is where the bottom of the picture hook should sit.
Hold the picture hook against the wall and hammer in the nail. Hang the picture wire on the hook and hold the level under the picture to level it out.
Centering one picture on a wall is easy. What if you want to center a group of pictures? It takes more measuring.
Let's say that you want to hang three pictures in a group so that they all have the same distance between themselves and the edges of the wall. You simply measure the length of the wall and divide that distance by four (always one more than the number of pictures you are hanging).
If you want to cluster those same three pictures close together in the center of the wall, you guessed it, more measuring. Let's say that your pictures are each 12 inches wide and you want them spaced four inches apart. You have a total picture width of 44 inches (12+4+12+4+12=44).
It is easier if you can imagine the cluster of pictures as one large window. Find the center of the wall (overall length divided by two) and make a mark at the height of your choosing. Your center picture will hang at this spot.
From this location you will add 16 inches (one-half the width of the center picture plus the 4-inch space plus one-half the width of the next picture). So from the center point on the wall, you will measure out 16 inches to the right and the left. Use a level to make sure the points are aligned and nail in the hooks.
For large pictures that have a bracket on each side instead of a wire, it is much like hanging two pictures instead of one. Measure the distance from one bracket to the other. Find the center of the wall and add one-half of this distance to both the right and left of this point.
Make sure the points are level and then install the proper hooks. Pictures that don't have a wire on the back are much harder to adjust if they are not installed level in the first place.
If a picture is a little crooked after you hang it, try wrapping the bracket on the low side with a couple of layers of paper, or stuff a piece of cardboard under it. No one will see it and it is easier than re-installing a hook.
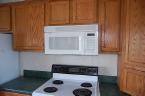
Here is an easy way to add 3 square feet of counter space to your kitchen...remove the old microwave from the counter and install a microwave hood above your range. You won't have to change any cabinetry because microwave hoods and vent hoods are uniform in width.
Plan on spending at least $250 for a low-end microwave hood, and about 1 1/2 hours to install it.
First, you'll have to remove the old range hood, then unplug the electrical cord in the cabinet above the hood. Next, unscrew the four screws (or less if the original installer got lazy) that hold the hood in place (usually one at each corner). Support the hood as you do this.
Your new microwave will come with a paper template, which you'll tape to the wall and to the underside of the cabinet where the microwave will be mounted. The template shows where to drill holes in the wall to fasten the mounting bracket that supports the microwave. Under the cabinet, the template shows where to drill holes to allow the cord through and the location of the height adjustment screw.
There are two types of mounting brackets. One has "arms" on either side at the top, which the microwave slides onto. The other has a channel at the bottom that the base of the microwave rests in, and is fastened with the height adjustment screw. Whichever bracket you have, you'll have to secure it to a wall stud.
This is easy because a stud finder (about $10) will pinpoint the location. Mark the location on the template and pre-drill the holes according to the manufacturer's instructions. The rest of the bracket will be held to the wall using toggle bolts (molly bolts), which are included in the package.
Insert the bolts through the holes in the bracket, then twist on the toggle nut just enough so it doesn't fall off. Push the toggles through the pre-drilled holes in the wall. As you turn the toggle bolt with a screwdriver, you'll have to pull outward on the screw to engage the toggle and tighten the bracket to the wall.
If the stud doesn't line up with one of the corner holes, secure the bracket to the wall stud using a wood screw (it's also included) into one of the holes in the bracket that aligns with the stud.
If you have ductwork to connect the hood to, use sheet metal screws and foil tape. If there is no duct work above the hood, you'll be installing the microwave range hood so that it recirculates the exhaust, which is a fancy way of saying that it blows it back into the room. However, there is a charcoal filter that the exhaust passes through before it is recirculated.
The microwave range hood comes ready for attachment to a ducted system. If you have a ductless system, you'll need to remove the blower and turn it according to the manufacturer's instructions (don't worry, it's a matter of four screws).
Once the blower is oriented, attach the microwave to the bracket. This is awkward because you'll have to thread the power cord through the hole in the underside of the cabinet while you support the microwave. There is a temporary pin that will hold the microwave in place until you permanently fasten it to the bracket and the cabinet. It's much easier to have a helper support the microwave while you stick in the pin.
Make any final adjustments to the microwave then, while supporting it, remove the temporary pin and insert the height adjustment screw. You can close any gap between the top of the microwave and the bottom of the cabinet by tightening this screw.
Now you're ready to plug in the hood and program the time.
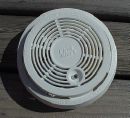
How many times have you been awakened by a chirping smoke detector? A few times I'll bet. So you replace the battery only to find that it still chirps? Try using a vacuum with a hose attachment and hold the hose up to the smoke detector. After you suck out a few years worth of dust, plug the unit back in to see if it works. If not, you may consider replacing it.
It's recommended that smoke detector batteries be changed when you set your clock for daylight savings time and again when you set it back to standard time. It's also recommended that the entire unit be replaced if it's more than 10 years old, because the circuits wear out and eventually stop working. Also, years of dust and clumsy painting can interfere with the sensor.
Smoke detectors are inexpensive. You can buy a direct-wired unit with a battery backup for about $20. And, if you have an area where you want to add one, install a battery-operated unit, which is about $15.
To replace your direct-wired smoke detector, first turn off the power at the main panel. The top of the old smoke detector will either pop off or will twist off with a slight turning motion. On the old units, you have to remove the body of the detector to access the wires that connect it to the electricity. The body is held in place by two screws. Remove these screws and the detector will dangle from the ceiling. Test the wires to make sure the power is off, then untwist the wire connections.
Screw the new smoke detector mounting plate to the electrical box with the two screws that you removed from the old unit.
Your new smoke detector will come with a connector plug that attaches to the electricity. After you make the electrical connections, simply plug this connector into the detector.
The electrical connections are the same as replacing a light fixture, except for what is called an interconnect wire. If you have multiple smoke detectors that are interconnected, when one goes off, they all go off.
You can tell if your detector is interconnected if it has a third colored wire. Connect the white neutral wire from the ceiling to the white wire on the connector plug. Connect the black hot wire from the ceiling to the black wire on the connector plug. If your old smoke detector had a third colored wire connected to it, then connect this wire to the yellow interconnect wire on the connector plug. New smoke detectors are wired for either single or interconnected use, so just connect the new detector with the same number of wires as the one you are replacing. Use wire nuts for tight connections.
Once the wiring is done, plug the connector into the new smoke detector and twist it onto the mounting plate.
This is really a simple job. However, it's a job that is vitally important. If this one smoke detector is old, the other ones in your home probably are old, too. Do yourself a favor and spend the money to change them all.
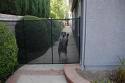
A while back I was doing some painting in the back yard of a customer's house. Assigned to patrol that back yard was a pit bull named Moses. I would peek over the gate and whistle and if Moses was there he would come barreling around the corner.
Well, one time ol' Moses decided to play possum. I whistled and no Moses. Thinking he was locked up inside the house, I confidently opened the gate and grabbed the paint. As I turned the corner I saw Moses on the other side of the pool. Then I realized how he got his name. I swear Moses ran across the pool to come get me. I made it through the gate and the mesh prevented his saliva from drenching the back of my shoes.
You can buy pet screening or mesh at a home center for less than $20 and you can choose from a few different colors. If you have an extra large gate, you may have to buy a few pieces. This mesh will also offer some privacy from the street, as the holes are quite small.
Be careful with this stuff because the edges are sharp. Use tin snips to cut the mesh. After you cut the sheet to fit your gate, the edges are downright dangerous.
You have a choice either to precut the mesh and screw it on the gate, or screw it on the gate first and then cut around the gate. If you choose to cut around the gate, as you cut, the mesh will have the tendency to curl, which may cut you or Fido.
Either way, you may want to wear heavy leather gloves when you handle it. A must for this job is a drill driver fitted with a Phillips head bit.
You need self-tapping, pancake-head, galvanized screws, which eliminate the need to predrill a pilot hole into the gate. Self-tapping screws cut a hole as they hold the surfaces together. Some mesh comes roughly 36 inches wide by 72 inches in length, so you will need to cut it before you hold it up to the gate.
Use clamps to hold the mesh to the top of the gate, but cover the jaws with wood scraps or something that won't scratch the paint. Once you have it in position, put a screw in the drill and hold it up to one of the holes in the mesh. Choose either the upper left or upper right corner of the gate and not too close to the edge.
Start slowly until the screw starts to cut into the gate and stop when the screw head holds the mesh snug to the gate. Align the rest of the mesh to cover the gate and add screws about every 8 inches along the top of the gate. Remove the clamps and continue down the gate making the bottom the last section to screw together.
If the interior bars of the gate allow, screw the mesh to them as well, otherwise every time the gate closes the mesh will bang against these bars.
If the gap between the sides of the gate and the wall are so large that Fido can fit through, you can screw a piece of angle iron to the gate, effectively widening the gate. This goes for the bottom of the gate as well. Just spray some paint on these parts to protect them from the weather.
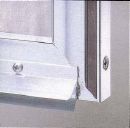
Many of the complaints I hear about leaking shower doors are that they leak from underneath the door.
I would like to add a complaint. Like many people, I have a glass shower door with a sweep on the bottom of it. The sweep attaches to the inside bottom of the door and has a drip edge to direct water back into the shower, and a rubber sweep on the bottom of the door to keep water from splashing out.
Now, my wife is a cleaning fanatic who goes ballistic if there is even a drop of water on the glass, so she bought a squeegee. Well, I got a little lax on squeegeeing the glass after a shower so she bought some chemicals to spray on the glass to leave a streak-free surface. Gravity pulled the chemicals down to the drip edge.
You know how when you open the door from the inside of the shower you sometimes have to push a little harder than normal? That extra effort pushed all those chemicals on the carpet, leaving a rainbow arc of discoloration. The nice thing though is that the chemicals permanently stained the carpet.
The sweep typically rubs against the bottom track of the shower. Often, the friction from opening and closing the door will cause the shower sweep to recede up into the drip edge, leaving a gap for water to splash through. The sweep can be adjusted or replaced to eliminate this gap.
The drip edge and sweep are usually held in place with a couple of screws, but I have seen them held in place with silicone caulk or even double-sided tape.
Inspect the condition of the sweep. It will probably be a little wavy but that's OK. If your drip edge is held in place with screws, this job is easy.
To adjust the sweep, loosen the screws (don't remove them), and pull the sweep down evenly so that it just touches the bottom track of the shower (the screw holes are oblong for this). Then tighten the screws.
If the sweep needs to be replaced, buy a new one at a home improvement or plumbing supply store and sandwich it in between the door and drip edge (you may have to trim it). Then screw the drip edge into the door.
Some types of drip edges have a groove that the sweep slides into. These sweeps are likely to be held in place with silicone caulk. I don't particularly like sweeps that are secured with caulk only, because they seem to work themselves loose quickly.
If you have this type of drip edge, apply a bead of clear silicone caulk to the back lip of the drip edge and push it back into place. Apply a second small bead of caulk at the top of the drip edge where it meets the door and smooth it with a wet finger. As a back up, you may want to install three small self-tapping water-resistant screws (like galvanized or brass) through the drip edge into the door.
Finally, some drip edges have a stop built in at the swinging side of the door. If yours does not have this feature, you can put a dab of caulk at the end to stop a spray of water (or chemicals) from arcing across your floor.
 This past Saturday, we received a call from a homeowner that his water heater was leaking. When we arrived, we found that the leak was caused by a fitting and not the water heater itself. Now in order to replace the fitting, we would have to shut the water off. We turned the water off at the gate valve and completed the work. When we went to turn the water back on, the handle just spun and spun. The gate valve had sheared off and wouldn't allow any water to pass. The gate valve would need to be replaced...this time with a more formidable ball valve.
A gate valve is a cheaper alternative to a ball valve, although by only a few dollars. Depending on the size, a gate valve costs around $5 and a ball valve is usually under $10.
Both types of valves have the same purpose, which is to control the flow of water. The design of each, however, is vastly different.
A gate valve has a round knob on top that you turn. This motion raises or lowers a gate inside of the housing to stop or start the flow of water. These valves are prone to failure as they age because they can corrode.
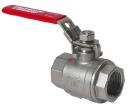
A ball valve is a man among boys. Instead of a knob, it uses a lever. This valve has positive stops machined in that allows the lever to move only 90 degrees. When the lever is parallel to the pipe, the valve is open and water will flow. If the lever is perpendicular to the pipe, the valve is closed.
If you were to cut a ball valve open, you would see that the lever is connected to a ball with a hole bored through the center of it. This is where the water passes through. Turning the water on and off is only a matter of throwing the lever 90 degrees.
Because of the round handle on a gate valve, it's hard to tell if the valve is open or closed, and when the valve is broken, you end up turning the knob one way and then the other without accomplishing anything. In some cases, the gate will corrode and separate from the lifting mechanism and drop. It will come to rest at the bottom of the valve and cut off the flow of water.
The long and short of it is if you are going to replace the valve, spend a few extra dollars and install a ball valve.
You are going to need to sweat off the old valve and sweat on the new one, although you can get ball valves with compression fittings.
When sweating valves in place, either remove the valve mechanism from the body or open the valve to allow the heat from the torch to escape and not damage the valve.