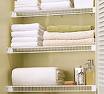
If you've ever thought about adding some extra shelving in your closet, wire closet shelves may be the way to go. Although they don't scream of luxury, they are economical and durable.
There are basically two types of wire shelving. One uses a vertical track that allows the shelves to be adjusted up or down. It is a faster installation, but it is more expensive and has somewhat of an industrial look to it.
The other method is less expensive, but the shelves will remain in a fixed position. Since most peoples budget is tight, we will concentrate on the fixed shelving.
To start, take measurements of the closet and make a sketch of what you want. The fastest way to get more closet space is to install a second hanging shelf. This works well if your wardrobe consists mainly of items that would hang in a space roughly 42 inches high. If you have items, such as dresses, that would not fit in this space, you obviously would have to leave a space for them to hang.
There are lots of options available. You can add shoe racks (by inverting the shelving), storage drawers and baskets, or even a column of shelves for sweaters using pre-drilled poles. Some shelves include an option for a continuous closet rod if you don't want to use the built-in lip. Closet design is limited only by space and imagination.
Start the project by removing the old closet pole and any attached shelving. Typically they will be held in place with screws. From your sketch, use a level and a pencil and mark on the wall where the shelves are to be placed. Extend the level lines around the closet. If you will have two hanging shelves, one on top of the other, mark the top shelf at 84 inches high and the bottom shelf at 42 inches high.
There are three ways to install a shelf: from one wall to another, from one wall to an open space, and from one open space to another.
Each way requires wall clips and support brackets. If the shelf will be mounted to the side walls, use wall brackets. Wall brackets are mounted at the front of the shelf, which rests in this bracket.
The mounting hardware is specific to these wire shelf products. Choose the hardware for that length of shelf and whether or not it fastens to a side wall.
Trim the shelves to fit using either bolt cutters or a hacksaw. The trimmed ends will be sharp but will rest in the wall brackets. If the sharp ends end in an open space (not attached to a side wall), cover them with end caps so that you don't get cut and your clothing doesn't get snagged.
The manufacturer's instructions will have recommendations on the spacing of hardware and supports. Whether it's wall clips, support brackets or wall brackets, they all install in the same manner. If you are mounting them over a stud, screw the hardware into the stud using a one-inch No. 8 screw. If you are securing the hardware into drywall, drill a one-quarter inch hole, push the hardware in and tap the metal pin. The pin will spread the end of the anchor out, which will secure it to the drywall.
Install the wall clips along the level line according to the manufacturer's instructions. These clips hold the back of the shelf. On the ends at the front of the shelf, install either the wall bracket (if it connects to a side wall), or a support bracket with end caps. Simply snap the back of the shelf into the wall clips and then to either the wall brackets or the shelf support.
To extend the shelving around the perimeter of the closet, you will have to negotiate the corners. The options are to install a corner piece, which has a sweeping curve, or to butt two shelves together for a 90-degree turn. To butt the shelves together, you will need a corner support to keep the assembly rigid.
The finished product will be a more efficient closet and more room, at least for now.
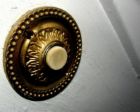 With Halloween coming up, you'll want to make sure your door bell is working. What would be the fun if the kids rang your doorbell and ran, only to find out the darn thing didn't annoy you. Door bell repairs are a must for the season.
Most doorbell problems are caused by loose wire connections or worn-out switches. To test your system, you will need a multi-tester (under $15), which checks voltage and continuity. It will even test batteries for you.
Start by removing the screws that hold the doorbell button to the house. Pull it away from the wall and check that the two wires are securely fastened to the unit. If they aren't, tighten the screws then test the doorbell. If it still doesn't work, disconnect the wires and test the doorbell with the continuity tester. If the meter registers no continuity, replace the doorbell button.
If the button is OK, twist the wires together to test the other parts of the system (don't worry, this is a low voltage system, so it won't curl your hair). Look for the doorbell's transformer, which is a small metal box about 3 inches tall by 3 inches wide and is likely located near the ceiling in your garage, or a closet. The transformer has two screws on it with one wire attached to each screw and will have a voltage rating of less than 20.
Set the dial of the multi-tester to the 50-volt setting, then touch the probes of the multi-tester to the screw terminals on the transformer. You should get a reading within a few volts of the actual rating on the transformer. If not, replace the transformer (about $10).
If you get no reading, there may be a loose wire in the box that the transformer sits on. Shut off the power to the transformer at the main panel, remove the cover to the box then check that the connections are secure.
If the multi-tester showed the proper voltage, move to the chime unit. Remove the cover and inspect the low-voltage wire connections. If any are loose, reconnect them. Next, take the multi-tester (again set at the 50-volt setting) and touch the screw terminals inside the chime unit. If the reading shows power within a few volts of the transformer rating, then the chime is receiving the proper current from the transformer. If the test shows no power or very low power, then there is a break in the low-voltage lines, and new wiring must be installed. Re-assemble the doorbell system and push the button. If the chime doesn't sound, you need to replace it.
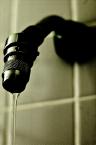
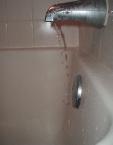 Nothing says relaxing weekend like doing some tub faucet repair. If you have a single handle that controls both the hot and cold water, you simply replace the cartridge. For faucets with separate hot and cold handles, there are a few more parts. If your faucet won't completely shut off, chances are the seat and stem are the culprit.
These items are fairly easy to replace, but you may need to buy a few specialized tools.
If the water dribbling out is warm, then start at the hot handle, and vice versa.
The handle is attached to the stem. As you turn the handle toward off, it pushes the stem against the seat of the faucet body. At the bottom of the stem is a washer that compresses against the seat and stops the water from flowing. However, the washer gets brittle and the seat wears out, and over time they won't fully stop the water.
Begin by turning off the water to the house and opening the tub faucets to let any pressure out. Pry off the handle cap and remove the screw that holds the handle to the stem. The handle should wiggle free, but in the worst case you may need to buy a handle puller for the job.
The handle puller is a goofy-looking tool but it works. Thread the rod of the handle puller into the faucet handle's screw hole and place the arms of the puller at the back of the handle. Turn the rod clockwise and the handle will pop free.
The stem will be partially hidden inside the escutcheon. Unscrew the escutcheon to gain access to the rest of the stem. Now you will be able to see the entire stem assembly.
Depending on how large the opening in the wall is and how deep inside the wall the stem assembly sits, you may be able to get a wrench around it to unscrew it. You may, however, have to buy a set of tub sockets. These look like a regular socket set, but they are much larger and much deeper.
Slip the socket over the stem assembly and unscrew it. At the bottom of the stem is the washer, which is held in place with one screw. Remove the washer.
The seat is located in the nether regions of the faucet body. If you look into the hole where the stem once sat, you will see another hole deeper into the faucet body. This is the seat and it looks round with squared edges cut into the center of it.
Use a seat wrench, stick it into the hole and unscrew the seat. A seat wrench looks like a mini version of an "L" shaped lug nut wrench for car tires.
Take all of the parts to a home center and buy replacements. You may have to go to a plumbing supply store, but a home center will have the basics.
While you are at it, you may as well replace both the hot and cold water parts. Why ruin two weekends when one will do? You might also consider replacing the entire stem instead of just the washer.
Once you have the replacement parts, apply some pipe dope on the threads of the new seat and screw it back in. Put some pipe dope on the threads of the stem assembly (called bonnet threads) and screw it back in. If you choose to replace the just the stem washer and reuse the old stem, lubricate the parts with plumber's grease and then screw it in.
Over the weekend I got a call from a customer that had just 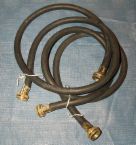 arrived home after an extended vacation. She had a great vacation and was looking forward to relaxing after unpacking. Her heart sank as she opened the front door to find 2 inches of water all over the floor.
The culprit? The rubber washing machine hoses that we all ignore. One of the hoses at the rear of the washing machine had ruptured and flooded the house. Now she gets to have another extended vacation, this time at a motel, courtesy of her insurance company.
Go now and buy 2 braided stainless steel washing machine hoses. They cost $10.00 each and you will need 2 of them. Turn the water off at the hose faucets, unscrew the old rubber hoses and simply screw on the new hoses. Connect the new ones to the same fittings as the old ones (hot faucet to hot inlet and cold faucet to cold inlet). You can also buy "floodsafe" hoses for toilets and the like that have a pre-set flow rate. If the flow rate of the water exceeds the setting, the water flow will stop to that fixture.
This is one of the easiest plumbing jobs out there, and it could save you thousands of dollars and weeks of inconvenience.
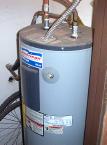 It always happens at the worst time possible. There is no hot water and there is a constant stream of water coming from the bottom of the tank. A water heater Las Vegas always seems to last 1 day after the warranty expires.
Start by turning off the gas to the water heater. The valve is located near the wall, usually at the base of the water heater. Turn the knob a quarter of the way (the knob will be at a right angle to the pipe when the gas is off). Next, shut off the water to the unit. This valve is located on the water supply line, which comes out of the wall and goes into the top of the water heater. Turn the knob to stop any more water from entering the tank.
Grab a garden hose and attach it to the drain valve on the bottom of the water heater. Roll out the hose to the street and open the drain valve. Be careful, because this water is hot.
Disconnect the flexible gas line at the gas control valve (the metal box at the bottom front of the water heater that has a temperature dial on the front and a knob on top of the box that controls the gas).
Use a large open-end wrench or a pipe wrench to unscrew the flexible copper connectors at the nipples on top of the water heater. Finally, disconnect the vent pipe from the top of the water heater and push it aside.
Recruit a neighbor to help you lift the old empty water heater down from the stand. A gas water heater must be elevated at least 18 inches to prevent heavy low-lying fumes (gas) from contacting the flame in the water heater.
Water heaters feature a safety device called a temperature and pressure relief valve (TPR), which limits tank temperature and pressure and keeps it from exploding. When you purchase a new water heater, make sure it has the TPR valve in the same general location as your old unit. In other words, if your old water heater had the TPR valve on the side, buy one with the TPR on the side. In doing this, you won't have to extend any drain lines to accommodate the new location of the TPR valve.
Your new water heater will come with a TPR valve, but you may have to install it. Just wrap the threads three times with Teflon tape and screw it in tightly with a pipe wrench.
Buy two dialectric nipples, wrap the threads three times with Teflon tape on both sides, then crank them down snugly. Dialectric nipples are galvanized, but are lined with plastic to slow corrosion between two metals. With some water heaters, you may also have to install the fill tube, which is included in your purchase. Again, wrap the threads with Teflon tape and screw it snugly into the cold water supply hole. This tube pushes the incoming water down to the burner to get hot before it can leave the tank.
Call your neighbor back to help put the new water heater on the stand. Trust me, you'll pay him back when his unit dies.
All that's left is to reconnect the fittings to the cold water supply line, the outgoing hot water line, and the TPR valve. Use a large open-end wrench or pipe wrench to screw them down snugly.
Reconnect the flexible gas line to the gas control valve. Wrap the threads of the gas fitting with gas tape, which is similar to Teflon tape, but its yellow and much thicker. Securely tighten the line to the valve using two wrenches, one to keep the valve from twisting and one to tighten the line.
Check the manufacturer's directions for the proper vent size. Four inches in diameter is typical but it may vary depending upon the heat output of the water heater. Reattach the draft hood and the vent pipe to the top of the water heater. The draft hood will slide into slits and the vent pipe will attach to the draft hood with sheet metal screws (three-eighths inch).
Open the hot water faucet that is nearest to the water heater. Go back to the water heater and open the cold water supply valve at the top of the tank. As water fills the unit, it will push out the air through the faucet that you opened. The hissing sound coming from the faucet will stop when the tank is full and water comes from the faucet. Thoroughly check the fittings for leaks and tighten accordingly.
Turn the gas back on and test for leaks by brushing a 50-50 mixture of dishwashing soap and water over the connections. If you get bubbles, then you have a leak. Tighten or reconnect the leaking joints and retest them.
Light the pilot light according to the manufacturer's directions. Usually, you turn the gas control valve to "pilot" and hold the button down for a minute as you light it. After the pilot has been lit, turn the dial to "on" and then set the dial to the desired heat setting. You'll have hot water in about an hour.
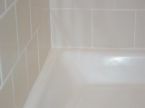 Many problems can be avoided with regular maintenance. Plenty of customers call to report they have a leak behind a shower wall resulting in a bulge.
The problem is usually not a plumbing leak. Don't get me wrong, water has crept behind the wall and seeped up the drywall. On some occasions there's a leak from the plumbing inside of the wall. However, the cause usually results from a homeowner neglecting some routine maintenance, like caulking a shower.
The drywall used in your shower is water-resistant greenboard, but it's not waterproof. When drywall gets wet, it's like an old dry sponge waiting for water. When water hits it, the drywall bloats. That's why your wall is bulging.
Homeowners often neglect to repair cracked or missing tile grout, and to replace the old caulking. Water will find its way behind your wall if you let it. Grout will crack and chip out creating a void where water can enter.
If you see a gap in the grout, fill it in. A box of grout will cost about $8. Mix it up with water and stuff it in the gap. Wipe off the excess with a wet sponge.
Caulking is meant to create a waterproof joint between your shower pan and the wall. Over time or due to poor initial installation, caulking cracks or peels away from the wall. If the drywall was installed too closely to the shower pan, the water easily will wick up the wall and cause it to bulge.
Before you apply new caulk, remove the old stuff. This can be tough because the old caulk can be as hard as concrete. My tool of choice is a thin metal putty knife (about $6), -- just don't scratch the surfaces. Work the blade under the caulk on both the shower pan side and the tile wall side. I also like a tool called a "grout getter". Although it is intended to remove grout, it works well to scrape caulking off of ceramic tile.
Sometimes the old caulk will come out in one strip, and sometimes you have to ram the blade into the caulk to break it off. You can use alcohol to clean the surface thoroughly after removal.
I use a mildew-resistant silicone bathroom caulk (about $3 per tube) that remains flexible.
After you load the tube in the gun (doesn't this sound exciting), use a utility knife with a sharp blade to cut the nozzle near the tip at a 45-degree angle. The opening should be about one-eighth of an inch. Make sure the cut is smooth with no burrs on the tip or your bead of caulk will have grooves in it. Use a long nail or a piece of wire and stick it down the hole to punch through to the caulk.
The key to a good-looking bead of caulk is applying it consistently. You want a bead that doesn't change much in size or shape.
Start at one end of the shower pan and continue all the way around with no stops in between. Use slow and steady pressure on the trigger. You may have to twist the gun or change the angle to get the right look. Once you have the right look, keep a steady hand. I usually caulk the vertical seams first, if they need it.
The last step is smoothing out the bead of caulk. Do this before the caulk has had time to skin over. Wet your finger and lightly drag it over the fresh caulk without stopping. If you have used too much caulk or too much pressure smoothing it out, you will push it out and have excess to clean up.
 It takes some intestinal fortitude to cut a hole in the side of your house. How do you know where to cut the hole for a pet door installation? It's a combination of an educated and common sense guess. Here are some ideas on how to make the project go smoothly.
First, make sure you buy the right door. The easiest to install are doors made specifically for going through a wall. When you cut a hole in an exterior wall, you will have insulation to contend with. These kits have pieces that span the opening from drywall to stucco. They also keep the insulation in place, as well as give the door a clean appearance.
Some people buy pet-door kits made for installing into a door, and then build a box to slide into the hole in the wall. This is OK so long as you use a material that will stand up to the weather and the pet. A laminated material, such as melamine, works well.
Cutting a hole in your house is scary. The idea is to place the opening in a spot that is convenient for you and your pet, yet does not run into electrical cables, plumbing, and other hazards.
Look at where outlets run and where switches are located. If you are placing a large pet door between two outlets, you will likely find an electrical cable (you may be OK if your pet door is small and is located low on the wall). Generally, a safe place is near a door, but not so close that you will run into the door frame. Use a stud sensor and mark the locations of the studs.
You also want to avoid areas under windows. There will be more lumber in the way under the window openings, so find another spot.
When you find a potential spot, you can cut a small access hole in the drywall and take a peek inside to see if there is a cable present, or you can mark the template on the wall and cut away. If you do run into a cable, you will need to route it around the pet door. This is a matter of installing junction boxes and running the cable up and over the pet door opening.
If you cut the opening in between studs, you won't need to frame the opening (unless the pet door manufacturer specifies so). If you have to cut through a wall stud (avoid this if possible) then you should frame the opening and install a header in the opening to support the stud you had to cut.
Most doors will easily fit in between studs, so just position it correctly and avoid all the extra work.
Generally, the pet door is installed so that the pet's shoulder is level with the top of the door. Make sure the template is level and trace around it.
Use a drywall saw and cut shallowly to avoid cutting through a cable. Use a utility knife and cut through the insulation so that the opening is square and clear of debris.
You want the opening on the outside of the wall to be identical to the opening on the inside of the wall. Drill holes at the corners of the exterior side of the wall to match the location of the corners on the inside of the wall. Mark lines to connect the holes. Use a circular saw with a Carborundum blade to cut through the stucco and wire, and then a saw to cut through the wood sheathing. You should be left with a nice hole in the side of your house.
Like I said earlier, if you didn't buy a wall kit, you can build a box out of melamine and fit it to the hole. If you do have a wall kit, assemble the pieces and push it into the opening in the wall. Simply connect the two trim pieces with flaps on either side of the box and screw the whole mess together. After everything is nice and tight, caulk around the perimeter of the trim pieces to hide any gaps.
You can also cut a piece of indoor/outdoor carpet and glue it to the bottom of the wall kit. Maybe Fido will learn to wipe his feet before he comes into the house.
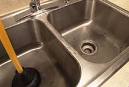 So you've tried chemicals and no luck. You've tried to plunge the sink, and still no luck. Now you're thinking about what I like to call "sink fishing"...read on.
The average clogged sink can be cleared very quickly, but be forewarned: it's a messy job.
First, remove as much water from the sink as possible, and then place a bucket under the P-trap (that's the U-shaped pipe under your sink where your jewelry will hopefully end up should it fall down the drain). Unscrew the slip nuts on the trap, give a slight pull and fill the bucket with the water that is left in the sink and tailpiece (the section of pipe that runs from the bottom of the sink to the P-trap).
The trap will likely be filled with debris, which you need to clean out. The tailpiece will also have debris hanging out of it which needs to be removed. Reinstall the P-trap and run some water. It should drain with no problems.
Incidentally, many times a clog will start with slow draining water. Don't get lazy and let it turn into a full-blown blockage. When you notice water draining slowly, it is best to clear the clog while it's still relatively easy to do.
Had the clog been past the trap and into the drain line, you would have needed a hand snake (also known as an auger). A 25-foot snake comes coiled up in a pistol-grip housing for under $20 at a home improvement store. The end of the snake resembles a corkscrew and grabs debris in the drain line.
Anyway, with the trap removed, loosen the locking screw on the snake and slowly feed the flexible cable into the drain line until you meet with resistance. This will either be a bend in the pipe or the blockage.
Next, tighten the locking screw on the snake, crank the handle clockwise, and push. If you can get past the resistance, it is likely a soap clog or a bend in the pipe. Whenever you feed the snake through the pipe, you must loosen the locking screw in the cable. When you finally do encounter resistance that you cannot push through, tighten the locking screw on the snake and crank the handle on the snake clockwise. This will snag the clog in the corkscrew end and allow you to pull out the blockage.
I suppose it's a little like fishing. Waiting and feeling for the right moment to pull and the anticipation of seeing what the lunker looks like when you finally bring it to the surface.
What is really gross though, is when you finally pull the clump of debris out of the drain line. It's a sight, and particularly a smell, which would make any medical examiner run. Let's hope fish never smell like this.
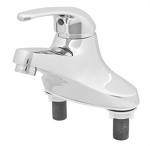 Faucet installations can jolt your bathroom into the modern age in about an hour.
Start by turning off the water at the hot and cold valves under the sink, then test that the water to the faucet is off.
Next, disconnect the water supply lines from the faucet. I suggest you wear safety glasses if you have to lay on your back to access the water supply nuts. I know wearing safety glasses sounds silly, but many times the corrosion around the nuts will flake off and land right in your eye.
If you're lucky, you can unscrew the nuts with a small crescent wrench or pliers (each about $5). If there is no room for a wrench, or even your hand, you'll need a basin wrench (about $10). This tool has a long handle with self-closing jaws, and is made for getting into tight places. Secure the nut in the jaws and unscrew. Repeat for the other side.
After you clean up the water that has spilled, loosen the screw that holds the sink stopper handle to the extension rod and pull out the handle.
Next, loosen the lock nuts that hold the faucet to the sink. It's the same deal as the water supply nuts, except that these nuts are bigger, and can often be removed by hand. Once the lock nuts are gone, pull the old faucet straight up through the holes and discard it.
A new faucet will typically attach to the sink by using the same fittings as the water supply lines, or it will have separate bolts coming out of it that will hold it to the sink using metal plates. If the faucet has separate fittings, wrap the water supply fittings three times with teflon tape. It's easier to wrap the fittings standing up than it is lying on your back.
Center the faucet on the sink and secure it using the locknuts or metal plates (whichever came with the faucet). Make sure the water supply fittings are wrapped with teflon tape and screw the nut on the fitting (make sure the hot water supply line is attached to the faucet's hot water side and vice versa). Turn the water supply valves back on and test for leaks. If it leaks, it will likely be where the water supply connects to the faucet's fitting. In this case, give the nut another quarter turn until it stops leaking.
Replacing the drain flange and pop-up assembly can be even easier because there is no water pressure.
First, loosen the slip nuts on the P-trap and drain the water out of the trap. Remove the pop-up pivot lever by loosening the retaining nut. The pivot lever attaches the pop-up stopper in the sink to the pop-up handle on the faucet -- it makes the stopper go up and down.
Next, loosen and remove the lock nut on the underside of the sink. Also, remove the gaskets between the lock nut and the sink. The drain flange may lift right out, or you may have to unscrew the tailpiece assembly from the drain flange.
Once the drain flange has been removed, scrape the old plumber's putty out of the sink's drain hole and clean the area.
Take the new pop-up assembly and place a ring of plumber's putty (or silicone caulk, depending upon the manufacturer's recommendations) under the drain flange. Place the assembly in the sink's drain hole, and place the sealing gasket under the sink. Slip the retaining washer under the gasket and screw on the lock nut behind the washer. Don't fully tighten it yet.
Align the hole for the new pop-up pivot lever with the pop-up stopper handle in the faucet, then finish tightening the drain's lock nut. Insert the new pivot lever, making sure it connects with the new pop-up stopper, and tighten it down with the retaining nut. Attach the pop-up handle extension to the pivot lever and adjust if necessary.
Finally, reconnect the P-trap by tightening the slip nuts. Use a rag to wipe away the plumber's putty that will have squeezed out from tightening the drain flange.
A leaking shower is enough to make you pull your hair out. Typically, the cause is a shower cartridge. A shower cartridge is about the size of a roll of nickels, and has holes and rubber washers all around it. It is located in the shower valve, which is in the wall, but it is easy to access. It will take about 30 minutes to fix, but will save lots of water as a result.
If you have to pull out the knob to start the flow of water, the replacement cartridge will cost about $20. If you simply turn the knob from side to side, the cost is about $45. You can find replacement cartridges at most home centers, but if they don't have your particular type, try a plumbing supply store.
Now, let's get to the repair. First, shut off the main water supply to the house. Open a faucet to let out the water pressure, then move to the shower.
Using a small, standard screwdriver, gently pry off the shower knob cover. Under this cover is a screw that holds the knob onto the cartridge. Remove the knob.
Next, you'll find the valve body, which covered by a decorative escutcheon. Remove the escutcheon by gently pulling it straight out.
A retaining pin holds the cartridge in the shower body. This pin will have a nub sticking out of the top of the shower body. Grab a pair of pliers and pull it straight up.
The only thing left to do now is remove the actual cartridge. I recommend that you get your hands on a cartridge remover, which costs about $10. You also can try your luck with pliers, however, the cartridge- removing tool is made just for removing cartridges.
Place the larger, hollowed end of the cartridge remover into the shower body and over the old cartridge. Tighten the screw on the end of the tool. This screw fits into the hole where your shower knob was, and it locks the tool into the cartridge. When the ears of the tool are engaged with the ears of the cartridge, turn the tool (and consequently the cartridge) to break the cartridge free from years of torment. The cartridge will pull straight out.
Install the new cartridge simply by pushing it into the shower body with the ears in the 12-and-6 position. Push it in far enough so that when you replace the retaining pin, it slides completely into place and locks the cartridge in place.
Next, turn the water back on and make sure there are no leaks. Replace the escutcheon and the handle.
Now, test to make sure that the hot water side is hot and the cold water side is cold. All you need to do is remove the shower knob, take a pair of pliers and rotate the stem (the part of the cartridge that the shower knob screws into) 180 degrees. The cartridge stays put, but the stem is free to rotate. It's the knob and the escutcheon that restrict the movement of the stem.
I'm amazed at the number of people who believe this reversed-temperature problem means that they'll have to re-plumb their shower. Maybe the next time someone presents this problem to me, I'll grimace, shake my head, and ask them for a calculator. Once I see the sweat pouring from their heads, I'll let them in on the easy fix.