Install A Microwave Hood
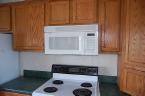
Here is an easy way to add 3 square feet of counter space to your kitchen...remove the old microwave from the counter and install a microwave hood above your range. You won't have to change any cabinetry because microwave hoods and vent hoods are uniform in width.
Plan on spending at least $250 for a low-end microwave hood, and about 1 1/2 hours to install it.
First, you'll have to remove the old range hood, then unplug the electrical cord in the cabinet above the hood. Next, unscrew the four screws (or less if the original installer got lazy) that hold the hood in place (usually one at each corner). Support the hood as you do this.
Your new microwave will come with a paper template, which you'll tape to the wall and to the underside of the cabinet where the microwave will be mounted. The template shows where to drill holes in the wall to fasten the mounting bracket that supports the microwave. Under the cabinet, the template shows where to drill holes to allow the cord through and the location of the height adjustment screw.
There are two types of mounting brackets. One has "arms" on either side at the top, which the microwave slides onto. The other has a channel at the bottom that the base of the microwave rests in, and is fastened with the height adjustment screw. Whichever bracket you have, you'll have to secure it to a wall stud.
This is easy because a stud finder (about $10) will pinpoint the location. Mark the location on the template and pre-drill the holes according to the manufacturer's instructions. The rest of the bracket will be held to the wall using toggle bolts (molly bolts), which are included in the package.
Insert the bolts through the holes in the bracket, then twist on the toggle nut just enough so it doesn't fall off. Push the toggles through the pre-drilled holes in the wall. As you turn the toggle bolt with a screwdriver, you'll have to pull outward on the screw to engage the toggle and tighten the bracket to the wall.
If the stud doesn't line up with one of the corner holes, secure the bracket to the wall stud using a wood screw (it's also included) into one of the holes in the bracket that aligns with the stud.
If you have ductwork to connect the hood to, use sheet metal screws and foil tape. If there is no duct work above the hood, you'll be installing the microwave range hood so that it recirculates the exhaust, which is a fancy way of saying that it blows it back into the room. However, there is a charcoal filter that the exhaust passes through before it is recirculated.
The microwave range hood comes ready for attachment to a ducted system. If you have a ductless system, you'll need to remove the blower and turn it according to the manufacturer's instructions (don't worry, it's a matter of four screws).
Once the blower is oriented, attach the microwave to the bracket. This is awkward because you'll have to thread the power cord through the hole in the underside of the cabinet while you support the microwave. There is a temporary pin that will hold the microwave in place until you permanently fasten it to the bracket and the cabinet. It's much easier to have a helper support the microwave while you stick in the pin.
Make any final adjustments to the microwave then, while supporting it, remove the temporary pin and insert the height adjustment screw. You can close any gap between the top of the microwave and the bottom of the cabinet by tightening this screw.
Now you're ready to plug in the hood and program the time.