 A water heater that starts out with hot water and gradually cools to luke-warm water can have many possible causes, from high usage to an undersized tank to a plethora of other water heater maladies. One of the possibilities that most homeowners don't consider is a damaged dip tube.
A dip tube is attached to the cold water inlet and forces the incoming cold water down to the bottom of the tank to get hot. Hot water is more buoyant than cold water and therefore it rises to the top of the tank and exits to your shower. If the dip tube is broken or cracked, the cold incoming water can't get to the bottom of the tank to get hot, and instead mixes with the warm water at the top of the tank on its way to your shower. You would typically start with a nice hot shower and, fairly quickly, the water would get cooler.
The fix here is to replace the dip tube. You will need to remove the cold water inlet nipple and pull out whatever is left of the dip tube and insert a new one.
As usual, you need to consider the age of your water heater. It may not be worth it to spend the money to repair your old one rather than replacing it with a new water heater. I've seen many instances where a homeowner spent a couple hundred dollars to repair an old water heater, and then the tank leaks the following month. You may want to bite the bullet and apply the money towards a new one.
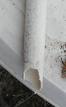
 This picture is from a customer's house. This is a plumbing pipe repair from someone that I'm guessing has never done plumbing before. The reason I say that is because the repair looks like it was done by someone with a knowledge of arts & crafts rather than a knowledge of plumbing.
I can only guess that the pipe was leaking and instead of replacing the section of pipe or replacing a damaged fitting, the homeowner bought some type of a fiberglass repair kit or maybe a paper-mache kit and wrapped wet strips around the damaged pipe...then crossed his fingers. It looks like after the material hardened he turned the water back on and didn't see any geysers. However, it appears the fiberglass/paper-mache repair just diverted the leak where he couldn't see it any longer. The drip or leak at that point turned into a nice rusty section of the piping. There really are so many ways to get information on a repair, even if you don't know anything about it (one is this website), there is no excuse for something like this.
The story ends with the homeowner becoming a casualty of the foreclosure market. Enter the new homeowner who bought the house "as-is" and now has some repairs to take care of.
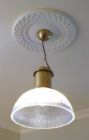 I have a customer that removed a can light (aka recessed light) and wants to install a hanging light fixture in its place. She is stumped because the decorative cover for the hanging light isn't big enough to cover the hole left by the larger can light. She called for an estimate on doing some drywall repair so that the cover of the new light fixture would cover the old hole.
As a Las Vegas handyman, of course I could repair the drywall, but I suggested she look at a ceiling medallion to take care of this. A ceiling medallion is a decorative plate that covers the hole. They come in all flavors, large and small. Pick one that fits your taste and stick it to the ceiling. They can be painted to match or contrast whatever you like.
Medallions are a great way of drawing attention to an otherwise boring ceiling or light fixture. For the most part, medallions are inexpensive and easy to install. They are made of plastic or polyurethane and may be painted. They usually come in one piece, which means you will have to take the light fixture down only to reinstall it again. Others come in two halves. You can then screw it to the ceiling, patch the holes and paint it.
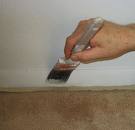 Painting is a great way to spruce up a room. Even painting just the baseboards can make a great change to a room. Just painting them a different color or sheen can really add some sparkle...and it's relatively cheap. There is always a little apprehension when painting around carpeting. How do you paint the entire height of the baseboard without getting paint on the carpet?
There are several ways to protect the carpet as you paint...drop cloths, plastic, paper etc. The trouble comes when the carpet meets the baseboard. You can use a large putty knife or broad knife and push the carpet down to get access to the bottom of the baseboard, but when you remove the knife the carpet tends to settle back to the baseboard and get paint on it anyway. If you try this, know that you must wipe off the putty knife after each time. It tends to accumulate paint and you will get paint on the carpet anyway.
So the best solution is to keep the carpet away from the wet baseboards until they dry. You can use 2 inch masking tape and run a strip loosely along where the carpet and baseboard meet. I say loosely because you want to let the edge of the tape touch (but not stick to) the baseboard about a half-inch up on the baseboard. You will take a putty knife and push the tape in between the carpet and baseboard and then pull the other side of the tape towards the middle of the room. Then secure the tape to the carpet by pushing it down onto the carpet. The finished product will leave a "V" shape as the carpet is pulled away from the baseboard via the tape. Just remove it after the paint is dry.
 Most people can can easily turn down the temperature of their water heater. It is safer and more efficient. Most of the time, after you get a new water heater, you never look at it again until you notice water running down the driveway years later.
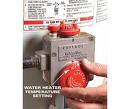
Turning down the temperature will accomplish several things. First it will lower the risk of scalding, which is a concern with small children in the house. Not only is there a risk of turning on hot water at a faucet, but also when they see a hose faucet attached to the base of the water heater. I've heard stories of kids getting scalded when they open the water heater's hose faucet.
You will also save energy by lowering the temperature. The lower the temp, the less the unit has to run to keep the water heated at the higher temperature.
High temperatures will also cause the tank to fail. High temperatures cause a more rapid accumulation of sediment and they speed up chemical reactions. The rusting reaction is accelerated by heat. Also, when water is heated, it expands slightly which could cause the glass lining to crack and flake.
The answer is to simply turn down the thermostat. It is the big dial on the front of water heater near the bottom. You will have settings from "vacation" to "high". Start at the setting just above "vacation" (usually labeled "A") and slowly raise it until it the temperature is sufficient for your needs.
 This is one of the most common calls I get as a Las Vegas handyman, and it really is difficult to get people to believe that they can solve this problem by themselves. Typically, all you need is your index finger.
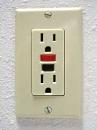
There are safety features in your home's electrical system. If you have electrical outlets near wet locations (bathrooms, kitchen, garage, exterior of the house), you should have Ground Fault Protection.
A Ground Fault Circuit Interrupter (GFCI) is a safety tool that protects against electrical shock caused by a faulty plug, cord or appliance. It senses small changes in electrical current and can shut off the power faster than you can blink your eyes. But all kidding aside, a GFCI could save you from a potentially deadly shock.
The GFCI receptacle has two buttons in the middle to periodically test that it is functioning properly. One button is labeled "test" and the other is labeled "reset." When you press the test button, the power to that receptacle should shut off immediately. To restore the power, depress the reset button. The power to additional receptacles may also shut off if they are downstream of the GFCI, that is, if they receive their power from that particular GFCI. In this case, those additional outlets should be labeled "GFCI protected outlet," but this is not always the case.
So, the fix here is to reset the GFCI outlet by depressing the "reset" button. Realize that the GFCI outlet in question may not even be located in the bathroom, but rather in the garage, the kitchen, on an exterior wall, etc...so look around until you find it.
You may have GFCI protection even though you don't see a GFCI outlet. In your home's main electrical panel, there may be a GFCI circuit breaker. This breaker has a test switch on it to ensure that the outlets in the circuit are operating properly. If this is the case at your home, the circuit breaker will trip to a middle position. Just turn it off and then turn it back on.
You will have to figure out why the GFCI outlet tripped. You may want to unplug whatever you have plugged in to the circuit and then eliminate possible sources.
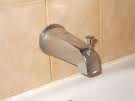 I got a call from a homeowner that he had a shower leak and that his shower wasn't working. The shower was working fine, but the shower diverter spout was letting all the water spill out at his feet. A very typical handyman job.
His shower is actually a tub/shower combination. So when he takes a bath he just turns the water on and fills the tub. When he wants to take a shower, he pulls up the little knob on the end of the tub spout diverter. This stops the water from flowing out of the tub spout and shoots it up a riser pipe to flow out of the showerhead. The problem was that the internal gate, which is attached to the knob, wasn't stopping much of the water, and so he got very little water out of the showerhead.
Although you can buy the parts to repair the tub spout diverter, you are better off just replacing the entire diverter. It costs about $15.00 and will save you some time. Rather than fiddle around with getting the gate out of the corroded diverter, bending it or breaking it anyway, just replace it. The spout will be attached to the end of the pipe by either a threaded fitting (just unscrew it), or it will be attached to a bare copper pipe with a setscrew.
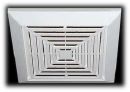 A customer called and said that he bought a foreclosed house. One of the many items wrong was that the bath exhaust fan didn't work. After many questions, I learned that the fan and light are operated by a single switch. So, when the light switch is turned on, the exhaust fan comes on with it. A bath fan replacement is not always necessary, so try to isolate the problem.
Many people get frustrated with the amount of noise these inexpensive fans can make. Consequently they want to quite the noise by unplugging them. It's just that simple. So, if you are suffering from a lack of ventilation in your bathroom, you might just check to make sure the fan is still plugged into the outlet in the ceiling. Just pull down the plastic cover and follow the motor's cord to see if it is still plugged in.
If the motor is pluggin in and it still doesn't work, test the outlet to make sure the motor is getting power. If the outlet is getting power, but the motor still won't run, replace the motor. If the outlet is not getting power, you will have to track down the source of the problem. It may be that the outlet is bad or that a wire is not connected.
 It may not be tonight, but it's coming. That time of year when we get a short period of freezing temperatures. Its good for business but a real headache for homeowners. Which brings me to the topic of today's post. Insulate your exposed exterior piping. The most common occurrence in a freeze is that the piping and/or pressure vacuum breaker (or anti-siphon valve) freezes and splits open. The piping is typically PVC and the pressure vacuum breaker (PVB) is brass. As water freezes it expands...and the strength of this is phenomenal. Freezing water will easily split brass or copper piping. You have to try to keep them warm.
Manufacturers make heat tape which is plugged into an electrical outlet that warms up and protects the piping. With heat tape though you can't wrap it on itself, it can only make contact with the pipe.
In my climate, I use typical pipe insulation to protect the pipes and the pressure vacuum breaker. You can open the insulation up and cover various areas on the PVB and then tape everything together.
You can also buy covers that are made of a Styrofoam material and then place this directly over the PVB assembly.
In a pinch, you can drape the entire assembly with a towel and then cover that with a plastic garbage bag. The towel will help keep the cold off of the assembly and the plastic garbage bag will keep it dry (and prevent it from freezing) if it rains. This makes for cheap but effective anti-siphon valve insulation.
As it gets colder outside, the importance of s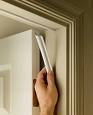 ealing air infiltration openings in your home grows. The same holds true for the heat of summer. The more the temperature grows away from our comfort level, the more important it is to keep the conditioned air in our living space. Weather stripping is very important for this and it is one of the most overlooked items in the house. Here is a decent article that discusses some low-cost improvements to your home to help keep the warm air inside and the cold air out.
Along with replacing the weather stripping around the doors, also replace the sweep on the bottom of the door. This is usually a rubber or vinyl piece that rubs on the threshold for a positive seal against the outdoors.
Weatherstrip comes in a few different flavors. Much of it is a peel-and-stick foam. However, this is cheap and doesn't last for very long. I prefer the style that actually pushes into a groove around the perimeter of the door. It is shaped like the letter "V" and has a barb that pushes into thesaw kerf around the door. Installing weatherstripping is very easy. You can read about it here.
For the door sweep at the bottom, there are also different styles. A grooved sweep gets pushed into grooves on the underside of the door-it too has barbs to hold it in place. Another kind gets stapled to the bottom of the door. Then there is a retro-fit style that is shaped like the letter "U". It simply slides along the bottom of the door and gets screwed to the inside. The nice feature of this one is that it is adjustable and also comes in several colors.