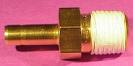
 Plumbing leaks are the scourge of home repair. Invariably, you get small leaks at the connections where two pieces of threaded piping or fittings meet. Some homeowners know to use Teflon tape and some don't. Teflon tape (or Teflon paste) fills the little nooks and crannies where the threads connect.
Screwing the fittings together without Teflon tape typically results in a leak. Water will always take the path of least resistance and find a way out. The Teflon tape fills these small voids and stops the water from leaking out. But there is a right and wrong way to apply the tape.
The right way is to wrap the threads in the same direction that the fitting screws on (clockwise). Wrap the threads clockwise and overlap the tape upon itself so that there are several layers with no gaps. The general rule is to wrap the threads three times.
After you wrap the threads, hold the tape to the threads and pull to break the tape. Then take your fingers and, pinching the threads between your fingers, rotate them clockwise to push the tape into the grooves of the threads. When you screw the fittings together, the tape will lay down (because you wrapped them clockwise), and will provide a smoother surface to screw against.
For gas fittings, you can use yellow Teflon tape, which is thicker and made specifically for gas connections.
 It's late at night and your water heater tank is leaking. You are mad not only because you have a mess on your hands, but because the water heater is only 3 years old. Shouldn't this be covered under warranty? Probably. You will have to do a little research first.
Generally, the minimum warranty on a water heater has been 6 years. However, builders have been known to install inexpensive units that have lesser warranties. Even homeowners can now buy a water heater at some home centers that carry only a 3 year warranty. They cost less, but I wouldn't want a flood in my garage every 3 years either.
On the side of the water heater is a sticker with the model number and serial number of the unit. You will need this to verify a warranty. As for contacting the manufacturer, you may get lucky and see a phone number on the water heater to verify the warranty. Some manufacturers also can verify a warranty on their website. As a last resort, look in the yellow pages under "water heaters" and you can find companies that service various brands. They may help you out. Generally, you are forced to jump through a few hoops to get a free water heater under a warranty claim. I guess they don't want to make it too easy to stick them for a freebie. It sometimes isn't entirely free either. The distributor for the manufacturer will often charge a "re-stocking fee" or a "service fee" to cover their expenses. This fee usually ranges from $45.00-$85.00.
A distributor will generally have you peel off the sticker on the side of the tank that has the model and serial numbers, and bring that in. For brands that are carried by home centers, you often have to bring the entire water heater into the store.
The warranty will generally not pay for installation of the new water heater. You will have to install it yourself, or hire someone to do it for you.
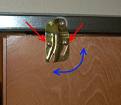 Have you ever had a sliding closet door or a sliding shower door drag so badly that you almost couldn't move it? Well your about 10 minutes away from fixing it. These types of doors hang from a header and have a divider at the bottom that keeps the doors from swinging in and out of the opening.
The tops of the doors are mounted to metal rollers that sit in the track of the header. Although the rollers sometimes break, the vast majority of problems with these types of doors can be fixed with a door adjustment.
Break out your screwdriver and start snooping at the rollers. Usually, the door needs to be lifted and tightened at the roller. So just loosen the screws that hold the door to the roller assembly and lift the door to the point where it is level and re-tighten the screws. Test it using the one-finger test. If it still gets hung up, adjust it up or down until it rolls smoothly.
Sure, you could go crazy with cleaning and lubricating the wheels, or even replacing them. You will typically find more nastiness with shower rollers due to the addition of water and corrosion, so you will have to replace these far sooner than closet door rollers.
 Toilet repair is an everyday part of life for me. Today I ran what I consider a very easy repair. The toilet handle wasn't working. This usually means that either the handle is so loose that it won't lift the flapper to allow the water into the bowl, or the flapper has become disconnected from the handle. Either way, it is a 30 second fix.
If you go to flush the toilet and the handle nearly falls out of the tank, lift the lid off of the tank and set it aside. The handle is held in place by a nut that you can tighten by hand. If the chain is laying at the bottom of the tank and disconnected from the handle, simply reach into the water (this water is clean) and reconnect it to the handle. You may have to estimate which hole in the handle to hook it into, but try one a flush the toilet...if it's not the right hole try another one until you get a good flush.
It may be that the handle is loose because the nut that holds it to the tank is corroded and broken. For under $10.00 you can buy a new handle. Feed it through the hole in the tank and tighten it down. Then just adjust the chain to the toilet flapper to get a good flush.
 If you've ever run your dishwasher and had water end up on your countertop, you might look to that little nubby cap sitting on your sink. It's called an airgap, specifically a dishwasher airgap.
When a dishwasher drains, the waste water flows up the drain line to the airgap and then down to the garbage disposal where it joins your kitchen sink's drain piping. Typically, the airgap backs up when there is a blockage leading to the garbage disposal. Either the hose that runs from the airgap to the disposal is plugged or the knockout plug in the garbage disposal was never removed (this is common with a new disposal installation).
The fix is to disconnect the hose where it meets the disposal. If you stick your finger in the nipple of the disposal and it meets with the metal plug, remove it by tapping on it with a screwdriver and a hammer, then pull it out with your fingers. If the plug has already been removed, use a long screwdriver or a metal hangar and snake it up the hose to pull out the debris. You can stick the end of the hose in a 5 gallon bucket and run a "rinse and drain" on your dishwasher to blow out the remaining debris. Then you can reconnect the hose and run a load of dishes.
 We have all been in the shower on a cold night basking in the warmth of the hot water...as it runs down the drain of your shower plumbing. It might feel good, but it sure wastes a lot of water. Shower heads can't exceed a per minute gallon volume of 2.5 gallons. Well many manufacturers have gone well below that, although they sure don't feel as good as 2.5 gallons per minute.
I recently bought a 1.6 gallon per minute shower head and it sure is stingy with the water. You know how most shower heads have a ring of holes around the perimeter? Well this on has one large hole in the middle of it. As it runs you can hear a loud "whirring" of what I imagine is a propeller of some sort. This shower head doesn't really spray water on you, rather it spits it on you. That sure doesn't feel as good as a spray.
I do like it for one reason though. If my teenager takes her usual 30 minute shower, I save approximately 27 gallons of water... each night. Assuming she showers nightly, 27 gallons x 365 days =9,855 gallon of water saved each year. I pulled a recent water bill, and with the water company's tiered pricing based on consumption, the water company charged me an average of $1.94 per 1,000 gallons of water. So, if I multiply my 9,855 gallons I saved by the cost of the water, I saved $19.11. Since I only paid $15.00 for the shower head, my break-even was about 10 months.
Of course, in my shower I still have the 2.5 gallon shower head...I like the feeling of the spray.
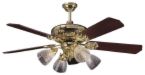 Most people wouldn't consider using a ceiling fan in the wintertime since ceiling fans are only for keeping us cool in the summer right? Wrong! Most ceiling fans have a "reverse" switch on them to allow the blades to reverse their direction and circulate the warm air residing at the ceiling. Ceiling fan direction is important for maintaining comfort.
If you look at the blades, you will see that they are pitched. This allows the fan to push the air down to the floor in the summer or pull the air upwards in the winter. Since warm air rises, this updraft circulates the warmer air throughout the room.
Some manufacturers vary with their terms of forward and reverse. If you stand directly below the fan and turn it on, the blades should run counter-clockwise in the summer and clockwise in the winter. Also, you can run the ceiling fan on high. If you feel the flow of air blowing directly on you, that is good for the summertime as it creates somewhat of a wind-chill effect. For winter use, reverse the fan's direction and the blades will carry the air upwards along the ceiling and down the walls to recirculate the warmer air throughout the room. Ceiling fans are useful year round.
 Installing a gas water heater requires a high level of attention to detail.
This morning in Cape Cod, MA a house completely burned and the tenant received 2nd degree burns, but is expected to live. Yesterday, a new gas water heater was installed at the property and the tenant noticed a gas smell soon after it was installed. The fire is still under investigation, but the fire department is "looking" at the water heater as the cause. You can read the story here.
As of now, there is no telling if the water heater was defective in some way, or if it was incorrectly installed. This is a good time to revisit the importance of testing the gas connections of the installation.
When you connect gas fittings, you should use yellow gas tape (as opposed to the white teflon tape) and tighten snugly. Test the fittings by applying either soapy water or a specific gas testing solution, which can be purchased at most home centers. It is a little thicker than the water and will allow you to see a slow leak.
You can read the specifics on installing a water heater here.
 Its time to hang your holiday lights, which isn't really a home repair, but is is a job for a handyman in Las Vegas, but you get to stand on a ladder anyway. Hanging holiday lights isn't really difficult, but doing it the first time takes a little more legwork than it will in subsequent years.
For a home with eaves, that is, an overhang, I suggest using plastic hangars, which can be purchased at a home center for less than $5. These are small clips that have a nail driven at an angle through them. Nail these to the inside bottom of the fascia board so they can't be seen. If you space them about 18 inches apart, you can get the cord to pull taut and all of the lights will face one direction. This is a very professional look. The other nice thing is that the lights are easy to take down, and next year you can hang them in half the time.
For a home without eaves, you can get the same look by using electrical cable ties, which cost about $3 per bag. These are the same type of ties that police officers use to handcuff criminals. Although the ties are plastic, they are very strong and can be used to cinch the cord.
Without an overhang, however, you won't have the luxury of choosing where to put the cord. If you hang it in the holes in the drip edge of the roof, just pull the cord tight, making sure the lights are facing the direction you want, then tighten it down. The only bummer is that when you remove the lights, you'll have to cut off the ties. If you can't find any holes, use clothespins to hold the cord at the edge of the roof tiles. Of course, the line will not be as tight, though.
Before you break out the extension ladder, the general rule is that the feet of the ladder should be placed a distance away from the wall of 25 percent of the height of the ladder as it rests on the wall. So, if your ladder is 10 feet tall, set the base 2 1/2 feet away from the wall.
A word of caution: When you're up on the ladder, keep your weight centered over it and don't stretch to reach the last hook. Instead, climb down and move the ladder over. I have a neighbor who broke his hip in a fall off a ladder; it could have been prevented if he had just climbed down and moved it.
Some people like to decorate even more and illuminate their garage door with halogen lights. This practice often results in several calls for help with electrical problems.
Typically, the only problems are due to circuits that are overloaded. If you're going to use a large display, spread the load over several circuits instead of just one. You'll know a problem exists when a circuit breaker in the main panel trips and shuts off power to the entire circuit.
The electrical outlets you'll use to power the display should be GFCI (ground fault circuit interrupter) protected. This prevents some dangerous situations by shutting off power when a ground fault is detected. If you'll be using extension cords, inspect them first to make sure they are in good condition and well-insulated.
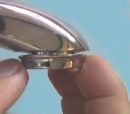 There are many times a frustrated homeowner will call needing some type of faucet repair for low pressure.
This is one of those cases where you have to isolate the problem. Yes, you might end up having the faucet replaced, or a valve, or a cartridge, or a stem, etc. You're thinking big dollar signs now right? Well I would ask you some questions before I started to worry (this quick fix will typically solve 90% of low-pressure problems in bath faucets).
Here's how the dialog usually goes: (and I will be interrupted many times throughout the conversation...please, just the facts, Ma'am)
Me: "Is the problem isolated to this particular faucet?"
Caller: "Yes, but"...
Me: "Do you notice low pressure at both the hot side and the cold side when they are turned on separately?"
Caller: "Yes, but"...
Me: "Try removing the aerator to see if that makes a difference".
Caller: "The what?"
Me: "The aerator. It's that thingy at the end of your faucet's spout where the water actually comes out".
Caller: "OK, how do I get it out?"
Me: "You grab it with your fingers and unscrew it"
Caller: "That's it?"
Me: "That's it"
Actually, removing the aerator is only half the battle. Then it is going to take you another 5 seconds to clean out the gunk caught in the screen, and an additional 2.7 seconds to screw it back into the faucet.
Now some people will want to make a project of cleaning the aerator. Just dump out the debris and maybe poke out the gunk in the screen with a pin. If you want to get really fancy, you can soak it in vinegar or CLR. Heck, go crazy and lay out $2 for a new one. It's up to you.