People will steal almost anything. We are in vacant houses 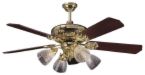 everyday and it amazes me that a thief will steal something that isn't even worth the time to remove it. Case in point: medicine cabinets and ceiling fans in Las Vegas. You've got to be kidding me.
That people would go through the trouble of removing a recessed medicine cabinet tells me they just wanted to vandalize the property. It leaves a hole in the wall and really looks trashy. A recessed medicine cabinet costs about $20.00 and I'm sure they won't be gentle in removing it and transporting it. I'm pretty sure it will end up on Craigslist for $5.00. Maybe I'm in the minority, but $5.00 just isn't worth going to jail for.
Stealing a ceiling fan, by comparison, is a little more understandable. After all, they cost in the neighborhood of $50.00 and would probably fetch $15 on the open market. We did a job that required us to replace some stolen fans and you could see where the thieves turned a 5-gallon bucket over to stand on to disassemble the fan. It must have taken them a while because they smoked many cigarettes in the process.
The thieves doing this aren't owners in trouble (although in some cases they are). These houses are being burglarized after the bank takes the property back. If I can make a suggestion to asset managers, turn the water off to the house in the garage (if the home has a separate shut-off valve). This way, the water will still be on for the landscape but off inside the home. In many cases as a parting shot, thieves will plug up a drain and leave the water running to cause a flood. It will also prevent a flood in the event a pipe freezes and breaks.
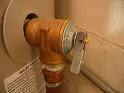 When you are done reading this, you need to check your water heater. Your water heater has a safety device called a Temperature & Relief Valve (T&P Valve). This valve is connected to a drain pipe to take hot water and pressure out of the tank. It is a vital safety device that opens if the temperature of the tank exceeds 210 degrees or if the pressure in the tank exceeds 150 psi. The drain line runs from the T&P valve downward to the exterior of the building, a floor drain, etc.
This drain line is critical for your safety. It carries away potentially scalding hot water, or highly pressurized hot water, or both, to allow cold incoming water into the tank which should prevent boiling. The diameter of this discharge line cannot be less than the T&P valve's discharge outlet and has to be made of heat-resistant material (no garden hose, PVC, etc.) The most common violation I see is that the drain line is "trapped".
This drain line must be gravity fed, i.e. it can't have any uphill rise in the pipe. This would "trap" water in the pipe and act as an obstruction for the hot, pressurized water. This water could also freeze which would be the equivalent of not having a T&P valve installed at all. A T&P valve doesn't open often, but when it does, the water and pressure inside the tank needs to make a quick exit, or the tank could explode.
In many cases, fixing the drain line is easy. Many drain lines are connected with a flexible copper line and you can bend them in such a way as to remove any uphill rise. In some cases though, you may have to replace or re-route the drain line altogether.
 My friend decided to try some home repair on his day off. He had a garbage disposal that was humming, but not working. He called me up and I told him it was jammed. I told him to use an allen wrench and place it in the hole underneath the disposal, and try to work the blades free by jiggling it back and forth. No luck.
I asked him if he knew what could be jamming the disposal.He said that he had broken a glass in the sink and that some of the broken glass may have fallen into the disposal.
There are only a couple of things that would prompt me to remove the disposal from the sink to unclog it. One is broken glass and the other is a coin, and both of these are commonly associated with children.
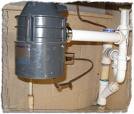
To remove the disposal from the sink, first unplug it and then remove the drain pipe jutting from the side of the disposal.This is held in place with a retaining ring that is screwed into the side of the disposal. You may also need to remove the dishwasher drain line (if you have a dishwasher). You might have enough slack in the drain line to be able to look inside, but if not remove the hose clamp and the disposal will pull free.
Set the disposal down and remove the rubber splash guard to see inside. You can use needle nose pliers to remove the obstruction. Most commonly the obstruction will be in between the blade and the wall of the disposal. Try using needle nose pliers or wedge a standard screwdriver in there to free the obstruction. You will probably want to have the disposal laying on its side so that the obstruction doesn't fall further into the unit.
Once the disposal spins freely just reinstall it back into place then reconnect the piping back to it.
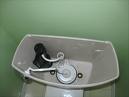 Have you ever heard the sound of water leaking in your toilet tank? A customer called on her toilet leak today. So I removed the toilet tank lid and water was running down the pipe in the center of the tank. This pipe is part of the flush valve (not to be confused with the fill valve). The toilet's flapper is also part of the flush valve. This was a simple fix of adjusting the float in the toilet tank.
The flush valve works like this: when you press the handle of the toilet, the flapper lifts off the flush valve allowing water to rush into the bowl. This creates a siphoning effect and pushes the waste down the toilet and out to the sewer. Then the flapper drops back down stopping any more water from entering the bowl. As water starts to refill the tank for the next flush, there is a little tube that runs from the fill valve in the corner, to the flush valve pipe in the center of the tank. This supplies water to refill and rinse the bowl. When the level of water in the tank reaches a certain level, the water shuts off. The fill valve will either have a hollow ball attached to a metal rod, or what looks like a doughnut that rides along the shaft of the fill valve. The ball/doughnut are hollow and as the water rises in the tank, they float on the water and shut it off at the appropriate level.
The customer today simply needed this level to be adjusted downward to shut off the water earlier and prevent it from running down the pipe. To adjust the rod/ball type, just bend the rod slightly downward. To adjust the "doughnut" style, you can simply twist the plastic adjusting screw or extend the distance from the fill valve arm. This repair should take under 2 minutes to troubleshoot and repair the problem...just perfect for a handyman in Las Vegas.
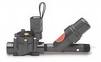
 A realtor called us today to troubleshoot a plumbing problem. They represented a bank and turned the water on to the house, but water was not flowing into the house. I suspected that the shutoff valve in the garage was not functioning.
It's pretty common when you shut off the water to a house with an old gate valve, the gate that controls the flow of water will drop down and stop the water from flowing into the house. As long as the water is on and the pressure is maintained, the gate will typically stay in place.
To get the water flowing again, you will need to replace the valve, or at least pull the broken gate out of the valve. The quick fix is to pull the broken gate out of the valve. This means that in the future, in order to shut off the water to the house, instead of turning it off at the gate valve, you will need to turn it off at the street. That probably isn't a big deal to most people.
So turn the water off at the street and put a wrench on the top half of the gate valve. The top will come off in one piece. Then reach down into the lower half of the valve and pull the broken gate out. Put everything back together and turn the water back on at the street.
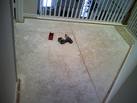
 We got a call today for a sprinkler repair...a customer was having all kinds of little geysers spray up around his desert landscape when the sprinkler system turned on. Desert landscape will have black poly tubing that supplies water to individual plants through drip emitters. These emitters deliver a specified amount of water to each plant. They are rated at gallons per hour (gph) and most commonly go from 1 gph on up, although you can buy emitters that deliver less or much more.
Drip emitters, and black poly tubing, are not glued together. Rather they are held together with barbs. The fittings and emitters have barbs and as they push into the tubing, they grip the inside of the tube to hole everything together...unless the water pressure is too high.
In this case, whoever installed the drip system didn't install a filter and pressure regulator. The pressure regulator will lower the incoming water pressure down to around 25 psi. Without the pressure regulator, the drip emitters will blow off of the tubing, which was what was happening here. The fix here was to install a filter and a pressure regulator.
Another source of the geysers are pets. Dogs love to chew on the drip lines and emitters. Try to keep the tubing buried by the landscape rock and keep the emitters close to the base of the plant.
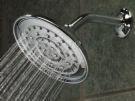 It surprises me sometimes that some people don't want to work on their own homes. Take today for instance. We were asked to install a showerhead today. To this handyman in Las Vegas, this is a very easy job, but I can understand how it might intimidate a homeowner who has never done it before.
It is merely unscrewing the old showerhead, wrapping the shower arm with Teflon tape, and screwing the new showerhead back on. Easy right? Usually.
I have had situations where a homeowner got in trouble because he wasn't holding onto the shower arm as he unscrewed the showerhead...and it either developed a leak, unscrewed it from the wall, or sheared it off inside the wall.
If you loosen it, I would completely remove it, clean up the threads on both male and female surfaces, wrap it with tape and re-install it. If the arm breaks off in the wall...start saying some prayers. You can get a pipe extractor and fish it out...you may need to put some penetrating oil on it first if it is being really stubborn.
Once you have removed the broken part, reinstall the new shower arm with teflon tape and do the same for the showerhead.
 In my job I go into a lot of other people's houses, and consequently get to see how they live. Sometimes it's amazing. I went into a house today that wasn't bad at all, but I was surprised at how people are willing to put up inconveniences that would drive me crazy.
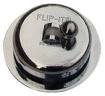
This customer had a bathtub drain stopper that was broken . Not a difficult job right? The thing I thought was funny was that she was using an old shower cap to plug up the drain. She would wad it up in a ball and stuff it into the hole. It wouldn't completely stop the water from draining, but it slowed it down enough where she had time to bathe. She said sometimes she would have to put her foot over the drain hole to help slow it. Too funny. She obviously was very tolerant. I wouldn't have lasted a day like that, but she had been doing this for 3 months!
I brought along a universal tub stopper kit and was done in about 3 minutes. This is a nifty product that has a stopper that fits any hole. It's gimmick is that it comes with many different size O-rings that you can replace to fit your particular drain hole. It simply pushes into the hole and the O-rings stop the water from draining until you throw a lever to drain the tub.
The customer was very happy, but I think she thought it would be a big project. Three months of suffering with short baths, when all it took was 3 minutes for this Las Vegas handyman to repair it.
 If you live in a 2-story house, you probably have a squeaking floor somewhere. This isn't fun to contend with, especially if your spouse is now asleep and you want him/her to stay that way. You need to either fix the squeak or develop skills like a gazelle to bound over it.
Typically, the squeaking noise can be traced to the sub flooring riding up and down on the shank of a nail. As you put your weight on the floor, the wood sub-floor travels down and squeaks. As you lift your foot and remove your weight from the area, the floor rides back up on the nail and squeaks some more.
You have a couple of options here. If you are going to replace the carpeting anyway, you can pull up the carpet from the area and screw a couple of deck screws into the sub floor. This will pin it to the joists and eliminate the movement. This is the safest way.
If you aren't planning on replacing the carpeting, you can either hire someone to stretch and re-secure the carpet back down after you fix the noise. Or, if you like some risk, you can get a nail gun and shoot a couple long nails at opposing angles through the sub floor and into the joist. You better hope there isn't a water line lurking close by though.
If you have vinyl flooring, you will likely have to get access via the ceiling of the first floor as you can‘t peel back the vinyl and reinstall it. You will probably need to cut a hole in the ceiling below and shim and glue to fill the gap and stop the movement. Then you have to repair the ceiling.
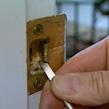 I went to look at a door problem today. The customer was saying that the door wouldn't latch. Sure enough the door swung and closed great, but it just wouldn't latch into the strike plate. The problem was that there was a large gap between the door and the strike jamb that it latches into. Maybe when it was installed, there shims weren't used to square and plumb the frame. The door frame seemed to bow out so that the door's jamb was nailed right to the rough framing without shimming it first. Anyway, through luck or otherwise, the door swung fine, but just didn't latch.
So somehow the trick is to close the gap between the latch edge of the door and the door frame, without removing the trim molding and sinking a lot of time into the repair. You could shim behind the hinges which would close the distance, but this would make it so the hinges wouldn't be flush with the hinge jamb. Not good. I would leave the door alone since it operates well as is.
The other alternative is to remove the trim covering the strike jamb and goose the jamb out towards the door. Since this is an interior door, this would work fine, but you risk cracking the trim while removing it, as well as damaging some paint in the process.
The easiest fix is to remove the strike plate and shim it outwards toward the door, which closes the gap and allows it to latch. Remove the two screws that hold the strike plate to the jamb and you can put a washer (or several washers if the gap is very large) behind the strike plate and then just screw it back in, making sure the screw goes through the center of the washer to hold it in place. You could even use several thicknesses of cardboard in a pinch...a quick repair for a Las Vegas handyman.