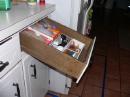
 Have you ever gone to open a kitchen cabinet drawer and the front about falls off in your hand? Well, builder-grade cabinets are built builder-grade. If you have a drawer that has a lot of weight in it, like a silverware drawer, a couple of quick pulls will do just the trick to damage it.
Children are the great destroyers of drawers. If they go to open a heavy drawer quickly, the weight of the contents slams into the drawer front. Repetition of this will cause the particle board box to start coming apart. Small children also like to open a drawer and pull themselves up on it to peek inside. It doesn't take much for the drawer guides to come loose from the sides.
Fixing these drawers is not terribly difficult. I would get some "L" brackets and, after tapping everything back in place, secure them to the corners of the box. I would secure the corners of the box with the brackets, but leave the bottom of the drawer alone as this is held in place by a groove on the inside perimeter of the drawer.
If the drawer front (the attractive wood piece) pulls off of the front of the drawer, you can screw that back together from the inside of the box. You must pre-drill the holes (not too deep as you don't want to go through the drawer front), and screw the drawer box to the drawer front.
To stop this from happening again, you might consider some child-proof locks.
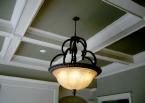 Those ceilings are very detailed and difficult to install. Although it looks like the coffers are made from solid beams, they are actually pieced together using lightweight stock.
First, plan how you want the ceiling to look. Consider how large and how deep the coffers will be and whether you will be painting or staining them. Also, make sure your ceilings are high enough and expansive enough so that the room doesn't look to cramped. Something else to cinsider is how your lighting or air-conditioning vents will look if they run through the ceiling.
The supports for the coffers will be channels that are glued and screwed to the ceiling. These will lok like an upside-down "U" and be made from lightweight stock; don't use the heavier MDF or plywood.
To build the U-shaped channel, cut the stock to the length and width of your choosing. Lay one piece flat on a worktable and then apply a bead of carpenter's glue alon gthe two long edges. Stand the two side pieces of the channel up, press them against the glue-covered ends of the piece laying flat, then use a finish nailing gun to nail along the edges to hold it together.
You are going to build these channels in three shapes: a cross, a "T" shape, and a straight section. The T-shaped channel will be attached to the perimter of the ceiling where one beam ends at another. The crosses will be installed where two beams intersect, and the straight sections will be used for support and alignment if you are using large coffers. You will decide the dimensions of these pieces based on your plan.
Lay out lines and mark them on your ceiling, so it looks more or less like a checkerboard. You should make parallel lines that match the width of the channels, so you will know exactly where to put them. You can use a chalk line for this, or if you have a projector, you can follow the lines it displays.
Apply thick beads of heavy-duty construction adhesive to the back portion of the channel and place it against the ceiling along your chalk lines. The open side should face down.
Screw the channel to the ceiling joists so that the screw sinks into the joist at least three-quarters of an inch. If you run into an area that doesn't have a joist, use 8d finish nails and shoot them in at an angle. You may not hit a joist on every leg of the channel, but once the entire ceiling is attached together, it will be very strong.
Now your ceiling will look like an afterthought, but this is where it all comes together. To close in the bottom of the channels, glue and nail long lengths of boards (the same lightweight stock or you can use a symmetrical baseboard of chair rail) to the underside of the openings. Make any cuts to the boards where they intersect with another board at a point that is not in the middle of the run. These intersections can later be covered with decorative caps.
To close in the coffers, build boxes out of baseboard to fit inside the squares that the channels have created. Miter the corners and glue them together. You can also drive a couple of brads into the corners to help the box stay tightly together. This baseboard box will attach to the bottom edge of the channel using 4d finish nails.
There will likely be a gap between the ceiling and the baseboard box, but that doesn't matter because you will build a second box from crown molding to transition from the vertical side of the coffer to the ceiling. The molding will cover any gaps.
You can choose any style or type. Since baseboard has the profile on top, you will turn it upside down so that the profile is visible from below. The nice thing here is that you can build both boxes on the worktable, transfer them to the ceiling and then nail them in with the finish nail gun.
When you are finished installing the coffers, you can putty over the nail heads and then paint or stain them.
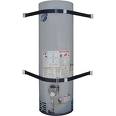 While repairing a water heater, I noticed that although the water heater was fairly new, it did not have earthquake straps on it. I remarked to the homeowner about this and he said he had replaced the old water heater with a new one. Since the old one didn't have straps, he didn't install them on his new water heater.
Water heater installations have changed over the years. One of the changes is the requirement of installing earthquake straps on water heaters, at least for Las Vegas water heaters. This job is easy but necessary. A 40 gallon water heater filled with water weighs over 400 pounds. If it is powered by natural gas, it is required to be elevated off of the floor. If an earthquake occurs, or a car bumps it, it could fall over and potentially cause serious damage or injury, not to mention filling the garage with natural gas. This can all be eliminated by installing earthquake straps.
The water heater should be strapped in 2 places. One strap should go around the tank in the top 1/3 of the tank, and the other strap needs to be secured in the lower 1/3 of the tank between two and four inches above the controls. You must install these straps into wall studs for holding power. The straps will come with lag bolts to secure them into the lumber. Use a stud finder to locate the studs and install the bolts into them.
Many water heaters are located in the corner of a room or garage, so shoot for the corner where there will be plenty of lumber.
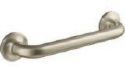 Shower grab bars aren't just for the elderly. They are a good idea for any shower. They are made in virtually any color and material and can complement or contrast the shower's design. Once you settle on the appearance of the grab bars, you need to consider their placement.
Generally, for a shower stall, the grab bar should be mounted between 36 inches and 40 inches from the floor. For a tub/shower combination, the bar should be mounted between 24 inches and 48 inches from the floor.
You should have a bar placed vertically at the entrance to the shower. This can be a small or medium length bar placed at shoulder-level. It should be placed near the opening on the inside of the shower. This will give the user something to hold onto upon entering or leaving the shower. You should also have a longer shower bar ( 3-4 feet) placed on the long wall of the shower. This grab bar can be mounted horizontally. If you use a bath chair, that grab bar should be slightly angled to allow you to pull yourself up from a sitting position to a standing position. You might also consider installing a small vertical grab bar at the toilet if a homeowner needs help going from a seated position to a standing position.
Grab bars must be installed into wall studs. For details on this, read this how-to on shower grab bar installation.
If your shower is looking a little tired, you can dress it up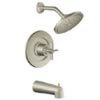 inexpensively by doing a few simple things. The first thing to do is clean it! We work in homeowner's showers every day and you would be surprised at how nasty some of these are. I sure wouldn't feel clean after coming out of one.
Second, remove the old caulking and install fresh silicone caulking in the shower. Here are some details on caulking a shower.
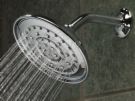
Finally, you can replace all the hardware in your shower. This is easy as long as you stay with the same manufacturer of your existing fixtures. For example, if you have Moen fixtures in your shower, you can buy a Moen trim kit to replace your existing hardware. The same for Delta and Price Pfister. Don't try to use Moen handles, for example, in place of Delta handles. Each has different patterns of mounting the handles to the stems. You can buy new handles, shower heads, shower arms, and the decorative escutcheons to completely upgrade the look of your shower. This also applies to bathtubs too. The nice thing is that these upgrades basically twist off and back on. You will need a screwdriver to remove the handles. For the shower arm, use Teflon tape and wrap the threads to prevent leaks.
 I got a call from a customer that she were having a problem with her plumbing: low water pressure. This is a common description from homeowners that is used generically for many different water problems. In this case, the homeowner was complaining about whenever she showered, if someone turned on a faucet, the water would dramatically decrease in the shower to the point that she couldn't shower until that faucet was turned off. We see this happen with pressure balancing anti-scald shower valves to avoid someone getting scalded if, for example, someone flushes the toilet. This type of valve intentionally lowers the hot water pressure to keep the temperature constant when there is a sudden draw of cold water. That wasn't the case with this though. The problem was uniform throughout the house, and not just isolated to that particular shower.
People often misuse the term low water pressure. In this case, the water pressure was fine. We put a water pressure gauge on the hose bib and the incoming pressure was nearly 75 psi. This is considered very strong water pressure. The problem here was the water volume. You can have strong water pressure but poor water volume. The result is a weak shower.
The first thing to check is the main water valves. In this case we went to the street and the water meter was turned on only about halfway, effectively cutting the water volume in half. Simply turning the valve all the way to the open position solved this customer's shower issue.
Had this not solved her volume problem, we would have done more investigating starting with the shut-off valve in the garage. It happened to be a gate valve which has a reputation for causing problems, such as the gate breaking off and partially or completely blocking the flow of water.
 We went to a customer's house yesterday because he had water coming from a pipe by his front door. He was calling it a plumbing leak, but if is coming from a pipe that is intentionally placed there, it is probably mechanical in nature. There are a few situations where you would see this. One is from the air conditioning condensation pan, and the other is from the temperature and pressure relief valve (TPR) of your water heater.
You typically would only see the a/c condensation drain line dripping if the a/c is running, and it is fairly humid outside.
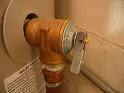
I put my hand under the pipe and the water was hot, and so it narrowed it down to the TPR valve of the water heater. The water heater happened to be on the exact opposite side of the wall, so it was pretty obvious. The TPR valve opens if the pressure in the tank exceeds 150 psi or if the temperature in the tank is higher than 210 degrees.
Sometimes the TPR valve is bad and it needs to be replaced and at other times it is operating properly and doing its job to prevent an explosion. You can go inside the house and turn on a hot water faucet this will allow hot water to drain out of the tank and cold incoming water to cool the tank down. I would also check the thermostat's setting. You probably have room to turn it down, save some energy, and still maintain your comfort.
Some people will test the TPR valve by flipping up the tab on the end, and this is a good idea. However, many times the TPR won't stop leaking after toggling it. You can try a gentle tap with a hammer to see if this reseats it. If not, you may have to replace the TPR valve.
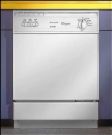 Have you ever gone to open your dishwasher and the whole thing about pulls out of the counter? Well if so, you're not alone. Maybe it was the result of a poor dishwasher installation. It is a pretty simple fix that you and your trusty screwdriver can remedy.
Your dishwasher is secured to the underside of the counter by two screws. If you carefully open the door (so that the entire dishwasher doesn't tip out of the opening) you will see 2 brackets jutting out of the top of the unit. These brackets have holes in them for screws.
Once you place the dishwasher in position, simply secure it to the underside of the counter with screws. One caveat here: don't attempt to screw directly into the countertop material. You should be screwing into the sub-top which is typically made of particle board, plywood, or even cement board. If you try to screw directly into the countertop material, you risk damaging it by drilling right through the top, or even cracking some surfaces like granite.
It's probably a good time to adjust the height of your dishwasher too. The feet at the bottom turn to raise and lower the height of the unit. You can play with them for a level fit that is equidistant from all edges.
 A customer called the other day about a carpentry job. She wanted to install a small safe in her house. She bought a small safe from a home center that fit her needs. A word to the wise: these are heavy! The safe this customer bought is very small (only about 1 foot square), but the walls are filled with concrete and it weighs a lot for its small size.
Part of the security of a safe, no matter what its size, is that you can't physically move it. So, the safe must be secured to the floor or wall. This small safe had holes in the base and the rear of the safe so that it can be screwed to either.
To secure the safe to the wall, push the safe into its final position and use a pencil to mark the holes on the wall. Move the safe away from the wall and pre-drill the holes into the wall studs. Move the safe back into position and bolt it to the wall using the provided lag bolts.
To mount the safe to the floor, you follow a similar procedure. For floor with wood joists, such as upstairs, again mark the holes, pre-drill and install with lag bolts. The difference comes when you are securing to a concrete slab. You will still mark the floor and pre-drill (you will definetly want to use a hammer drill for this). However you will need to use concrete anchors, such as "red heads" and then just bolt the safe to the floor.
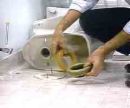 A pretty handy customer called and said he had a toilet repair and that there was water leaking from between the toilet bowl and floor. This is usually indicative of the wax ring leaking.
There is a wax ring that compresses between the bottom of the toilet bowl and the drain flange that carries the waste away. The toilet bowl is held in place with some bolts that screw to a metal ring surrounding the toilet flange. If the toilet bowl moves or a bolt rusts then this seal is broken and you get all kinds of nasty stuff on your floor.
The customer said he tried to replace the wax ring but the metal ring that holds the bowl to the floor had broken, which is why he called us. The answer was a reinforcement ring.
Instead of replacing the old mounting ring, which would be a hassle, a reinforcement ring screws directly on top of the old ring and keeps the toilet in the same footprint. If you are upstairs with a wood subfloor, you can screw it into the wood joists to hold it in place. For a concrete slab, you pre-drill a hole and use a tapcon screw. Then just re-install the toilet. By the way, if you've been thinking you will replace the toilet, now would be a great time, since you already have the old one off, especially to a more efficient toilet.