 A customer just called and asked about why her water heater was making a thumping noise. Specifically, she said the sound was similar to the noise that her clothes dryer makes when she has a pair of tennis shoes rolling around inside.
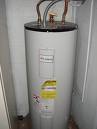
I asked her when the last time she drained her water heater, and she didn't know. The water heater was 5 years old. It sounded to me like it had never been touched since it was installed. What happens is that you get a layer of sediment at the base of the water heater. If your water heater is gas, this sediment effectively creates a barrier and slows the transfer of heat from the burner to the water, making the unit burn longer to heat your water (and also costing you more money). This sediment makes your water heater inefficient and causes it to make a gurgle or rumbling sound. If your water heater is electric, the sediment builds up on the heating elements and eventually flakes off.
All of this sediment collects on the bottom of the water heater's tank and effectively displaces the amount of water available turning a 40 gallon tank, for example, into a 38 gallon tank.
This customer's water heater was gas and the analogy I used was for her to imagine cooking spaghetti sauce. Imagine a delicious thick sauce on the stove. As the heat builds up from the burner below, the sauce is so thick and heavy it can't boil and instead develops a large bubble that finally burps out. This is what happens at the bottom of your gas water heater, but instead of sauce its sediment. Here is some information on flushing your water heater.
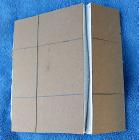
 While moving a washer and dryer into the tiny closet area that serves as a laundry room in her condo, a customer just happened to hit the bifold door off of the track. Man, do I hate bifold doors.
These are doors that span an opening when closed and when open they fold in half and push to either side of the opening. They are also known as accordion doors. These types of doors always seem to need adjusting.
The hinge side of these doors are secured with a metal bracket to the jamb of the door. The bottom hinge side of the door has a pin that sits in a groove, and the top has a pin that sits in a hole at the top of the opening. The door opens and closes via a spring-loaded guide that rides in a track. When someone hit's the door on accident, it is this part that usually breaks off or comes out of the track (you can get all replacement parts at any home center). This part just pulls out of the door and you can push the new pin right back in.
If the door has been hit, you will likely need to adjust it on the hinge side. This means lifting up the door and moving it slightly on the bottom bracket, or loosening the top guide and slightly moving it. You want the end result to be a smoothly rolling door with uniform gaps around it and the other door it contacts. Here is some more information on adjusting a bifold door.
 A drywall patch for an inexperienced homeowner can leave your knees knocking. There is a trick though that can shave a little time and apprehension off of your job. When I say small, I mean about 4 inches or less, so a hole caused by a doorknob is perfect. They sell screens that go right over the hole, but I prefer to use a drywall plug.
First off you want to clean up the hole. Cut the drywall hole larger ( I know it sounds counterproductive)in the shape of a square. Now you will need a piece of drywall (the same thickness as the piece you're working on, either ½ inch or 5/8 inch) 3 inches larger than the size of the hole you are patching. That means if your hole is 4 inches square, use a piece 7 inches square. We are going to make this 7 inch piece of drywall fit into this 4 inch hole...sort of.
Normally, you would screw a couple of wood boards behind the hole so the drywall patch has something to screw into. Then you would use tape (either paper or fiberglass) to cover the edges and float out the drywall compound (aka mud). However, with the plug method, you can bypass the wood and the tape.
Here's how you do it. Lets assume the hole is 4 inches. With your 7 inch piece of drywall you will remove everything but a 4 inch square in the middle, that means we will take off 1 ½ inches from each side of the piece. Use a utility knife and score the back side of the drywall piece. Then snap the drywall and pull it away from the paper face. You will do this on all 4 sides and when done you will have a flap of paper that is connected to the patch. This flap will act as the tape.
Butter up the flaps and smoosh it the hole. Once you push it in, the drywall compound will squeeze out around the perimeter of the patch. Use a drywall knife or putty knife and float it out. After it dries you can clean up the perimeter, texture and paint. Here are some details on how to texture drywall.
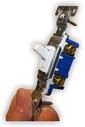 At a customer's house today, her son came tearing around the corner and slammed his hand into the light switch to turn it on...all it did was break it. Light switches are cheap. For the most part, they are made from plastic with metal terminals for the wiring contacts. We generally aren't easy on them either. How many times have you slammed your hand into the switch expecting it to perform over and over again? Probably as many times as I have. Well, those cheap plastic switches do break but it's pretty easy to replace it with a new one.
This switch was a single pole, meaning it controlled a fixture from a single location. Three-way switches control a fixture from two different locations, and four-way switches control a set of lights from 3 or more locations.
Make sure you turn off the power to the location from the main electrical panel, and then remove the switch plate and finally pull out the switch from the box. Buy an replacement switch with the same number of screw terminals and wire it just like it came out. I don't advise using the push-in fittings on the switch, rather wrap the wire around the screw terminal. With a push-in fitting, you simply push the wire into the hole and it makes contact, however these fittings just don't seem to give the secure contact that wrapping the screw terminal does.
For this single-pole switch there are only 2 wires to connect. If you have 2 cables entering the box (meaning that the switch is in the middle of the run), you will have 2 black wires to connect to the brass screw terminals. If you have only one cable entering the box (meaning this switch lies at the end of the run), you will have a black and white wire connecting to the switch, although the white wire may have a piece of black tape at the end to signify it is actually hot (normally a white wire is neutral). You may also have a green screw on the switch for a ground wire, but the ground wire may be grounded to the box that holds the switch.
Make tight connections and secure the switch to the box and finally re-install the coverplate.
 Many of us have the "Hollywood" light bars in our bathrooms. You know, the light fixture that looks like a bar with several large light bulbs in a row? (C'mon, imagine a starlet applying makeup in front of one). Well, these are among the first items that get replaced when updating the look of a bathroom. When you go to replace this type of light fixture, you are in for a surprise.
Normally, a junction box (a.k.a. j-box) is installed in the wall to house the electrical connections and give the light fixture something to screw into. Not so with the light bar. Builders have typically just punched a hole into the drywall and run the wiring to the light bar without using a junction box. This is all fine and dandy except when you go to replace the light bar with a fixture that uses a junction box. When you remove the Hollywood bar you will find a rather large hole.
So you have a couple of problems. There is no junction box, there is a large drywall hole, and now there is no light in the bathroom. The last one is easy as you can run a light with a cord into the bathroom, so at least you have light to work. The first two problems will take a little more work.
You may not have to do drywall work if you buy a light fixture that has a large enough base to cover the drywall hole. Here is some information on how to do drywall repair.
For the junction box, you can use a remodeling box which has plastic ears that grip the drywall. You simply place it in the hole and tighten the ears to pinch the drywall. The Romex wiring can then be placed into the box through the slots in the side or rear of the box. If your hole is next to a wall stud, you can use a metal junction box and nail or screw it to the stud. Here is information on installing a metal junction box.
Once the drywall and junction box issues are solved you can install the new light fixture.
 Have you ever pulled up on your bathroom sink stopper only to find nothing happens? It's time to get under the sink. Sink stoppers aren't the usual suspect, rather it's the parts that make them move. The knob you pull is attached to a pivot rod which goes into the drain pipe (actually called a "tailpiece" assembly) and connects to the sink stopper. So when you pull up on the knob the stopper should go down to stop water from running out of the sink. Usually, after years of sitting in a flow of water, the pivot rod corrodes and stops working. Fixing it will take about $12.00 of parts and about 15 minutes of your time.
In the back of the tailpiece is a nut that holds the pivot rod into the sink stopper. Unscrew this nut and pull out the remnants of the pivot rod. I would take it to a home center and buy a new one as there are a few sizes and diameters. You may have to buy the entire drain assembly, which includes a new stopper, pivot rod, etc.
Simply push the new pivot rod into the hole of the sink stopper and tighten the not that holds it in place. You can play around with it so that it isn't too tight or too loose. Once you re-connect the pull rod (the knob that you pull up) you can make sure the tension is right. You can connect the pull rod using a spring clip that comes with the pivot rod. By the way, if you pull up on the knob, and the stopper won't stay down to hold water in the sink, you need to tighten the nut that holds the pivot rod to the tailpiece.
 The Hot And Cold Water Is Reversed In My Shower!
This repair makes me giggle. Not because of the repair, but because of the image in the customer's mind. When I get a call like this, I can feel the terror in the customer's voice.
Everyone realizes that this isn't a life-or-death repair...I don't know about you, but I generally stick a body part in the stream of water before I commit with my entire body to be scalded or frozen. So when a customer calls with this problem, it is usually because it has become a nuisance (or their spouse is complaining that it needs to be fixed).
Back to the terror...The customer has visions of cutting open walls, re-piping the house, drywall repairs, and huge invoices.
I ask some questions:
Me: "Is the problem limited to this particular shower?"
Caller: "Yes"
Me: "Does the shower have separate handles for the hot and cold, or is there a single handle that controls both the hot and cold?"
Caller: "A single handle"
Oh goody. I am going to be revered like a rock star when I tell this customer that the problem can be resolved in about 30 seconds and you don't even need to turn off the water to the house to do it.
Behind the handle lies a cartridge with O-rings, washers and the like that turn to allow a mixture of cold and hot water to your desired temperature (it's called a mixing valve). All you need to do is rotate the stem 180-degrees.
You will need to remove the handle to get access to the stem. The handle will have a cap on it that you can pop off with a small screwdriver, or it wall be attached with a set screw near the underside of the handle. With the cap off, remove the screw that holds the handle to the stem. Once you pull off the handle, the stem is right in front of you...it is the piece that the handle screws into. Just turn it 180-degrees (you can do it with your fingers) and screw the handle back on.
 It's Saturday morning and your laying under your sink, cursing your faucet with your scraped knuckles. After all, you just want to replace your kitchen faucet . Sometimes it seems impossible to remove the old faucet. So what do you do?
For starters, it helps to have the right tools. Some deep sinks will leave you only a few inches to access the nuts that hold the faucet to the sink. It is virtually impossible to get your hand and a tool into this small area to turn the nut. For this situation, you need a basin wrench.
A basin wrench is a skinny tool that will fit into these tiny areas. It looks like a thin piece of pipe with jaws on the end of it. On the bottom is a handle. To use the tool, just set the jaws over the nut and turn. It sounds easy , but sometimes it's not. Sometimes the handle will start to bend with the amount of force you have to apply. In that case you can place a length of pipe over the handle and turn it, effectively increasing the amount of leverage you can apply to the nut. You can also use the basin wrench to install the nuts on your new faucet.
If this fails and you have the room, you can try a nut splitter (place the tool over the nut and turn the handle). You can also try to cut off the faucet and or nuts from either on top of the sink or beneath it.
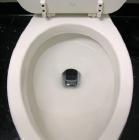 As I was driving to work today, a friend called me to ask for some advice on fixing his toilet. He told me that it wasn't flushing very well and that all the waste was not going down the drain. I thought of a couple of problems: a partial blockage, a blocked vent, or a flapper problem. I asked him if he could hold the toilet handle down and not let it up. He said it was a good flush and everything went down the drain.
It sounded to me like a toilet flapper problem and that the flapper was not staying up long enough to allow enough water to flow out of the tank and into the bowl. I told him he could try to shorten the length of the chain between the flapper and the handle by 1 link. He said he tried this but that the flapper became cockeyed.
The answer is a "dial-a-flush" toilet flapper. This product allows you to control how long the flapper stays lifted off of the tank, and so you can control how much water goes into the toilet bowl, giving you a good flush. It is simply a replacement flapper with a small dial on the top of it. This flapper operates by allowing a bladder on the flapper to fill with air and, depending on the setting of the dial, allows air to escape from this bladder for a quick flush or large flush. Simply attach it, adjust the dial and flush your troubles away.
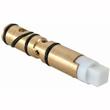
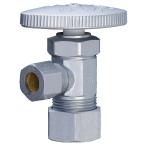 When you go to replace a plumbing fixture, it is sometimes intimidating trying to figure out how everything goes together without leaking. You've probably seen a threaded fitting that you would screw a hose bib or a water supply line onto. If you've not done much plumbing, you may not be very familiar with a compression fitting.
A compression fitting is used on a bare copper pipe. A nut goes over the pipe, then a soft ferrule and finally the fixture or water supply line, or whatever it is you are connecting to the pipe. This all gets squeezed together tightly. The soft ferrule gets sandwiched in between the nut and the fixture. As it gets squeezed, the ferrule molds itself to whatever gaps there are between the nut and fixture, eliminating leaks.
When you go to replace a fixture that uses a compression fitting, the old ferrule is very difficult to get off the pipe. You almost have to score it and split it open, or grab it and rotate in back-and-forth while pulling it off the pipe. For this reason, I generally leave the old ferrule and nut on the pipe and reuse them with the new fixture. It sure beats damaging the pipe, and if you get a small leak, just tighten the nut another quarter-turn.