 Some people might consider this the cheapest shower remodel around. If you use a shower curtain and straight rod, you might consider installing a curved rod instead. It actually makes the seemingly cramped shower more roomy. It’s not more roomy, but it since you have more space up near your head and shoulders, it sure feels roomier.
Installing a curved shower rod is only slightly more difficult than a straight rod. With a straight rod, installation is as simple as twisting the rod until enough tension is placed on the rod to hold it up. With a curved rod, you will need to fasten it to the wall.
An important aspect of the installation is placement. Since the rod is curved, you want the curve centered at the curve of the tub/shower. The ends of the curved rod usually mount closer to shower hardware so that the arc of the rod aligns properly with the edge of the tub/shower.
Once you have the placement of the rod laid out and level secure the hardware to the wall. Installing into wall studs is best, but if you are going through ceramic tile, you will need to use a glass/tile bit and a hollow wall anchor, which is included in many of the kits. Then it’s a matter of threading the shower curtain on the rod and cleaning up.
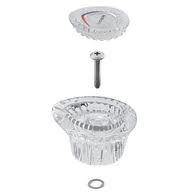 Shower faucet handles get damaged, particularly plastic handles. They are held in place with one screw and an aggressive turning when it has bottomed-out will crack it and necessitate replacement. That’s not to say that metal handles don’t get damaged, they can also get damaged if someone slams their hand against it to turn off the water abruptly. It’s just that plastic gets damaged more frequently because it is not as strong.
You can replace the handle easily enough, as I said, just one screw holds it to the stem. You don’t have to buy the exact handle either. Just keep in mind that as long as you stay with the same manufacturer, the new handle will fit. In other works, if you have a Moen faucet, you can use any Moen handle. Don’t try to install a Delta handle on a Moen faucet as they each have a different mating pattern.
The screw to remove the handle is going to be located under the plastic cap. You can use a standard screwdriver and slide it under the cap to pry it off. Then just remove the screw, replace the handle and screw it back on.
For metal handles, there is usually a setscrew located on the underside of the handle. Remove the setscrew and the handle should pull right off.
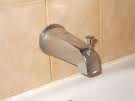 If you have a bathtub/shower combination, when you want the water to come out of the showerhead instead of the tub spout, you simply pull up on the tub spout diverter and the water shoots up to the shower head (for older styles there may be a separate handle in the wall for this).
The problem is that over time the gate inside the shower diverter will wear and either the gate of the entire shower diverter will need to be replaced. Replacing the shower diverter is easy, but you may be able to get a free gate from the manufacturer. By the way, the gate is the little door that blocks water from exiting the tub spout and forces it back up the riser to the showerhead.
Getting access to the gate is tricky. It is inside the end of the tub spout and you will either have to rotate the spout or practically stand on your head to work on it. You will need to disengage the bottom of the gate (it rides on the rod operated by the knob) and remove the gate. It is typically plastic and will slide off, but you may need to remove the knob too. Once you slide the new gate onto the rod, reinstall the end of the rod into the groove at the base of the tub spout. Then just turn the water on and test it.
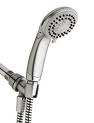 Hand held shower heads are very convenient. Not only can you move them wherever you want them, but they generally have features like a massage spray, pulsating spray, stream, etc. Installing a hand held shower head is exactly like a standard shower head, except that you have a few extra steps.
You will first need to remove the old shower head. Hold the shower arm securely and use an open-end wrench to twist off the old showerhead. Make sure you don't allow the shower arm to move or you might develop a leak in the wall where the arm connects to the shower riser. Clean off the threads of the shower arm and wrap them with 3 wraps of Teflon tape.
Next, install the shower arm coupling. This part screws onto the end of the shower arm and has a threaded fitting for the hose, and a clip to hold the shower head. Screw this coupling on snuggly so that it is oriented vertically when you are done. The fitting for the hose should be pointing down and the clip should be on top.
Wrap the threads of the fitting 3 times with Teflon tape and screw the hose onto this end snuggly. Wrap the threads of the shower head with Teflon tape and screw it into the other end of the hose. Then just turn the water on and check for leaks.
 Have you ever pulled on the shower handle to start the flow of water and the valve partially moves with the handle? This is typically because the pipes were not strapped to the wall framing, which allows for some play in the valve and piping. You wouldn't really notice this in a valve where you just turn the handle side-to-side, such as a Moen Positemp or Delta Monitor. However, with a valve and handle that you have to pull out to start the water, particularly when the handle or cartridge is sticky, you really notice the problem.
You can have a handyman strap the pipes to the lumber in the wall, which will solve this problem, but it creates a lot of additional work. You have to gain access to those pipes, which means cutting the wall open and then repairing the wall. With the wall open, you simple secure a couple of pipe straps with screws near where the pipes enter the shower valve. Then you have the drywall repair.
You can try to avoid this by doing a couple of things. Try shooting expandable foam into the wall cavity and let it set up and get hard. This may give the shower valve enough resistance that it won't move when you pull the handle out. Additionally, replace the shower cartridge. This should make it so that minimal effort is required to pull the shower handle out. These two items may help you avoid the job of strapping the pipes.
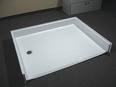 When it comes time to replace your fiberglass shower pan, you obviously don't want to have any movement in it. So whether you or your handyman is going to install it, pay attention.
Under a fiberglass shower pan is a webbing of sorts, small vertical supports that make it so that the shower pan won't "give" when a heavy person steps on it. This deflection can crack the pan, or even cause the drain connection to fail where it connects to the pan. Well made shower pans have more substantial supports, while the cheaper pans have less substantial ones. The floor upon which the shower pan rests might also be a factor if, for example, it is damaged or not level.
The answer then is to make the shower pan solid...very solid, particularly around the drain. You can do this my adding some thin-set mortar onto the floor before you seat the shower pan.
Once you have the pan lined up, mix up some thin-set mortar and pour it around the perimeter of the drain hole on the surface of the floor, whether it is the slab or an upstairs sub-floor. I would stay a few inches back from the drain hole and pour a ring about 12 inches wide around it. Then install the pan. You want the pan to sink in to the mortar. This is what will make the shower pan rock solid, and what a difference it will make.
 The Hot And Cold Water Is Reversed In My Shower!
This repair makes me giggle. Not because of the repair, but because of the image in the customer's mind. When I get a call like this, I can feel the terror in the customer's voice.
Everyone realizes that this isn't a life-or-death repair...I don't know about you, but I generally stick a body part in the stream of water before I commit with my entire body to be scalded or frozen. So when a customer calls with this problem, it is usually because it has become a nuisance (or their spouse is complaining that it needs to be fixed).
Back to the terror...The customer has visions of cutting open walls, re-piping the house, drywall repairs, and huge invoices.
I ask some questions:
Me: "Is the problem limited to this particular shower?"
Caller: "Yes"
Me: "Does the shower have separate handles for the hot and cold, or is there a single handle that controls both the hot and cold?"
Caller: "A single handle"
Oh goody. I am going to be revered like a rock star when I tell this customer that the problem can be resolved in about 30 seconds and you don't even need to turn off the water to the house to do it.
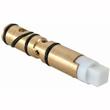
Behind the handle lies a cartridge with O-rings, washers and the like that turn to allow a mixture of cold and hot water to your desired temperature (it's called a mixing valve). All you need to do is rotate the stem 180-degrees.
You will need to remove the handle to get access to the stem. The handle will have a cap on it that you can pop off with a small screwdriver, or it wall be attached with a set screw near the underside of the handle. With the cap off, remove the screw that holds the handle to the stem. Once you pull off the handle, the stem is right in front of you...it is the piece that the handle screws into. Just turn it 180-degrees (you can do it with your fingers) and screw the handle back on.
I got a call from a homeowner that he had a shower leak and that his shower wasn't working. The shower was working fine, but the shower diverter spout was letting all the water spill out at his feet. A very typical handyman job.
His shower is actually a tub/shower combination. So when he takes a bath he just turns the water on and fills the tub. When he wants to take a shower, he pulls up the little knob on the end of the tub spout diverter. This stops the water from flowing out of the tub spout and shoots it up a riser pipe to flow out of the showerhead. The problem was that the internal gate, which is attached to the knob, wasn't stopping much of the water, and so he got very little water out of the showerhead.
Although you can buy the parts to repair the tub spout diverter, you are better off just replacing the entire diverter. It costs about $15.00 and will save you some time. Rather than fiddle around with getting the gate out of the corroded diverter, bending it or breaking it anyway, just replace it. The spout will be attached to the end of the pipe by either a threaded fitting (just unscrew it), or it will be attached to a bare copper pipe with a setscrew.
 We have all been in the shower on a cold night basking in the warmth of the hot water...as it runs down the drain of your shower plumbing. It might feel good, but it sure wastes a lot of water. Shower heads can't exceed a per minute gallon volume of 2.5 gallons. Well many manufacturers have gone well below that, although they sure don't feel as good as 2.5 gallons per minute.
I recently bought a 1.6 gallon per minute shower head and it sure is stingy with the water. You know how most shower heads have a ring of holes around the perimeter? Well this on has one large hole in the middle of it. As it runs you can hear a loud "whirring" of what I imagine is a propeller of some sort. This shower head doesn't really spray water on you, rather it spits it on you. That sure doesn't feel as good as a spray.
I do like it for one reason though. If my teenager takes her usual 30 minute shower, I save approximately 27 gallons of water... each night. Assuming she showers nightly, 27 gallons x 365 days =9,855 gallon of water saved each year. I pulled a recent water bill, and with the water company's tiered pricing based on consumption, the water company charged me an average of $1.94 per 1,000 gallons of water. So, if I multiply my 9,855 gallons I saved by the cost of the water, I saved $19.11. Since I only paid $15.00 for the shower head, my break-even was about 10 months.
Of course, in my shower I still have the 2.5 gallon shower head...I like the feeling of the spray.
 We got a call from an existing customer today that she had an emergency with her shower plumbing. We had worked on this very shower 3 weeks ago and it has been working great since. Well today the homeowner couldn't get the cold water to shut off in that shower. She had to shut off the water to the entire house from the street. In came the call.
We took apart the shower valve and discovered that some small pebbles had made their way in between the stem and the seat of the valve (these parts mate together to seal off any water from passing through). So with the rocks keeping the valve open the water wouldn't turn off.
Sometimes when the city or water company services the line underground, invariably some debris will get into the line. Whoever turns on the water first will carry the debris wherever the water pressure takes it. In this case, it was to our customer's shower.
We explained this to the customer and she mentioned that the water company had some workers working on the water supply recently. She saw large pieces of construction equipment and piles of dirt but didn't put it together.