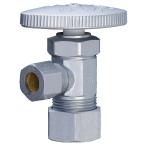
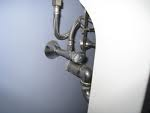
 Most people hate plumbing jobs. When I'm asked to replace an angle valve to a toilet or faucet, and the valve uses a compression fitting, I rarely go through the hassle of replacing the compression ferrule and nut. You can't get the nut off without removing the ferrule anyway, but you don't need to, unless you want to change colors, for example from chrome to gold. You might also have to remove them if you want to replace the escutcheon trim ring behind them. The ferrule is a soft anyway, and will mold to the new valve when you tighten down the nut that squeezes it.
If you do need to remove the ferrule and nut, you can try one of several methods. First, I would use a large pair of channel locks, or pliers and firmly grab the ferrule. Then move the pliers up and down to get the ferrule moving. While you are doing this, force the ferrule towards the end of the pipe. The ferrule should come off of the pipe after a minute of moving it.
You can also try to cut the ferrule. Score it with a hacksaw blade to the point where you can break the ferrule. Remember though that the last thing you want to do is damage the bare pipe. So cut to the point where you comfortable and then use a large standard screwdriver and insert it into the groove that you just cut. With a quick twist of your wrist, you should be able to snap the ferrule.
If you have no plans on changing colors or finishes, I would simply re-use the old ferrule and nut.
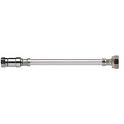 I have some customers who went to Europe for several weeks only to come home and find their house flooded. The culprit: a $10.00 rubber washing machine hose. They spent an additional 3 weeks out of their home while the construction crew went to work.
As a handyman, we see many different types of customers. Some want the cheapest parts available and others want better quality. This is one of those times you want to use quality parts.
You can buy water supply lines that have a built-in shut off in the event they sense a large water loss. They are sold under the brand name "Floodsafe" and are installed like any water supply line...they simply screw on to the water valve and the fixture.
Floodsafe lines have a mechanism just behind the inlet that senses the water flow for the fixture it is made for. For example, on a faucet that flows 2.2 gallons per minute, the Floodsafe shuts off at 2.8 gallons per minute. The difference is for water pressure fluctuations. These supply lines are made for faucets, toilets, washing machines, dishwashers, and ice makers.
A Floodsafe line will also shut off the water if someone removes the flow restrictor in a fixture and the water volume falls outside of the factory preset amount. In this case the Floodsafe needs to be reset to allow water to flow again. This is done by shutting off the water valve and removing the Floodsafe line. Once you remove the line you can screw it right back on and the water will flow again.
Self-rimming or drop-in sinks are not difficult to install for an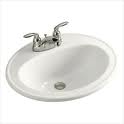 experienced handyman or homeowner. As their name implies, the sink bowl drops into a hole in the countertop and the rim of the sink rests along the perimeter of the bowl. So for the most part, they are not likely to move much unless impacted.
The only thing you need to do is to secure the perimeter of the sink in place. There are a couple of methods here that are both straightforward.
Most drop-in sinks will come with clips that screw into the rim of the sink from underneath the counter. These clips act like a clamp and the more you screw the clip in, the more pressure is exerted on the underside of the countertop. These work very well, unless the countertop is very thick. If you are installing the sink on top of a ceramic tile countertop, it may be too thick to use the mounting clips. This is because you have a wood substrate, followed by cement board, mortar, tile, etc. This counter may be so thick as to prohibit you from using the clips. In that event, you can use adhesive caulking.
Adhesive caulking is applied around the perimeter of the opening so that when you set the sink into the hole, the rim comes to rest in the adhesive caulking. When you set the sink, run a wet finger around the perimeter of the sink for a smooth finish, and then let everything dry.
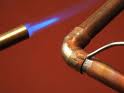 Soldering copper is not rocket science. Sure, it uses some scientific principles, but for the most part it is simply a process. Most of the opportunities that this Las Vegas handyman has for soldering, are for leak repairs. Every once in a while, we will find a valve that needs to be replaced, and there are special precautions to be taken when applying heat to these valves.
You want to protect the valve from damage. Specifically, protect the valve's inner workings from the heat of the torch. Many of the valves mechanics are made of plastic and flexible washers, and heat doesn't mix well with these.
If you will be working on a shower valve with a mixing cartridge inside, you must remove the cartridge before you solder the copper. You can remove the cartridge with a cartridge puller or a pair of pliers. If you leave the cartridge inside the valve while applying the torch, the plastic cartridge and O-rings can melt and virtually glue themselves to the inside of the valve.
For ball valves and gate valves, you want to fully open them up to allow the heat to escape and dissipate. Then you can apply the torch and solder the copper pipe.
 Every once in a while, you will be driving along and see a something that just stands out. We had a list of handyman jobs to do at a customer's house and noticed a very lush area of grass surrounded by a grassy area that wasn't so lush. When you have a patch of grass that is 12 inches tall and dark green, and the rest of the grass is 3 inches tall and light green...I would suspect a problem.
The problem in this case is a pipe leak that is feeding this tall, lush grass. If you step on this tall grass, it will likely be very mushy and soft. So you know you are going to have some digging to do. You might also check the water meter for movement. It may be that the leak is occurring on a main line and is leaking constantly, or it may be that the leak only happens when the sprinklers are turned on. If the ground is mushy, it's a good bet the leak is constant, but you can verify that by seeing if the micrometer is moving on the water meter when there is no water running in the house.
At this point, you will need to shut off the water and start digging out the area until you find the source of the leak HINT: it will be right under the tall, lush, green grass. Here is some information on how to repair a PVC pipe leak.
 If you have a leak on the water supply line heading to a faucet (or a toilet), you need to do a little inspection. This is a very common repair...a slow drip coming from an angle valve or water supply line. Just because the water is dripping off of the valve doesn't necessarily mean the leak is at the valve. The valve just happens to be the lowest (and last) fitting before the direction changes, and so the water drips from the valve.
You need to check the length of the water supply line for any wetness. It may be that the faucet is leaking and the water is traveling down the supply line and finally dripping off of the valve. An easy way to determine wetness is to get some toilet paper and touch the water line with it. It will pick up any wetness and clue you in as to where the leak is originating.
I would start high near the faucet (or toilet) and work downward. The most likely areas are going to be where you have water connections. For example, where the angle valve attaches to the pipe in the wall, where the supply line attaches to the angle valve, and where the faucet attaches to the supply line.
Once you have found the cause of the problem, the repair of these items are all easy. If the supply line is corroded, you may have to replace it, but you can first try a new rubber washer. If the angle stop is dripping, you may have to replace it, but first try to tighten the nut just underneath the handle. You might even need to replace the packing underneath the nut to stop the leak.
Here is an article on repairing a drain leak at a kitchen sink.
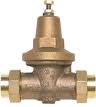 Water pressure regulators serve a vital function in your plumbing system. As their name implies, they regulate the pressure of the water coming into the house. Typically, they are installed on the incoming line with a shut-off valve so that they can be serviced. The allowable water pressure in a house is between 40 psi to 80 psi. When the water pressure creeps up towards the higher end of the scale, fixtures can fail and break, and plastic toilet fill valves can leak. Some fixture manufacturers exclude damage from water pressure exceeding 80 psi, and some home warranty companies will not cover damage to the home for high water pressure. So it's a good idea to have a water pressure regulator.
If you don't already have one at your house, you will need to find a suitable location to install one. In your garage you will likely find a shut-off valve. This would be a good area to install one, but you may need to open the wall and do a little re-piping. For this reason, this wouldn't be a good job for someone with little plumbing experience. You can read this for information on how to solder copper.
Once you have access to the pressure regulator, you can adjust the water pressure by turning the nut on top of the unit (most water pressure reducing valves come factory pre-set at 50 psi). Test the pressure by screwing on a water pressure gauge and checking it after you adjust the nut.
If you've ever had a frozen copper pipe, you know the tremendous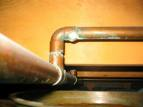 force that freezing water can exert. As water freezes, it expands, and although copper is very strong, the force of expanding water and ice can split a copper pipe wide open.
In addition to water spraying out of the opening, you will have to do some quick thinking. First of all, get the water to stop spraying out of the pipe. Here is an article on how to shut off the water. Once you have the water turned off and have cleaned up the water-soaked area, you are going to need to repair the pipe.
Usually, you will see a nice hole in the pipe with the edges of the copper peeled outward from the pressure. Typically, you will have to cut out the damaged section with a pipe cutter (avoid using a hacksaw as it will leave nasty edges). Once you have cut away the damaged section you will be left with a void in the pipe. You will then use a repair coupling to span the void.
A repair coupling has no stops in it and so you can place it over the pipe and slide it to wherever you need it to go (this is also known as a repair sleeve). From there you will need to either sweat the coupling in place or use a copper adhesive, but check to make sure that your local building authorities allow a copper adhesive, as some don't allow it. Here is an article on how to solder copper piping.
 Many the homeowner has encountered the slow bathtub drain. Not that it is totally clogged, but it has just enough debris in the drain to make the water drain very slowly. Most of the time, the obstruction is not deep in the drain pipe, but rather just beyond the strainer where you can reach it with a tool.
Drains that drain slowly typically smell. This is because the hair and soap mixture that is clogging the drain is decaying and really lets off a pungent odor. So be forewarned, clearing a slow or clogged drain is nasty business.
You need to get access to the drain pipe. Typically you can remove the drain cover by unscrewing it. Because you will have to wrestle around the support for the drain stopper, you must use something long and reasonably thin. Needle nose pliers work great if the clog is fairly close to the surface.
You can use a coat hanger. Straighten out the hanger and bend a little hook in the end of it. Then you can fish it down the drain and hopefully lock on to the hairball. You can also buy a product called a "zip it" that works in the same manner. It is a plastic stick with little barbs all over it. When you push it into the drain the hairball gets caught on the barbs allowing you to pull it out.
Get creative. I've used a shopvac to suck out clogs. I've even taped a PVC pipe to the end of a shopvac to reach a deep area. Finally, you can use a snake. Here is some information on using a snake to clear a drain clog.
Whatever method you use, just be prepared to get the foul smelling clog out of your house quickly.
 Have you ever pulled up on your bathroom sink stopper only to find nothing happens? It's time to get under the sink. Sink stoppers aren't the usual suspect, rather it's the parts that make them move. The knob you pull is attached to a pivot rod which goes into the drain pipe (actually called a "tailpiece" assembly) and connects to the sink stopper. So when you pull up on the knob the stopper should go down to stop water from running out of the sink. Usually, after years of sitting in a flow of water, the pivot rod corrodes and stops working. Fixing it will take about $12.00 of parts and about 15 minutes of your time.
In the back of the tailpiece is a nut that holds the pivot rod into the sink stopper. Unscrew this nut and pull out the remnants of the pivot rod. I would take it to a home center and buy a new one as there are a few sizes and diameters. You may have to buy the entire drain assembly, which includes a new stopper, pivot rod, etc.
Simply push the new pivot rod into the hole of the sink stopper and tighten the not that holds it in place. You can play around with it so that it isn't too tight or too loose. Once you re-connect the pull rod (the knob that you pull up) you can make sure the tension is right. You can connect the pull rod using a spring clip that comes with the pivot rod. By the way, if you pull up on the knob, and the stopper won't stay down to hold water in the sink, you need to tighten the nut that holds the pivot rod to the tailpiece.