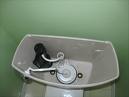
 When you open your vanity cabinet, do you see a small puddle of water beneath the plumbing trap? You might have a leak underneath the sink trap. Fortunately, the fix is pretty easy.
If the leak is at the trap, the leak will only occur when the water is running down the drain (assuming the trap itself isn’t cracked). The most obvious places to check are the connections leading to and from the trap.
The sink’s tailpiece (the straight vertical drain pipe) will connect to the trap via slip nuts. The tailpiece slips inside the trap. A slip washer is pushed on to the tailpiece and seals the gap between the tailpiece and the trap. The slip nut then screws onto the trap until secure. Leaks occur here for a few reasons. Since the connections are all plastic, it is easy to cross thread the connection. Unscrew the nut and carefully screw it back down onto the threads. You should feel it grab and then slowly pull the two together. Tighten these until snug but don’t over tighten the fitting. It’s pretty easy to damage them because they are plastic.
Also, check the slip washer. If the leak is small, it may be that there is a small crack in the washer which will allow water to pass and drip off of the bottom of the trap. Look closely as the crack can be small. You can simply push a new washer onto the end of the tailpiece and screw it all together. No glue required.
 When you flush the toilet does it seem to take forever to refill? There could be several reasons for this.
The most obvious is that you may have a large tank that empties with each flushing, and it simply takes a long time to refill the tank with that much water. This isn’t the case most of the time though.
Try opening the water supply valve fully. It may be that the valve isn’t letting much water through and it simply takes a long time for the small amount of water to fill a large tank. Turn the valve’s handle counter-clockwise until it stops…this may fix it.
Next, turn the valve off and remove the water supply line from the bottom of the tank. Point the supply line into a bucket and turn the water back on. You want to see a good strong flow of water. If the water if flowing well, replace the fill valve inside the toilet. We are looking to exclude possible causes here, and if there is a strong flow of water from the supply line, then it can only be that the fill valve is clogged or bad. If the water flow into the bucket is poor, it may be that the angle valve is clogged or bad. Replacing the angle valve would be the next step and should solve your problem.
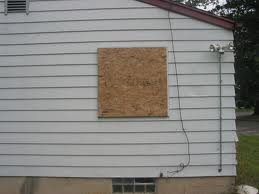 This is a unique carpentry job, unique in that this is only temporary…at least until the glass company can replace the glass. So although it is a temporary fix, it has to be solid enough to deter any additional vandalism. With so many vacant houses around, knowing the proper way to board up a window is valuable.
A sheet of plywood is tough. I prefer ½” plywood because it is tough, but light enough to manhandle by yourself, although I know people that use wafer board. Forget about just nailing it up to the perimeter of the opening. The bad guys can just pull it down.
I think the best way is to use some short lengths of 2”x 4”s and some carriage bolts and screw it all together. Here’s how it’s done…
Cut the plywood so that it fits over the window’s opening. Cut 2”x4”s long enough so that they will overlap each side of the opening. You want two 2”x4”s per opening, one near each end of the opening. In each 2”x4” will be two carriage bolts. The smooth head of the bolt will be on the exterior and the threads and nut will be on the interior (so the bad guys can’t just unscrew it). Thread the carriage bolt through the plywood, and into the 2”x4”. Place a washer and finally a nut on the end of the carriage bolt and tighten it down until snug, which is usually when the plywood will start to bow. This configuration basically sandwiches the window opening between the plywood and the 2”x4” lumber.
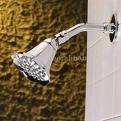 I get calls all the time for plumbing leaks. A shower head is one of the most common calls. So the question becomes: is the shower head dripping when the water is turned on or when the water is off?
This is an important question because it determines what the root cause of the problem is. If the shower head drips when the water is turned off at the handle, then the valve in the wall is not stopping the water from passing. So it slowly makes its way up to the shower head and drips out. If the shower faucet has separate hot and cold handles, feel the dripping water to see if it is hot or cold. The temperature of the water will tell you which side you need to work on. Whichever side it is, you can replace the stem and seat on that side. Honestly though, while you are at it, replace both sides and you should have years of a drip free shower.
If the shower faucet has only one handle, you will need to replace the cartridge in the shower valve. Here is an article on replacing a shower cartridge.
If the water drips when the water is on, it may be a cheap shower head, or it may just need some plumbing tape around the threads where the shower head screws on to the shower arm.
 So you push the toilet handle and nothing happens, except that the handle goes down…and probably stays down. This is the hallmark of a broken toilet flapper chain.
So, lets get serious here. A new flapper costs about $5.00 and takes 30 seconds to install. It’s an easy job. However, when the chain breaks, and you don’t have time to run and get a new one, you can do a redneck repair (no offense to rednecks). If the chain pulls out of the rubber flapper, really your only choice is to reach down into the water (don’t worry, it’s clean) and lift up the flapper. If the chain has corroded and broken in the middle of the chain, grab a paperclip and reconnect the broken ends. This will buy you enough time to get to the store and replace it. Be aware, the paperclip will corrode quickly, so if you don’t replace the flapper soon, you will at least be replacing the paperclip soon.
When you get the replacement flapper, pull it off of the ears on the flush valve tube, and disconnect the chain at the handle. Replace it just like you removed it. You will have to play with the length of the chain to get a good flush so that the flapper stays up the right amount of time.
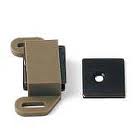 Cabinet Doors can take a lot of abuse. Not only do they get slammed, but kids like to use them as a seat and even a ladder to get to the countertop. Is it any wonder that they occasionally need a little TLC?
Sometimes you can take care of the door by making adjustments to the hinges. It may be that the screws holding the hinges to the stiles have elongated the hole and now the hinge has some play in it. If this is the case, remove the screws and use some glue and toothpicks or a golf tee and repair the hole. Let the glue dry, cut off the tee or toothpicks flush with the surface, and reinstall the screw. If you use the golf tee, you probably want to pre-drill a hole for the screw.
As a last resort, you can install a cabinet catch. This is a two-part mechanism that catches and holds the door to the frame. The most common ones use a magnet that mounts to the door’s frame and the other part mounts to the cabinet opening frame. When the cabinet door closes the two mating parts connect and the door holds firmly to the cabinet. They install with a couple of screws and will take just a few minutes to complete. Just remember to pre-drill the holes.
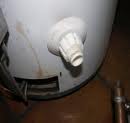 Your water heater may be leaking from the drain valve, or maybe you just flushed the tank and the valve won’t shut off. It’s time to replace the valve.
These valves are typically made of plastic and it’s no wonder they can’t be trusted to shut off the water when you need it. You can buy replacement drain valves for about $10.00.
You can choose to drain the water heater or not. Regardless, start by turning off the control valve (if gas) or turn off the power (if electric). If you choose to drain the tank, connect a hose to the valve and open the valve to drain the water. If you choose not to drain the tank, keep the water on to the tank and open a hot water faucet near the tank. When the water runs cool you can turn off the faucet, and close the water supply valve to the tank. Realize that you will be working quickly and will lose only a few cups of water from the tank. This all hinges upon nobody in the house turning the water on. So long a the water is off to the tank and nobody turns the water on inside the house (allowing air into the system), the water will not fully run out of the tank.
Use a wrench and unscrew the old drain valve. Have the new valve ready to screw back in after wrapping the threads with Teflon tape. Like I said, a few cups of water will drip out so long as nobody opens a faucet inside the house. Screw on the new valve until snug and turn the water back on, checking for leaks.
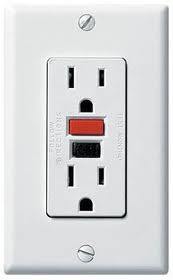 A call for help about not having any power in a bathroom is one of the most common calls I get. In most cases, you won’t even need any tools to fix this one.
The very first thing to do is to look for a GFI outlet (aka GFCI Ground Fault Circuit Interrupter). This is an outlet with two buttons on it. One of the buttons says “test” and the other says “reset”. This outlet may have tripped after sensing a ground fault. For example, if you plug in a hair dryer or a cell phone charger that has a bad cord, the outlet will sense this and shut off the power. Try pressing the “reset” button and see if the power comes back on. If you don’t have this type of outlet in your bathroom, look throughout the house for one. Just because you don’t have a GFI outlet in that bathroom doesn’t mean the outlet is not GFI protected. You may find the outlet in another bathroom, in the kitchen, in the garage, or even outside. I have seen them in closets. I tell people to start in one room and walk the house looking for a GFI outlet that has tripped off. It’s probably a good troubleshooting idea to unplug items from that particular circuit so that it will reset.
If all the GFI outlets are reset (not tripped), head to the main electrical panel. Look for a circuit breaker that has tripped off. Note that the breaker switch will not be in the off position, but rather somewhere between the “on” and “off” positions. You might have to look closely as when many breakers trip, the switch will trip just slightly. I should be pretty obvious, but you might have to look closely.
To reset the breaker, turn it all the way to “off” and then back to “on”.
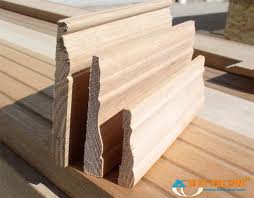 Installing baseboard or door trim is straightforward work. I love using a compressor and nail gun…it makes for fast and accurate work. However, most beginners don’t have these tools and stick with a hammer and nail set. This works great too. How do you hide the nail head after nailing the wood? It is actually pretty easy.
If you are going to paint the baseboard or door trim, countersink the nail just below the surface with a nailset. This is a stiff tool with a point on the end of it. Set the point onto the head of the nail and give it a tap to sink it. Then just fill in the divot with wood putty, sand it and paint.
The process gets a little trickier for baseboard and door trim that you are going to stain and finish. This means you will see the grain of the wood, which makes this method so attractive. The problem with using wood putty to fill in nail holes is that it accepts stain differently than the surrounding wood. This leaves you with a noticeable mark and it can be unsightly. The secret here is placement of the nail. Yes you want to hit the nail into the lumber behind the drywall. But the trick is to hit it into the grain.
Wood grain, especially open grained wood like oak, stains darker then the surrounding wood, just like wood putty. So, if you can locate a position that will both hit the grain and lumber behind the wall, that is the sweet spot. You may still notice the mark left by the wood putty, but since it is in the darker stained grain, most people won’t even notice it.
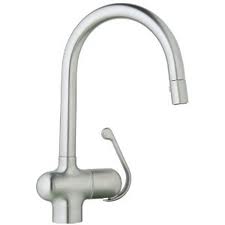 Kitchen faucets don’t often become loose, but certain faucets have a higher likelihood of becoming loose because of their design. Faucets with a pull out spout place more stress on the neck of the faucet because you have to grab the spout and pull it. If the faucet has a high looping neck from which the spout rests, when you pull the spout, it places stress on the top of the neck where it begins to arch up and around. This action pulls the faucet forward and can cause some movement over time on the fasteners underneath the sink.
It is important to be aware of this as the faucet will get a little loose. There is also a small weight on the hose of the pull out spout that helps it to retract back into the faucet body when done using the spout. This also adds some pressure to the faucet when someone pulls out the spout.
So the answer is to make sure the faucet stays tight to the countertop or sink (whichever it is mounted to). If you crawl under the sink, you will see the underside of the faucet where it pokes through. Look for the water supply lines leading from the wall up to the faucet. There will be some type of screw-on nuts or fasteners that hold the faucet to the underside of the sink. Tighten these nuts. If there is only one mounting point, look for where the hose runs up through the faucet. Around this area will be a nut…only it doesn’t look like a typical nut. It will look more like the letter “C”. The opening allows the hoses to run through it. Tighten the fastener(s) and check it every now and then.